Target
Our target for this lesson will be Assault Cube 1.2.0.2.
Identify
In the previous lessons, we created several hacks for Assault Cube, including a triggerbot, an aimbot, and ESP. In this lesson, we will create a multihack that combines these hacks together along with a wallhack. Then, we will add an interactive menu that will allow us to toggle all the hacks we have created at once.
Our result at the end of the lesson:
Understand
We have written code in the previous lessons for a wallhack, triggerbot, aimbot, and ESP. However, if we try to combine all this code together, it will quickly become overwhelming to add new features. To create our multihack, we will use a software development technique known as refactoring.
When refactoring code, you take existing code and alter its structure without changing its behavior. There can be many goals when refactoring, but in our case, our goal will be to encapsulate certain functionality into classes so that the code can be separated out into logical sections. This will clean up the code and make it easier to maintain. Once this is done, we will build off this refactored code to add our menu.
This lesson will involve working with a lot of code. Each separate stage of the code will be available in the github repository for this lesson. The final code will be on the master branch.
Wallhack
In the Wallhack (OpenGL) lesson, we covered an approach for making a wallhack for games that used OpenGL. We can use the same technique for Assault Cube with some small modifications.
In the original target game (Urban Terror), we needed to check for counts and re-enable depth testing if the model’s count was not large enough. If we did not do this, every item would have depth testing disabled. However, in Assault Cube, the rendering logic works differently, and this check is not required. Additionally, Assault Cube does not require us to worry about clipping planes. As a result, our glDrawElements code cave can be simplified:
__declspec(naked) void opengl_codecave() {
  __asm {
    pushad
  }

  (*glDepthFunc)(0x207);

  // Finally, restore the original instruction and jump back
  __asm {
    popad
    mov esi, dword ptr ds : [esi + 0xA18]
    jmp opengl_ret_address
  }
}
By using the same hooking technique described in the Wallhack (OpenGL) lesson, we now have a working wallhack for Assault Cube.
Combining
This combined code we are covering in this section is available on the “combined” branch.
Our first task is to combine all of our code from the previous lessons into one DLL. Our multihack will contain the following hacks:
- OpenGL Wallhack
- Triggerbot
- Aimbot
- ESP
We can combine this code by copying it all into a single main file and changing any conflicting variable or function names (like all the versions of injected_thread). The result of this can be seen in the github branch.
Looking over this code, the first thing that should jump out is that it is over 300 lines long with 20 global variables. In addition, we can see that we have two threads being created (one for hooking OpenGL and one for our aimbot) and multiple code caves.
With our combined code, we can make two small changes to slightly improve the size of the code. First, we can combine together the aimbot and ESP code, since they use a majority of the same logic. Second, we can modify the thread for OpenGL to break out of its while loop once it hooks glDrawElements:
if (openGLHandle != NULL && glDepthFunc == NULL) {
  glDepthFunc = (void(__stdcall*)(unsigned int))GetProcAddress(openGLHandle, "glDepthFunc");
  ...
  // Since OpenGL is loaded dynamically, we need to dynamically calculate the return address
  opengl_ret_address = (DWORD)(opengl_hook_location + 0x6);
}
else {
  break;
}
This will effectively exit the thread once we hook OpenGL, to prevent our hack from having so many open threads.
In its current form, this code could be built and used as a multihack; however, it is almost impossible to maintain. If we want to add a menu and a method to toggle functionality, we would need to thoroughly examine all 300+ lines of code and make sure our toggles do not introduce any unexpected behavior across the many threads. Furthermore, we do not currently have a good way to print text outside of our ESP.
First Refactor
The source code we are covering in this section is available on the “refactor-triggerbot” branch.
There are multiple approaches that can be used to simplify our code. For our purposes, we will encapsulate major functionality inside classes. Our end goal is to create classes that can be easily reused in other FPS games. We will then call those classes from the main file.
Classes in C++ commonly have two components: the header, which describes what the class contains and is included by the caller, and the source, which contains all the class’s code. Therefore, we will split our multihack’s code into Header and Source folders for all the following refactoring.
A good place to start is the triggerbot. In its most basic form, our triggerbot sends a mouse down event whenever we are looking at a player. To make this code reusable, we will structure the triggerbot class to require the main hack to provide information on if we are looking at a player.
Let’s start with the current triggerbot code:
__declspec(naked) void triggerbot_codecave() {
  __asm {
    call triggerbot_ori_call_address
    pushad
    mov edi_value, eax
  }

  if (edi_value != 0) {
    input.type = INPUT_MOUSE;
    input.mi.dwFlags = MOUSEEVENTF_LEFTDOWN;
    SendInput(1, &input, sizeof(INPUT));
  }
  else {
    input.type = INPUT_MOUSE;
    input.mi.dwFlags = MOUSEEVENTF_LEFTUP;
    SendInput(1, &input, sizeof(INPUT));
  }

  _asm {
    popad
    jmp triggerbot_ori_jump_address
  }
}
In Assault Cube, the edi register holds whether a player is being looked at. However, in other games, this will be different. Therefore, it makes sense to only abstract out the code between the __asm blocks. We can replace this code with a call to our triggerbot class:
__declspec(naked) void triggerbot_codecave() {
  __asm {
    call triggerbot_ori_call_address
    pushad
    mov edi_value, eax
  }

  triggerbot->execute(edi_value);

  _asm {
    popad
    jmp triggerbot_ori_jump_address
  }
}
Now that we know how the calling code will look, we can create the class. First, we can create a header that will contain the definition of our triggerbot class:
#pragma once

#include <Windows.h>

class Triggerbot {
private:
  INPUT input = { 0 };
public:
  Triggerbot();
  void execute(int isLookingAtEnemy);
};
Classes have both private and public members. Public members can be accessed by other code. For example, we can see that the execute method will be called directly by our main file. However, the main file will not have access to the input variable.
To implement the code for our triggerbot class, we will create the source file next. This file will include the header we defined above, but will contain the actual code of the class:
#include <Windows.h>

#include "Triggerbot.h"

Triggerbot::Triggerbot() {
  input = { 0 };
}

void Triggerbot::execute(int isLookingAtEnemy) {
  if (isLookingAtEnemy != 0) {
    input.type = INPUT_MOUSE;
    input.mi.dwFlags = MOUSEEVENTF_LEFTDOWN;
    SendInput(1, &input, sizeof(INPUT));
  }
  else {
    input.type = INPUT_MOUSE;
    input.mi.dwFlags = MOUSEEVENTF_LEFTUP;
    SendInput(1, &input, sizeof(INPUT));
  }
}
This is the same as the original triggerbot code, except now encapsulated into this one class. We could add this class to a hack for another game and it would work, assuming that the main source file in that hack provided the correct value for isLookingAtEnemy.
To use this class in our main code, we will need to include the header and create an instance of it:
#include "Triggerbot.h"
...
Triggerbot *triggerbot;
...
BOOL WINAPI DllMain(HINSTANCE hinstDLL, DWORD fdwReason, LPVOID lpvReserved) {

  if (fdwReason == DLL_PROCESS_ATTACH) {
    triggerbot = new Triggerbot();
  }
  else if (fdwReason == DLL_PROCESS_DETACH) {
    delete triggerbot;
  }
By structuring the code this way, our triggerbot code is now simplified and can be easily modified. For example, to toggle the triggerbot on and off, we could simply add a single conditional, like:
if(triggerbot_enabled) {
  triggerbot->execute(edi_value);
}
We can also use this opportunity to remove the input global variable from the main source file.
Finish Refactor
The code for this section is on the “refactor-finished” branch.
Another major component we would like to separate out is the code responsible for the aimbot and ESP. Looking at the code, we see that it is responsible for setting the following values:
x_values[i] = (DWORD)(1200 + (yaw_dif * -30));
y_values[i] = (DWORD)(900 + ((pitch_dif) * 25));
names[i] = enemy->name;

player->yaw = closest_yaw;
player->pitch = closest_pitch;
The X, Y, and name values are used for the ESP whereas the player’s yaw and pitch are used for the aimbot. To calculate these values, our aimbot and ESP require the player’s base address, the enemy list’s base address, and the current number of players in the game.
To encapsulate this behavior in a class, we will separate the functionality into two functions. The first function will be responsible for calculating all the X, Y, and name values for the ESP, as well as the closest yaw and pitch. The second function will be responsible for setting the player’s view to the calculated location. Separating these functions will allow us to easily toggle both the ESP and aimbot.
Since this class is responsible for player geometry and the player’s relation to the world, we will call it PlayerGeometry. Like we did with the triggerbot, we can change our aimbot thread to:
void aimbot_thread() {
  while (true) {
    playerGeometry->update();
    playerGeometry->set_player_view();
  }
}
Since this code is now easily maintainable, we can combine the two threads in the main file:
void injected_thread() {

  while (true) {
    ...
    if (openGLHandle != NULL && glDepthFunc == NULL) {
      ...
    }

    playerGeometry->update();
    playerGeometry->set_player_view();

    Sleep(1);
  }
}
Our PlayerGeometry class will contain all player-relevant functions. To handle printing the ESP in our main file, the class will expose the array of X, Y, and name values:
class PlayerGeometry {
private:
  DWORD player_offset_address;
  DWORD enemy_list_address;
  DWORD current_players_address;

  float closest_yaw;
  float closest_pitch;

  Player* player;

  float euclidean_distance(float, float);
public:
  DWORD x_values[MAX_PLAYERS] = { 0 };
  DWORD y_values[MAX_PLAYERS] = { 0 };
  char* names[MAX_PLAYERS] = { NULL };

  int* current_players;

  PlayerGeometry(DWORD, DWORD, DWORD);
  void update();
  void set_player_view();
};
Unlike the triggerbot class, which just needed a parameter, this class requires the player’s base address, the enemy list’s base address, and the current number of players in the game. We will pass these in the constructor of the class, which is a special function that executes when the class is created:
PlayerGeometry::PlayerGeometry(DWORD p_address, DWORD e_address, DWORD cp_address) {
  player_offset_address = p_address;
  enemy_list_address = e_address;
  current_players_address = cp_address;
}
We can then use these values in the class’s code:
void PlayerGeometry::update() {
  DWORD* player_offset = (DWORD*)(player_offset_address);
  player = (Player*)(*player_offset);
  ... rest of aimbot and ESP code ...
}

void PlayerGeometry::set_player_view() {
  player->yaw = closest_yaw;
  player->pitch = closest_pitch;
}
When we create this class in our main file, we will pass these values. In this way, we can reuse the aimbot code in any game that has a similar memory layout:
playerGeometry = new PlayerGeometry(0x509B74, 0x50F4F8, 0x50F500);
We will also need to adjust the ESP code to use the values from this class:
for (int i = 1; i < *playerGeometry->current_players; i++) {
  x = playerGeometry->x_values[i];
  y = playerGeometry->y_values[i];
  text = playerGeometry->names[i];
Finally, we can move some variables that never change to a constants header, just to separate the variables out from the main file.
Adding a Menu
The code for the rest of this lesson is on the “master” branch.
With our code refactored, we can add a menu. First, we will extract out the text printing functionality to its own function:
void print_text(DWORD x, DWORD y, const char* text) {
  if (x > 2400 || x < 0 || y < 0 || y > 1800) {
    text = "";
  }

  x += 200;

  __asm {
    mov ecx, text
    push y
    push x
    call text_address
    add esp, 8
  }
}
Like we have done with our refactoring, we will place our menu functionality in its own class. Our menu needs to handle two things:
- Toggling items on and off
- Displaying a cursor and set of menu items
We will focus on displaying the menu first. To make the job of displaying the menu easier, we will create two arrays in our menu class definition: one that contains item display texts, and one that contains item states:
#define MAX_ITEMS 4

public:
  const char* items[MAX_ITEMS] = { "Wallhack", "ESP", "Aimbot", "Triggerbot" };
  bool item_enabled[MAX_ITEMS] = { false };
We will also need a way to return a string of On or Off depending on the item’s state:
const char* Menu::get_state(int item) {
  return item_enabled[item] ? "On" : "Off";
}
With these pieces in place, we can now add a loop in the text code cave to display all the menu items:
for (int i = 0; i < MAX_ITEMS; i++) {
  print_text(50, 250 + (100 * i), menu->items[i]);
  print_text(500, 250 + (100 * i), menu->get_state(i));
}
With our items printed, we can move on to adding a cursor. Our cursor will need to have a character and a position, so we will add these in the class definition. We also need to create an external function to handle all input for our menu:
public:
  int cursor_position;
  const char* cursor = ">";

  const char* get_state(int);
To handle our input, we will use GetAsyncKeyState, similar to what we did in previous lessons. First, we will handle up and down:
void Menu::handle_input() {

  if (GetAsyncKeyState(VK_DOWN) & 1) {
    cursor_position++;
  }
  else if (GetAsyncKeyState(VK_UP) & 1) {
    cursor_position--;
  }
The &1 has the effect of only registering the key press a single time for a short period of time instead of spamming it. The API documentation discusses this behavior.
If we press left and right, we want to enable or disable an item. Since all the item states are either true or false, we can simply switch their current value with the not (!) operator:
else if ((GetAsyncKeyState(VK_LEFT) & 1) || (GetAsyncKeyState(VK_RIGHT) & 1)) {
  item_enabled[cursor_position] = !item_enabled[cursor_position];
}
If we navigate past the boundaries of our menu, we want the cursor to appear at the other end. We can do that by adding a few checks:
if (cursor_position < 0) {
  cursor_position = 3;
}
else if (cursor_position > 3) {
  cursor_position = 0;
}
We can now add our menu to our main file. First, we need the text code cave to also print the cursor. We will make it look like it’s moving by offsetting the current position with a multiple of 100:
print_text(10, 250 + (100 * menu->cursor_position), menu->cursor);
In our thread, we also need to pass input to the menu to check for key presses:
menu->handle_input();

playerGeometry->update();
Toggling Features
Finally, we need to toggle features based on their menu state. We already created an array of all the item states. To determine the current value of one of the features, we can query this array via:
if (menu->item_enabled[0])
To make these entries more readable, we can create constants in our menu header that reference the positions for each item:
#define WALLHACK 0
#define ESP 1
#define AIMBOT 2
#define TRIGGERBOT 3
We can implement checks in our code by using these values. For example, to toggle the wallhack, we can change the code to:
if (menu->item_enabled[WALLHACK]) {
  (*glDepthFunc)(0x207);
}
This builds off of our refactoring efforts from before. To toggle our aimbot, we can easily do the following in the thread:
if (menu->item_enabled[AIMBOT]) {
  playerGeometry->set_player_view();
}
Similar checks can be done for the triggerbot and ESP.
Adding Colors
Just for some visual flair, we can add colors to the menu items to make them easier to read. By issuing votes in game, we can see that some text in the game already has color, like the Press F1 to vote text. If we examine this string in x64dbg, we see that it has the following data:
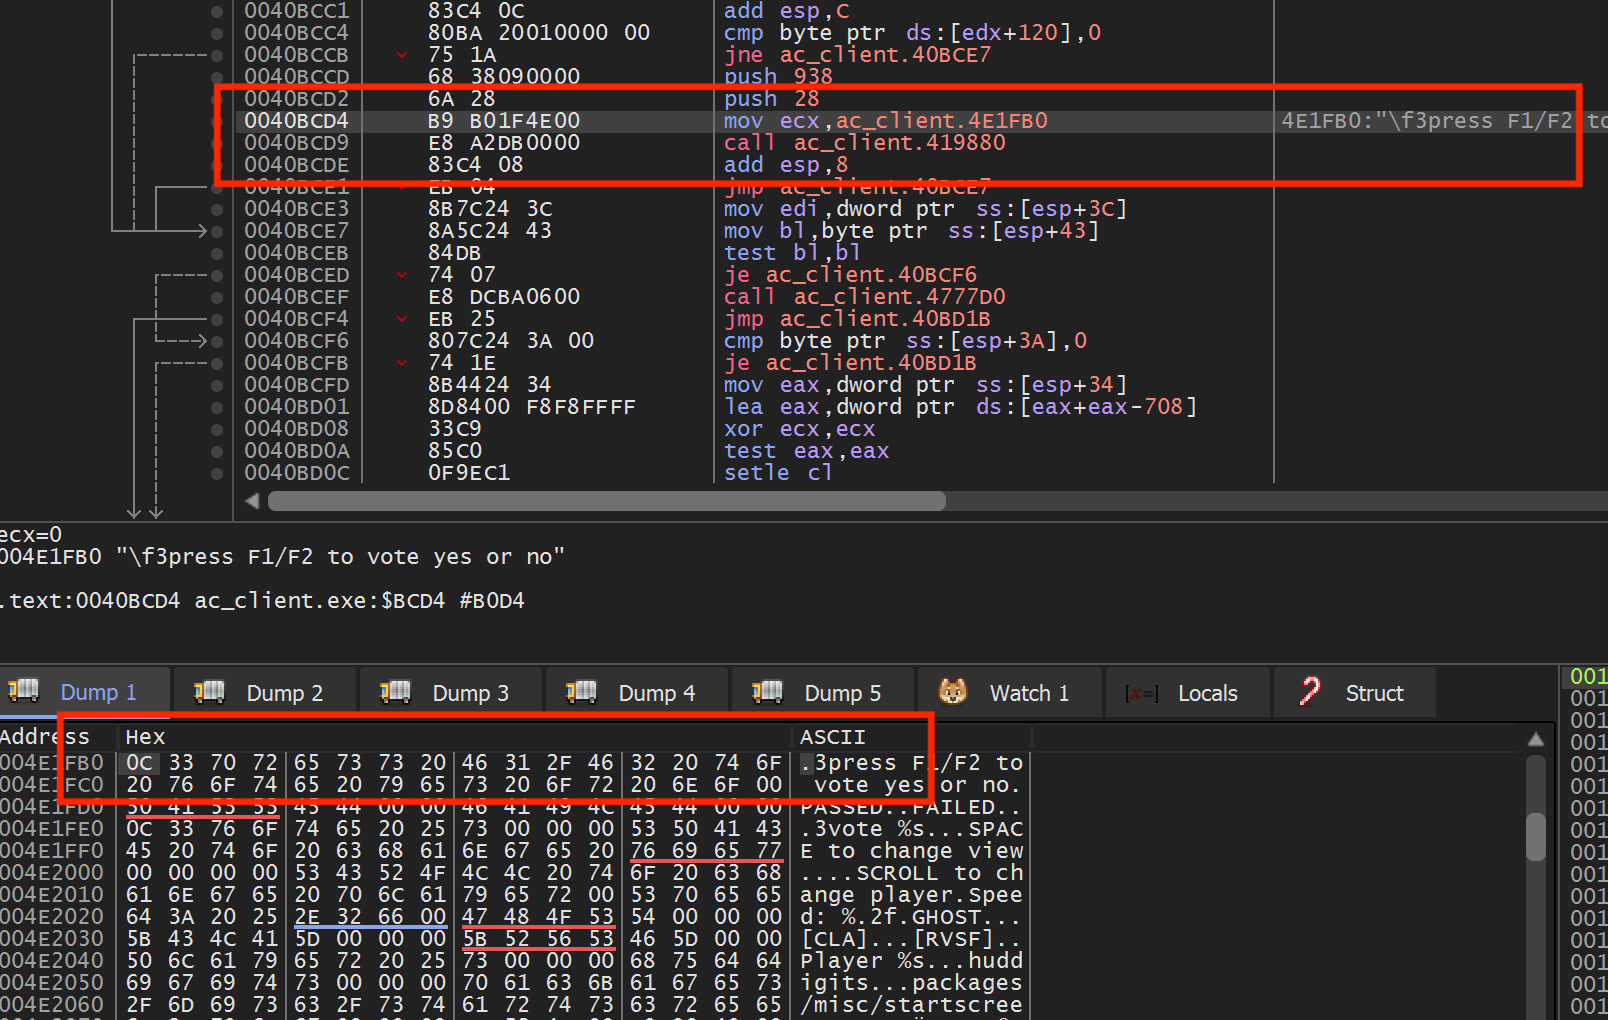
It looks like strings prefixed with 0x0C 33 are given a
color. If we look for other strings, we see that 0x0C is
always there, but occasionally the value of 0x33 will be
different. Let’s incorporate these bytes into our on/off strings:
class Menu {
private:
  const char on_text[5] = { 0xc, 0x33, 'O', 'N', 0 };
  const char off_text[6] = { 0xc, 0x33, 'O', 'F', 'F', 0 };
If you go into the game, you will see both our strings are now red. If you
play around with the 0x33 and try different values
(0x31, 0x38, etc.), you will eventually see that
0x30 is green. Now we can modify our code to change the
On text to green:
const char on_text[5] = { 0xc, 0x30, 'O', 'N', 0 };
With this, our multihack is complete.