Target
Our target in this lesson will be Wesnoth 1.14.9.
Identify
Our goal in this lesson is to create a code cave inside a DLL. The code cave will be executed whenever we select Terrain Description. The code cave will give us 888 gold before bringing up the terrain description box.
Understand
In the Using Code Caves lesson, we created a code cave in the game’s memory. We then adjusted the opcodes in the Terrain Description feature to jmp to this code cave. We used x64dbg’s built-in instruction assembler to create the code cave and adjust these opcodes.
To create this behavior inside a DLL, we will first need to create a code cave in our DLL. We will then need to modify the opcodes in the Terrain Description feature to jump to this code cave inside our DLL.
Assembly in C++
One feature of C++ is the ability to insert assembly code into a C++ source file. This assembly will not be modified during the compiling steps. To do this, you use the __asm keyword. For example, the following code can be used to execute the instruction pushad in a C++ source file:
__asm {
    pushad
}
You can also mix C++ and assembly in a function. For example, the following code will save all registers, create a variable x, add 1 to it, and then restore all registers:
__asm {
    pushad
}
int x = 0;
x = x + 1;
__asm {
    popad
}
Finally, variables declared in C++ can be referenced in these assembly blocks. We will use this behavior later when programming our hack.
Assembled Functions
To jump to our code cave from Wesnoth’s code, we will need to know our code cave’s location. The easiest way to accomplish this in C++ is to declare our code cave as a function. We can then use the & operator on it to retrieve its address, identical to other variables. The pseudo code for this might look like:
void codecave() {
    //our codecave
}
...
terrain_description_jump_location = &codecave;
However, when assembled, functions are normally created with stack frames. Stack frames allow the compiler to easily offset and compute the location of local variables and function arguments. We will discuss this behavior more in future lessons as we explore the stack. For this lesson, we need to know that the codecave function above will be assembled into:
codecave:
    push ebp
    mov ebp, esp
    ...
    mov esp, ebp
    pop ebp
    ret
These extra instructions can cause our code cave to corrupt the game when we jump to it. This corruption can then cause the game to crash. To avoid this behavior, we will use the __declspec C++ keyword to modify how the function is assembled. When using this keyword with the naked attribute, the compiler will not add a stack frame.
Cave Skeleton
Now, we can move on to creating our code cave. First, create a DLL in Visual Studio identically to how we have done it in previous lessons. The name for this project will be CodeCaveDLL.
After creating the DLL, we can add our code cave function. Like we discussed above, the function will use the __declspec keyword to avoid the compiler adding a stack frame. Its definition will look like:
__declspec(naked) void codecave() {

}
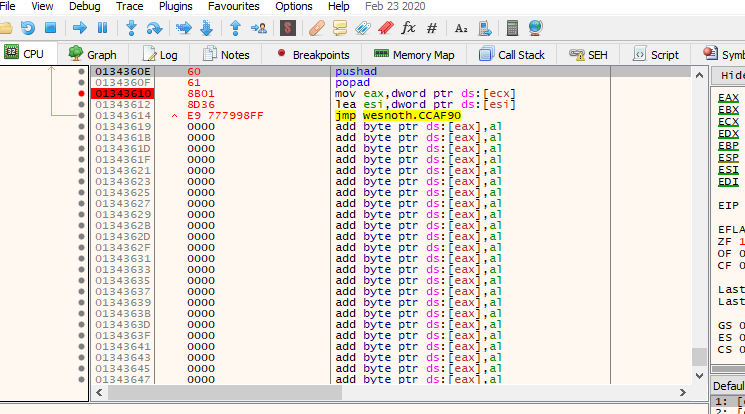
As we discussed in the Using Code Caves lesson, the first step when creating a code cave is to save and restore the registers and then restore the overwritten instructions. We identified these instructions in the Using Code Caves lesson.
pushad
popad
mov eax, dword ptr ds:[ecx]
lea esi, dword ptr ds:[esi]
jmp 0xCCAF90
When this code cave was created in x64dbg, it looked like:
In our DLL, we will create two separate blocks of assembly instructions. The first block will save all of the registers. The second block will restore the registers and then execute the original instructions we have overwritten. Between these two blocks, we will place C++ code to modify our player’s gold.
__asm {
    pushad
}

// code to modify gold

__asm {
    popad
    mov eax, dword ptr ds:[ecx]
    lea esi,dword ptr ds:[esi]
    jmp 0xCCAF90
}
If you attempt to compile this code, you will get an error on the jmp instruction:
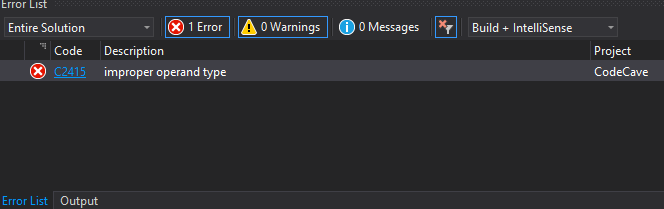
This is because the compiler cannot resolve the jmp instruction when a static address is provided. There are many types of jmp instructions which differ based on the length of the jump. Without this knowledge, the compiler does not know how to encode the instruction. There are several ways to resolve this ambiguity, the easiest of which is to create a variable. That is what we will do in this lesson.
Since our code cave has no stack frame, we cannot declare variables inside of it. To bypass this, we will declare all of our variables globally, right below the include statements. Since we need to hold a static address value, we will declare the address as a DWORD:
#include <Windows.h>

DWORD ret_address = 0xCCAF90;

__declspec(naked) void codecave() {
    __asm {
        pushad
    }

    // code to modify gold

    __asm {
        popad
        mov eax, dword ptr ds:[ecx]
        lea esi,dword ptr ds:[esi]
        jmp ret_address
    }
}
Changing Gold
With our code cave function created, we can now use the same approach discussed in the DLL Memory Hack lesson to modify the dynamic address of our gold through the use of several pointers.
As we discussed in the previous section, we will place this code between the two assembly blocks so that our code cave properly saves and restores all the game’s registers. The code to change our gold will be mostly identical to the previous lesson. The only difference is that we will have to initially declare our variables globally outside of our code cave function:
DWORD* player_base;
DWORD* game_base;
DWORD* gold;
...
__declspec(naked) void codecave() {
    __asm {
        pushad
    }

    player_base = (DWORD*)0x017EED18;
    game_base = (DWORD*)(*player_base + 0xA90);
    gold = (DWORD*)(*game_base + 4);
    *gold = 888;

    __asm {
        ...
Redirection
Next, we can work on redirecting the game’s code to call this function. To
do this, we will again use a pointer. However, this time we will declare
the pointer to point to the address of the game’s code responsible for
displaying the Terrain Description feature. This will be the same
hooking location we found in the previous code cave lesson at
0x00CCAF8A.
We need to take a slightly different approach to modify the game’s code using a pointer. Since we want to modify individual bytes, we will declare our pointer as an unsigned char (short for character). Unlike a DWORD, an unsigned char represents 1 byte of data. Declaring our pointer like this will give us the flexibility to modify individual bytes.
Before we can modify the game’s code, we will need to change its protection type. Code is only intended to be executed, so Windows will, by default, not allow other processes or DLL’s to write data to code addresses. To change this protection, we will use the API VirtualProtect and reassign the protection type.
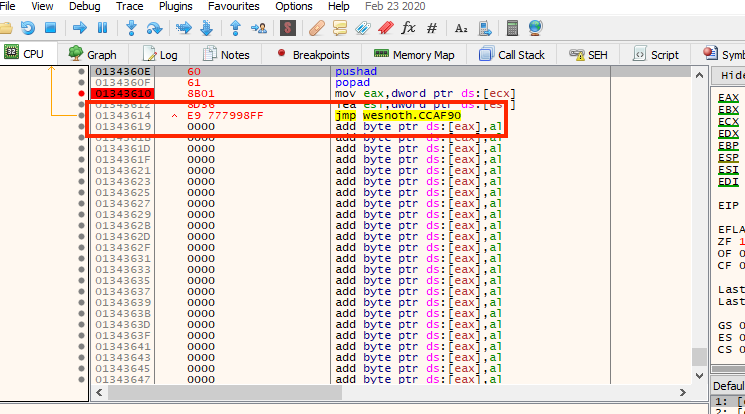
Finally, we need to understand how the jmp opcode is
structured. We know that jmp’s start with the opcode
value of 0xE9. However, there are an additional 4 bytes after
this 0xE9. These additional bytes direct the CPU where to
jump to. These 4 bytes are not simply the new address. We can see an
example from our previous code cave that we created with x64dbg:
There are several resources online that describe how this opcode is structured. The basic formula is:
new_location - original_location + 5
Let’s verify this formula with the code cave above:
0xCCAF90 - 0x1343614 + 5 = FF 98 79 77
This initially looks incorrect. However, bytes are stored in a “reverse” order on all Windows-compatible CPU’s. This is a concept known as endianness, which we will cover more in future lessons. If we reverse the byte order from the value we found above, we find that it matches the opcode in x64dbg:
77 79 98 FF
Since we verified that the formula works, we can implement it into our own code to jmp to our code cave.
Redirection Function
We will handle the redirection in our DllMain function, when our DLL is first injected. First, we will need to declare a pointer to our hook location. In addition, the VirtualProtect API requires a parameter to hold the previous protection type. We will declare that as well:
DWORD old_protect;
unsigned char* hook_location = (unsigned char*)0x00CCAF8A;
Next, we will change the protection type for our hook location. The VirtualProtect API has similar parameters to the ReadProcessMemory and WriteProcessMemory API’s. Like we did in our previous code cave lesson, we will need to rewrite 6 bytes.
if (fdwReason == DLL_PROCESS_ATTACH) {
    VirtualProtect((void*)hook_location, 6, PAGE_EXECUTE_READWRITE, &old_protect);
    //redirection
}

return true;
With the location now writable, we can begin the process of reassigning
the bytes to jump to our code cave. First, we will set the first byte to
0xE9:
*hook_location = 0xE9;
We will then write the additional opcodes needed for the jmp using the formula we tested above. These opcodes will begin 1 byte after the hooking location:
*(hook_location + 1) = &codecave - (hook_location + 5);
However, this code will not work as intended. Instead of writing 4 bytes, this will only write 1 byte. This is because hook_location is defined as a pointer to an unsigned char, which is 1 byte long. To write the 4 bytes we need, we will cast hook_location as a pointer to a DWORD. We will also cast the other variables to DWORD’s:
*(DWORD*)(hook_location + 1) = (DWORD)&codecave - ((DWORD)hook_location + 5);
Finally, just like we did in the previous lesson, we need to make the sixth byte a nop. This can be done in an identical manner to the method we used to set the first byte to a jmp. We add 5 (instead of 6) as values are indexed from 0 in C++:
*(hook_location + 5) = 0x90;
With this done, we can build and inject the DLL identically to how we did it in the previous lesson. When in game, select Terrain Description on any tile. Before displaying the description, your gold should be set to 888.
The full code is on github for comparison.