Target
Our target for this lesson will be the game Assault Cube 1.2.0.2, since it has an easy way to create bots and disable their movement. However, this same technique will work on any FPS that displays a player’s name when you hover over a player.
Identify
Our goal in this lesson is to create a triggerbot, a type of hack that automatically fires whenever we look at another player.
DLL Injection
While the following lessons can be done using the AppInit technique discussed in previous lessons, using a DLL injector will vastly speed up development time. From this point on, the rest of the lessons will assume that you are using an injector. Creating a DLL injector is discussed in the DLL Injector lesson. General-purpose DLL injectors can also be found online.
Understand
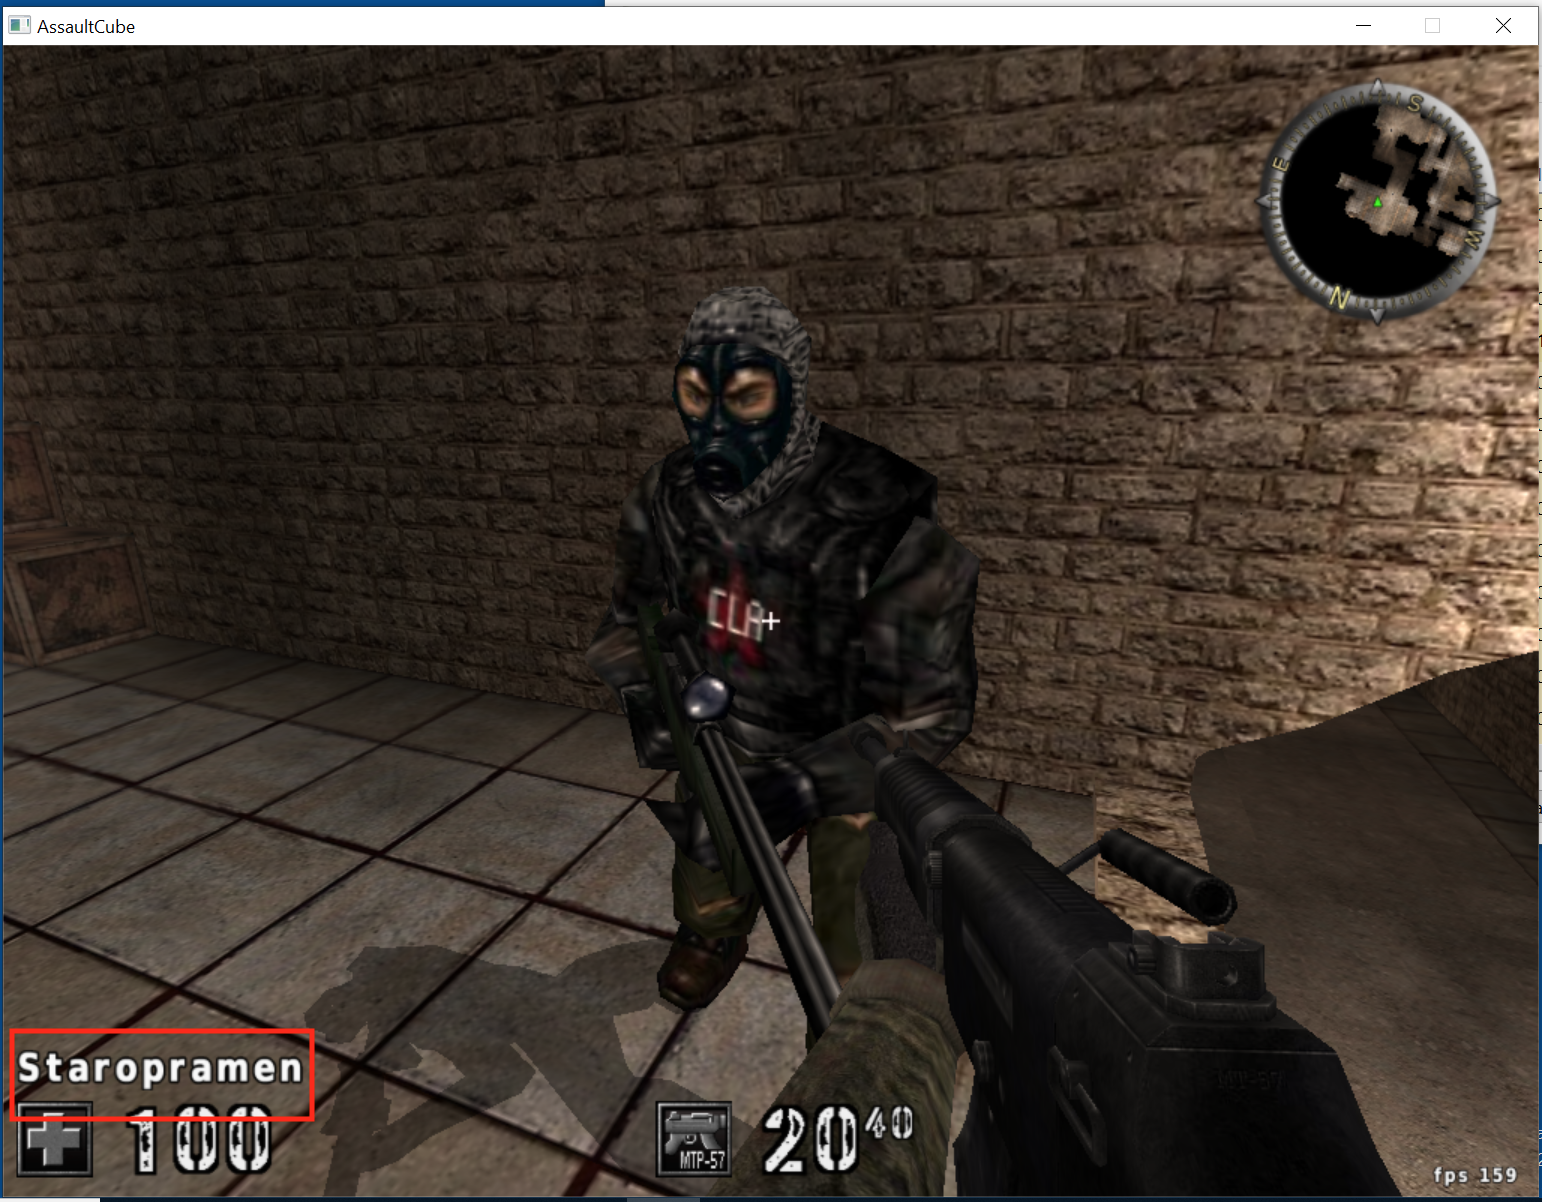
To write a triggerbot, we need to calculate where our player is looking and identify if we are looking at another player. Luckily for us, most games already have this functionality in their code to display a nametag when you hover over a player or change the crosshair to a different color. Assault Cube displays a nametag, as seen in the bottom left-hand corner:
If we locate the code responsible for displaying this text, we can hook it and write custom code to send a mouse press.
Locating Code
The method for locating the responsible code will depend on how the game reacts to hovering over a player. In general, games will react in two different ways:
- The crosshair will change, either in size or color.
- The player’s name we are looking at will be displayed somewhere on the screen.
In games with the first reaction, we will have to search for one value while not looking at a player and then filter for a different value while looking at a player. After enough filtering, a value will remain that will generally be 0 when not looking at a player, and 1 (or a value linked to the player’s location in the entity list) when looking at a player. You can then set a breakpoint on this memory address and see what code writes to it.
Other games, like Assault Cube, will display a string that represents the player’s name. In these cases, we can locate a player’s name in memory and then set a breakpoint on access on the name. When we hover over the player, this breakpoint should pop at the code responsible for determining if we are looking at a player.
First, make sure the nametags option is enabled in the HUD settings. Then, start a new single-player deathmatch game with 8 bots. When the game starts, hit the “~” key to open the console and run the command idlebots 1. This command will disable bots from moving and shooting, making it easier to search for the information we want. In games that do not have a way to disable bot movement, you can use Cheat Engine’s Enable Speedhack feature to slow down the game and allow you to search easier:

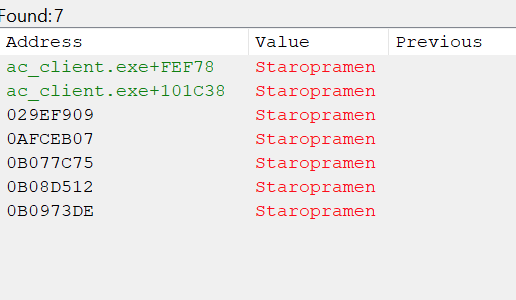
With the game started, find a particular bot and note its name down. Search in Cheat Engine for this name, which should return about 10 results:
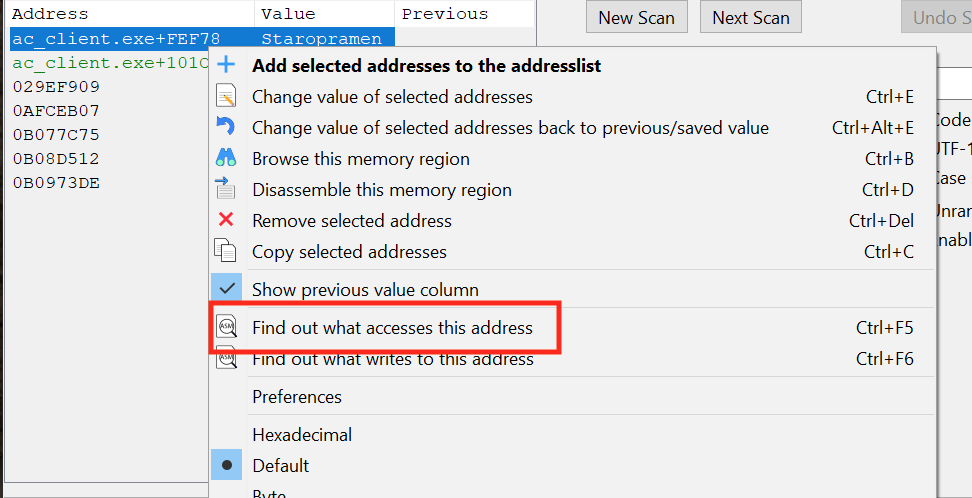
Next, look away from the bot so that its nametag is no longer displayed. For each address identified, use Cheat Engine’s Find out what accesses this address option, which will attach a debugger to the process to determine what code is touching the memory:
For each address, look at the bot again so that the nametag displays. We are looking for an address which has a ton of accesses only when looking at the bot. After going through several of the addresses, you should find one that is always accessed only when looking at a bot:
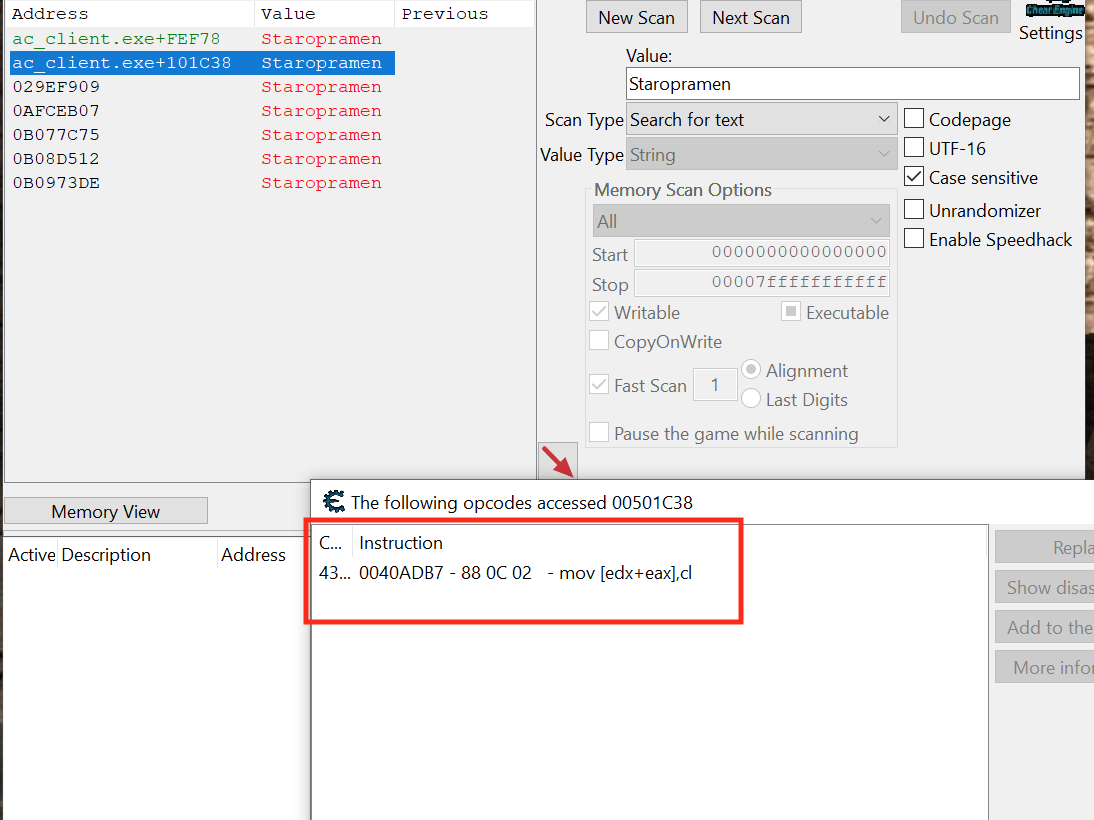
With this code found, we can close Cheat Engine and start working on reversing the responsible code.
Locating Code Cave
Open up x64dbg and attach it to Assault Cube. In Assault Cube, make sure that the nametag is still displaying. Navigate to the address we found in Cheat Engine and place a breakpoint on the code. It should pop immediately:
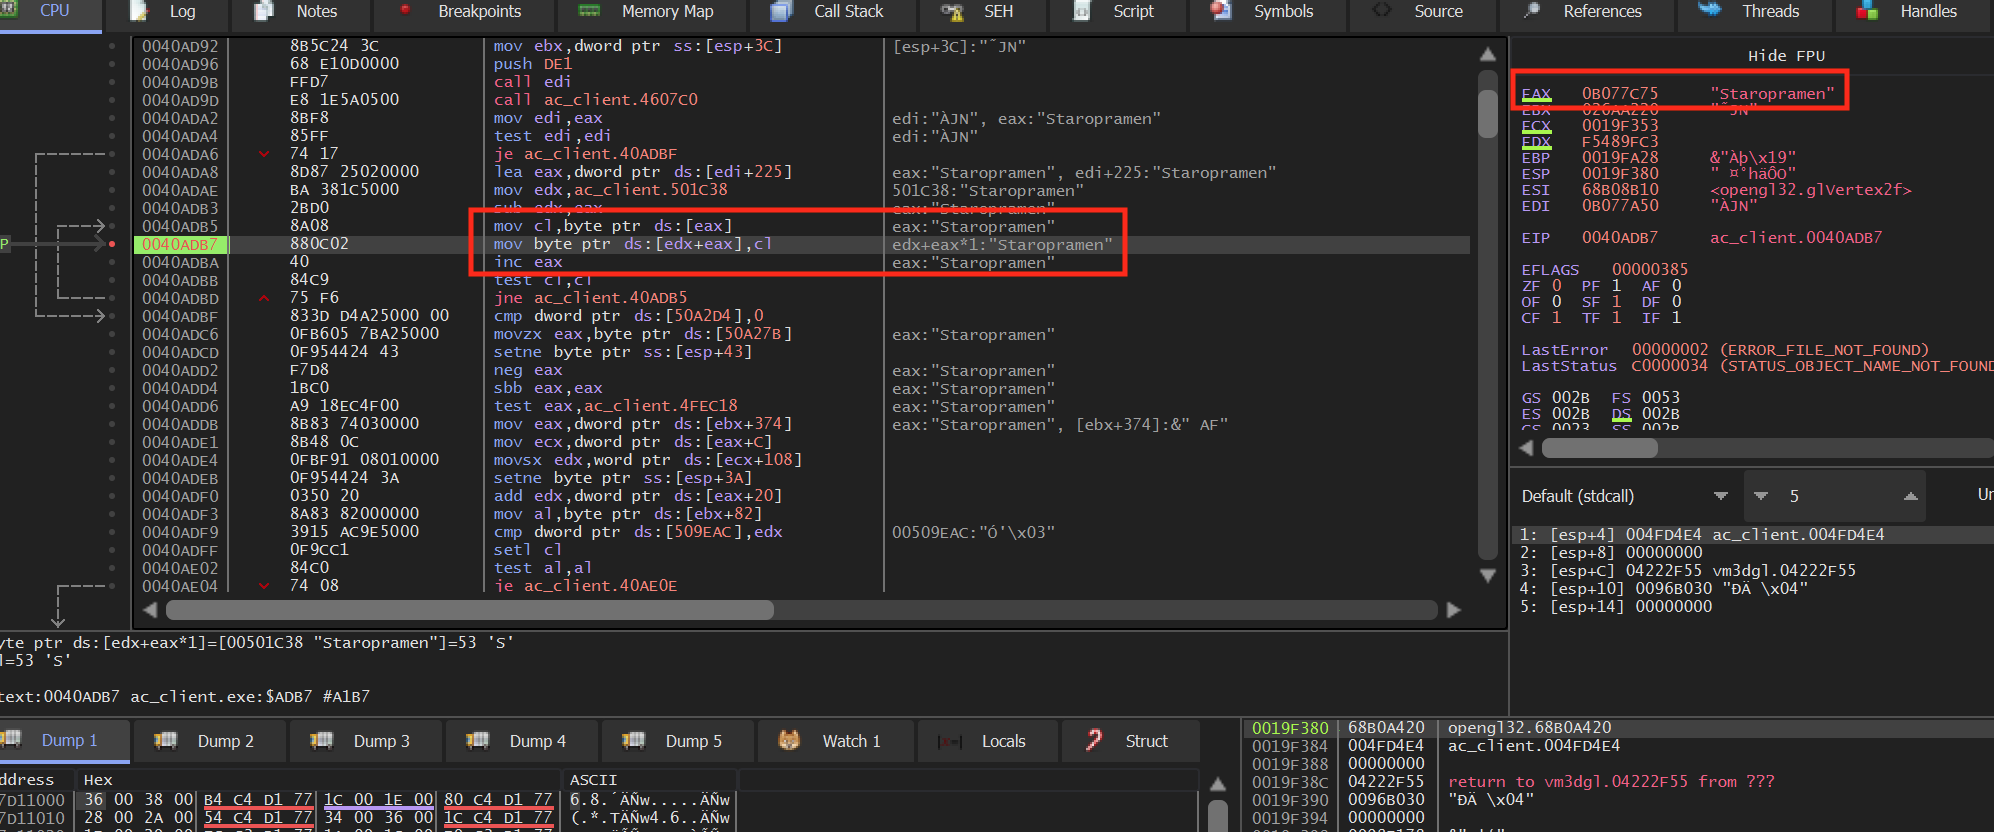
You will notice that we are inside a loop that is loading the player’s
name into a buffer. We see that this loop is only entered if the
je at 0x0040ADA6 does not jump. The
condition for this jump is the test edi, edi instruction.
Testing a register against itself compares its value to 0. From this, we
can assume that the nametag is only displayed if edi is
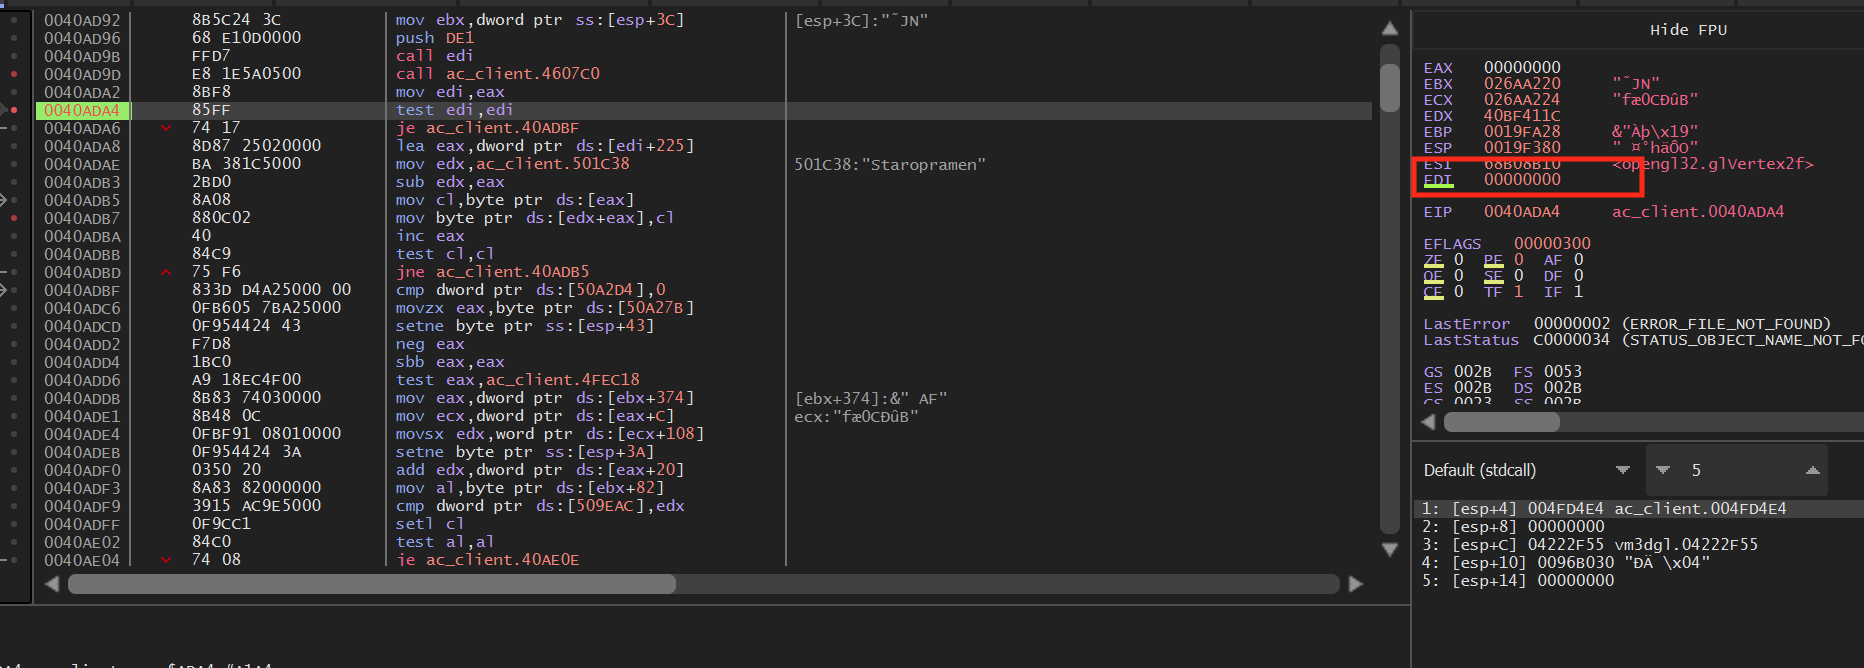
not 0. We can confirm this behavior by setting a breakpoint on the
test edi, edi instruction. When looking at a player,
edi will have a value:

However, if we are not looking at a player, edi will hold the value 0:
Looking at the call above, we can see that edi gets its value from eax, which is the return value from the call:
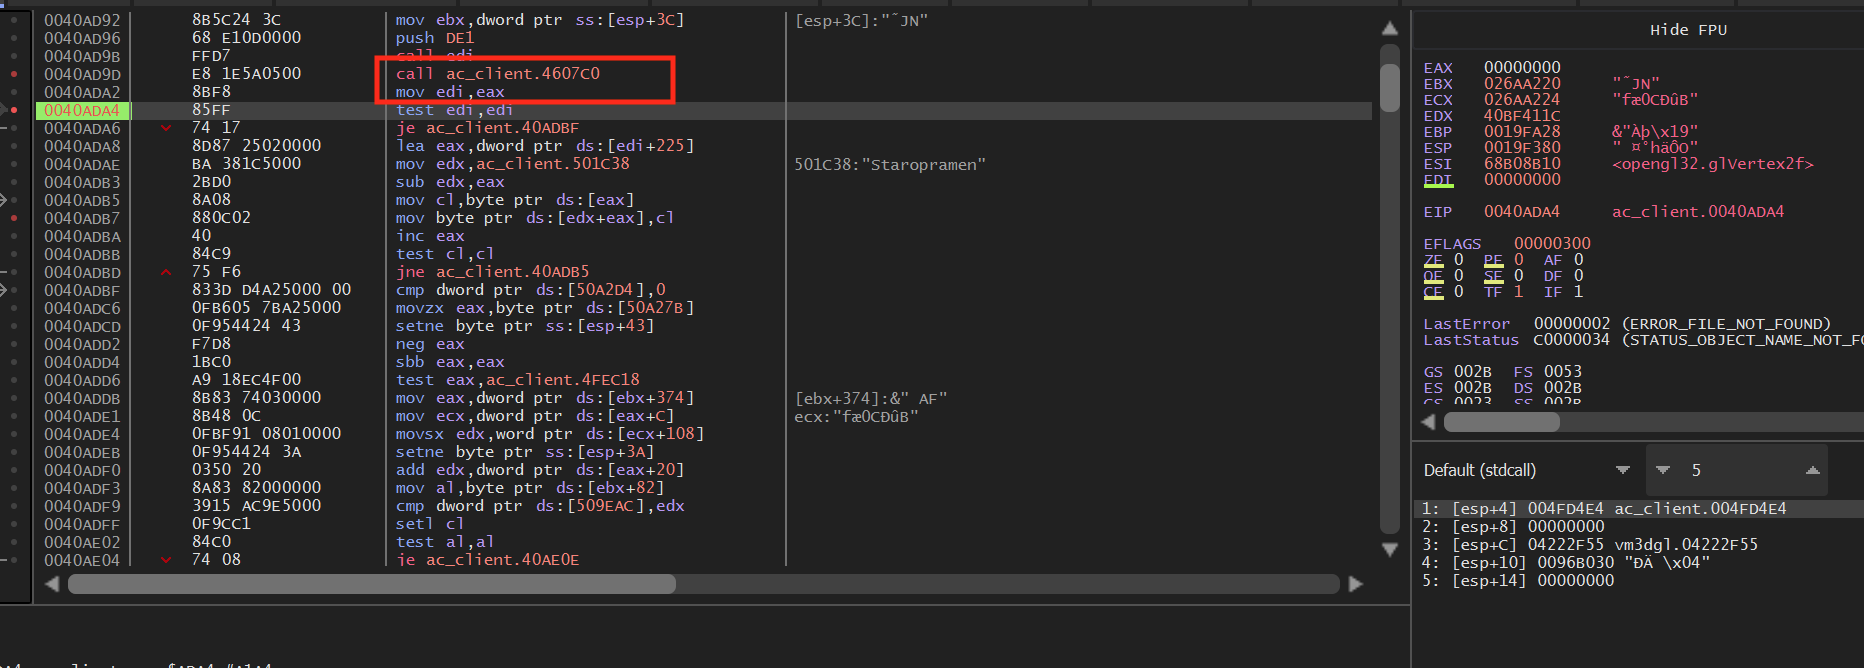
Since this call is 5 bytes, we will overwrite this call with a code cave to our own code.
Writing Code Cave
The logic for our code cave will be simple. First, we will execute the call we hooked. Then, we will read the value of eax into a variable. After that, we will read the value of the variable. If we are looking at a player, we will use the SendInput API to send a left mouse down event to the game. Otherwise, we will send a left mouse up event to the game. We need to use this approach since SendInput sets a key’s state permanently. If we do not send a left mouse up event, the mouse button will act as if it is held down.
Like we discussed above, we will hook the call at
0x0040AD9D. We will do this in an identical manner to
previous lessons:
unsigned char* hook_location = (unsigned char*)0x0040AD9D;
...
VirtualProtect((void*)hook_location, 5, PAGE_EXECUTE_READWRITE, &old_protect);
*hook_location = 0xE9;
*(DWORD*)(hook_location + 1) = (DWORD)&codecave - ((DWORD)hook_location + 5);
In our code cave, we will first start by calling the method that we overwrote and then moving its return value (eax) into a variable that we declare:
DWORD ori_call_address = 0x4607C0;
DWORD edi_value = 0;

__declspec(naked) void codecave() {
  __asm {
    call ori_call_address
    pushad
    mov edi_value, eax
  }
Next, we will check the value of our edi_value variable to determine if we should send a left mouse down or mouse up event:
if (edi_value != 0) {
  //looking at player
}
else {
  //not looking at player
}
SendInput takes an array of input events, which allows you to send multiple events. This can be useful if we want to do multiple actions at once, such as firing and then reloading. In this lesson, we will only send one input, which is the mouse down or mouse up event:
INPUT input = { 0 };
...
if (edi_value != 0) {
  input.type = INPUT_MOUSE;
  input.mi.dwFlags = MOUSEEVENTF_LEFTDOWN;
  SendInput(1, &input, sizeof(INPUT));
}
else {
  input.type = INPUT_MOUSE;
  input.mi.dwFlags = MOUSEEVENTF_LEFTUP;
  SendInput(1, &input, sizeof(INPUT));
}
Just like in previous lessons, we want to restore the registers and jump back to the original code:
DWORD ori_jump_address = 0x0040ADA2;
...
_asm {
  popad
  jmp ori_jump_address
}
If you are using the DLL injector from the DLL Injector lesson, we can make some small modifications to use it for this target:
const char *dll_path = "C:\\Users\\IEUser\\source\\repos\\triggerbot\\Debug\\triggerbot.dll";
...
if (strcmp((const char*)pe32.szExeFile, (const char*)L"ac_client.exe") == 0) {
With those changes, we can inject the DLL into Assault Cube and hover over a player. When we pass over a player, we will automatically fire.
The full code for this lesson is available on github.