Target
Since we are shifting to a new dimension, we have to shift to a new target. Several of the following lessons will be targeting Urban Terror 4.3.4. This game is an FPS based on the Quake engine.
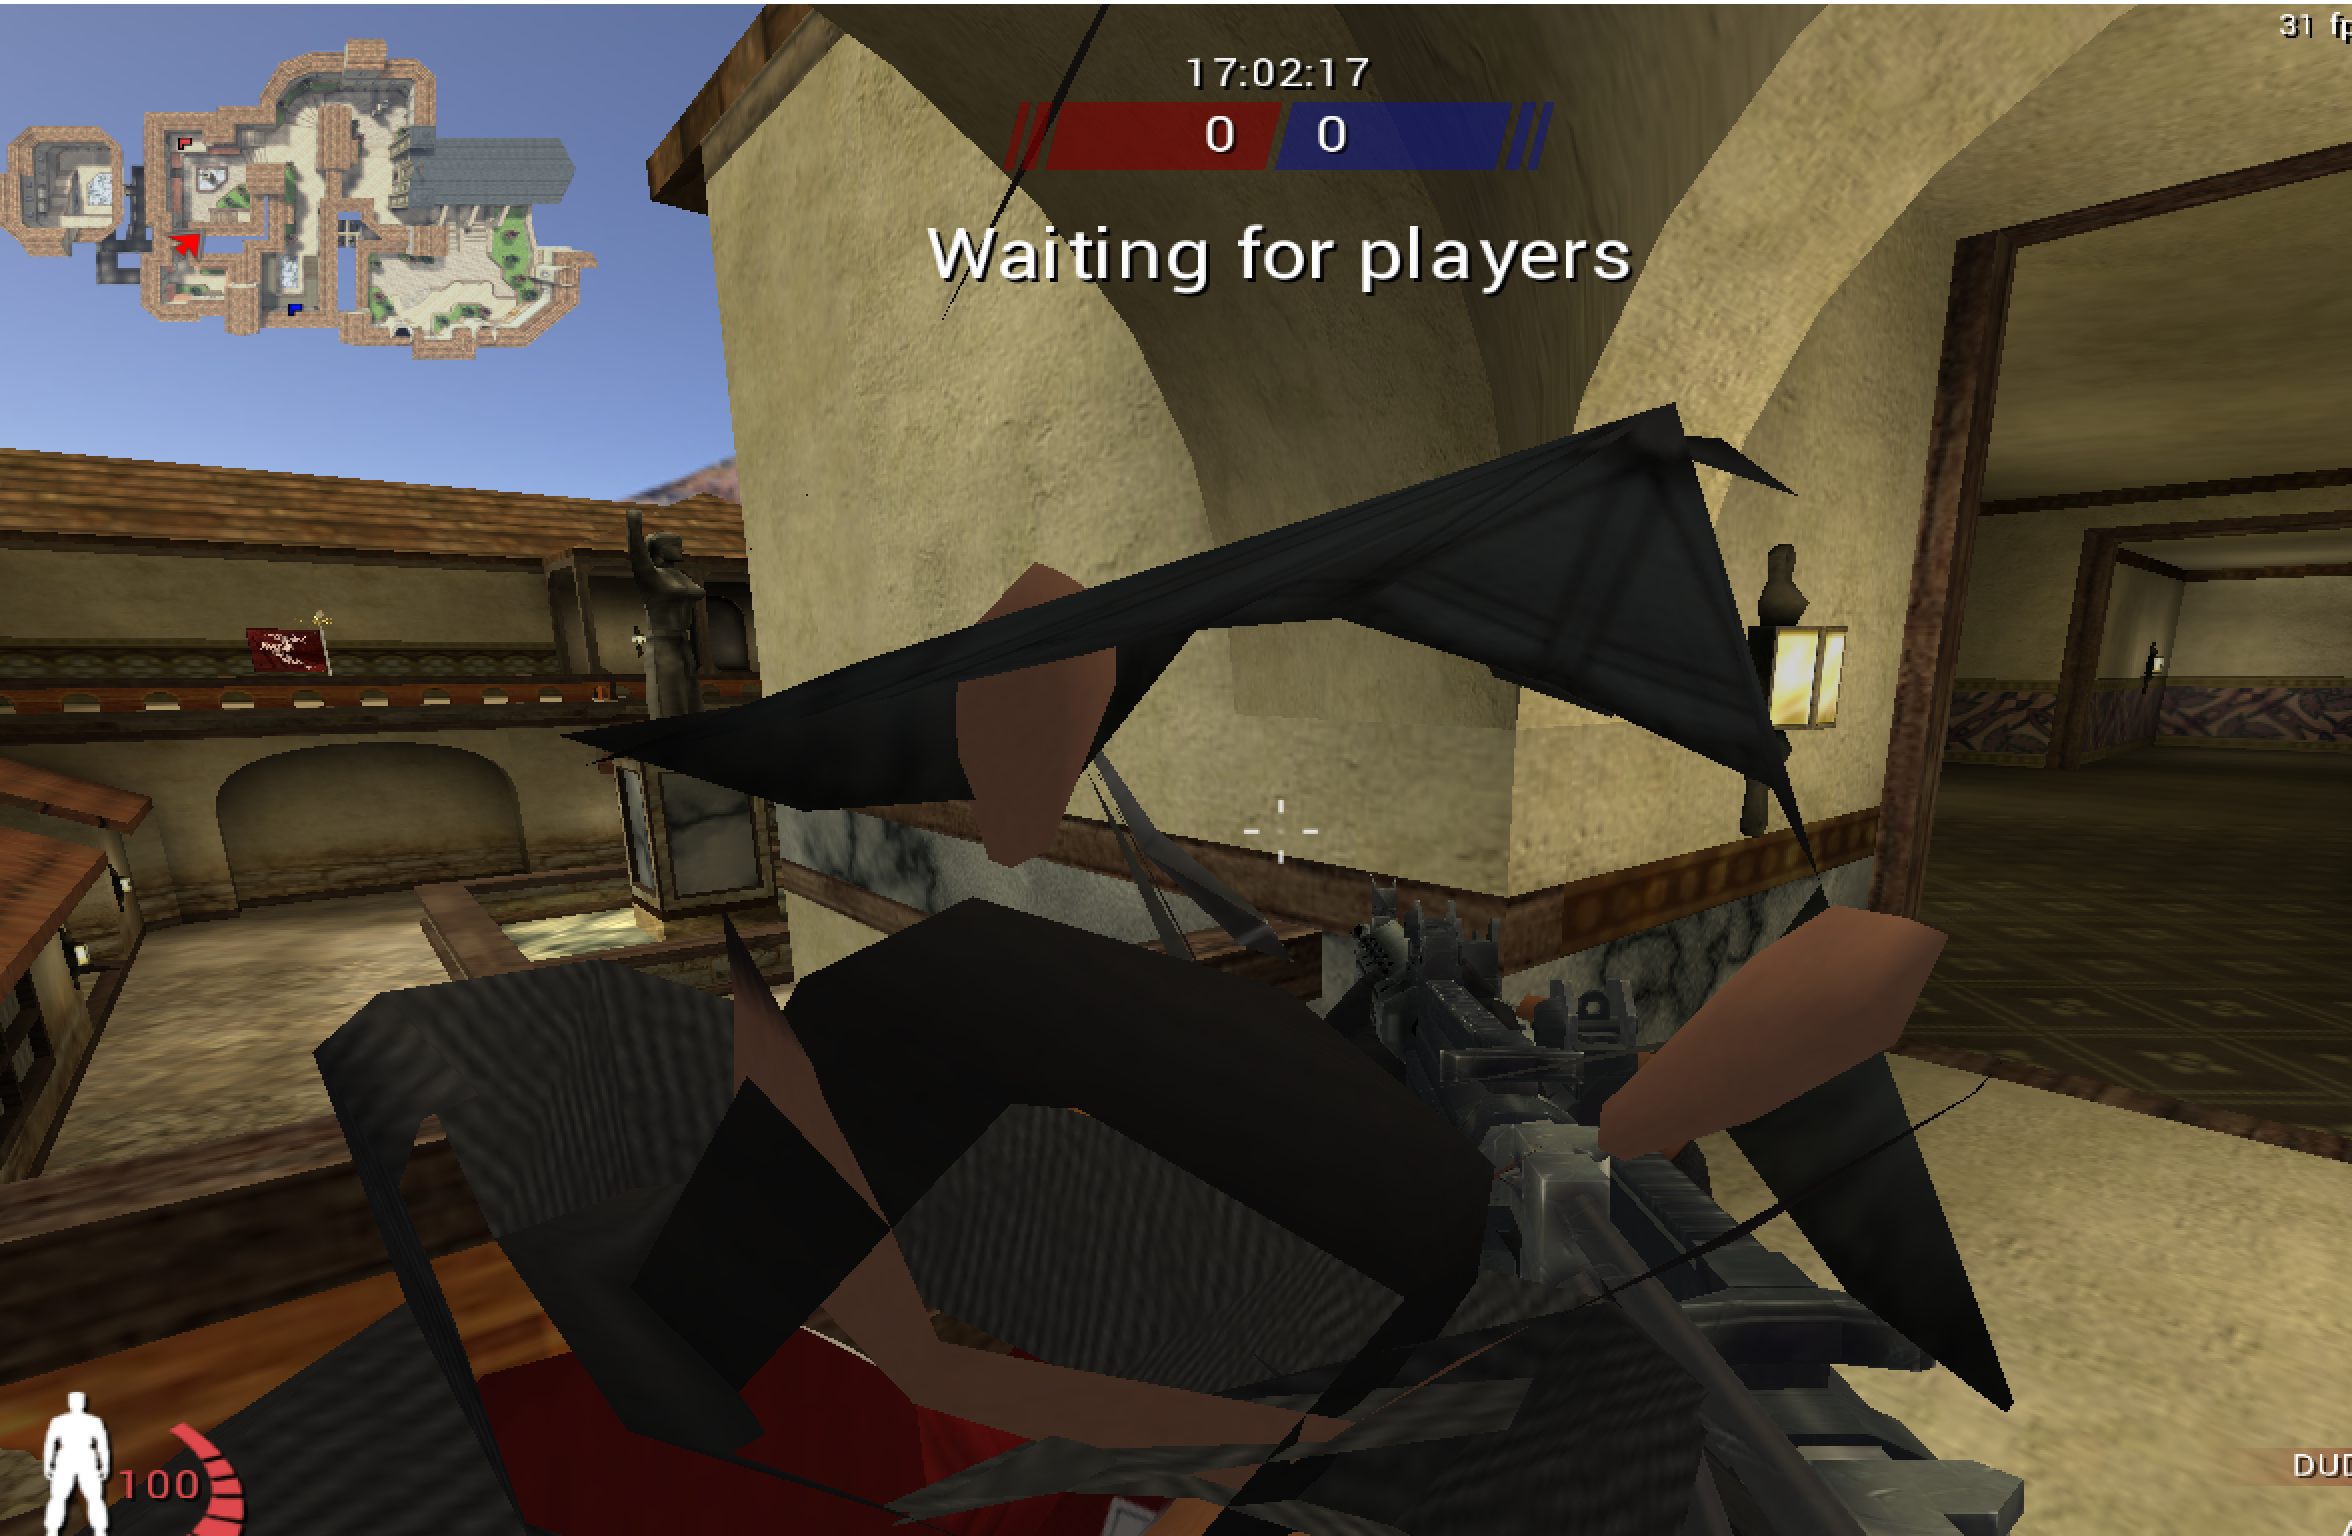
Like Wesnoth, this game is open-source and has no integrated anti-cheat. It also runs well on low-spec hardware. Unlike Wesnoth, the Chocolatey package is broken. Due to this, the best way to install the game is to download and run the installer from the site.
You will need to enable 3D acceleration in VirtualBox for the game to function. Depending on your computer’s hardware, it may not be possible for your machine to run a 3D game inside a VM. In this case, you have several options. Some are better than others:
- Explore another hypervisor, like VMWare or Hyper-V.
- Use another machine as a dedicated hacking computer and isolate it from your home network.
- Find another target game with even fewer requirements and follow along with the concepts of the following lessons.
- Partition your hard-drive and dual-boot. Even if you encrypt your personal drive, it is possible for malicious tools to access your personal data.
- Run the target and tools on your personal machine and hope that nothing malicious happens.
Identify
Our goal in this lesson is to create a wallhack, a type of hack that allows us to see other players through walls. We will not modify any of the graphics functions of the game. Instead, we will use the game’s rendering logic and modify sections of the game’s memory.
Understand
In 3D games, depth testing is used to determine when an item should be visible in the player’s viewport. For example, if a player is behind a wall, depth testing will tell the rendering logic of the game to not draw the player.
All wallhacks operate on the principle of disabling depth testing. One way to do this is by hooking the graphics library of the game and disabling depth testing through library functions. We will cover this approach in the next lesson. In this lesson, we will rely on the game’s built-in rendering logic to achieve our goal.
Games have to draw many dynamic objects, including players, weapons, and map assets like doors. These objects are normally referred to as entities. To simplify development and increase performance, games will often use the same function for drawing all of these entities.
However, these entities often have different rendering considerations. A game may want to draw shadows on characters, but not on static entities like doors that can be opened. Games will often have structures for each entity and store these rendering considerations in the entity’s structure. When the entity is rendered, the game will check this member and render the entity according to it.
For some entities, like puddles of water or glass, games will want to disable depth testing. Because of this, the render member in the entity class will have a disabled depth testing value. If we can locate the function responsible for drawing entities and then modify all entities to contain this disabled depth testing value, players will appear through walls.
Target Setup
All games that are based on the Quake engine have a console. This console can be accessed by hitting the tilde (~) key while in game. This console allows you to run commands, such as moving the player or changing a map. These commands typically start with a backslash (\) and can be auto-completed by hitting tab. Some helpful commands for our purposes are:
- \devmap abbey - start the map Abbey with cheats enabled
- \g_gametype 0 - set the default game mode to deathmatch
- \bot_enable 1 - enable bots to join a game
- \reload - restart the current map
- \addbot boa 1 - add a bot
In addition to these commands, we can easily switch the game to a windowed mode by hitting Alt+Enter.
Locating Draw Entities
By exploring the commands available to us, we can find several drawing commands under \r_:
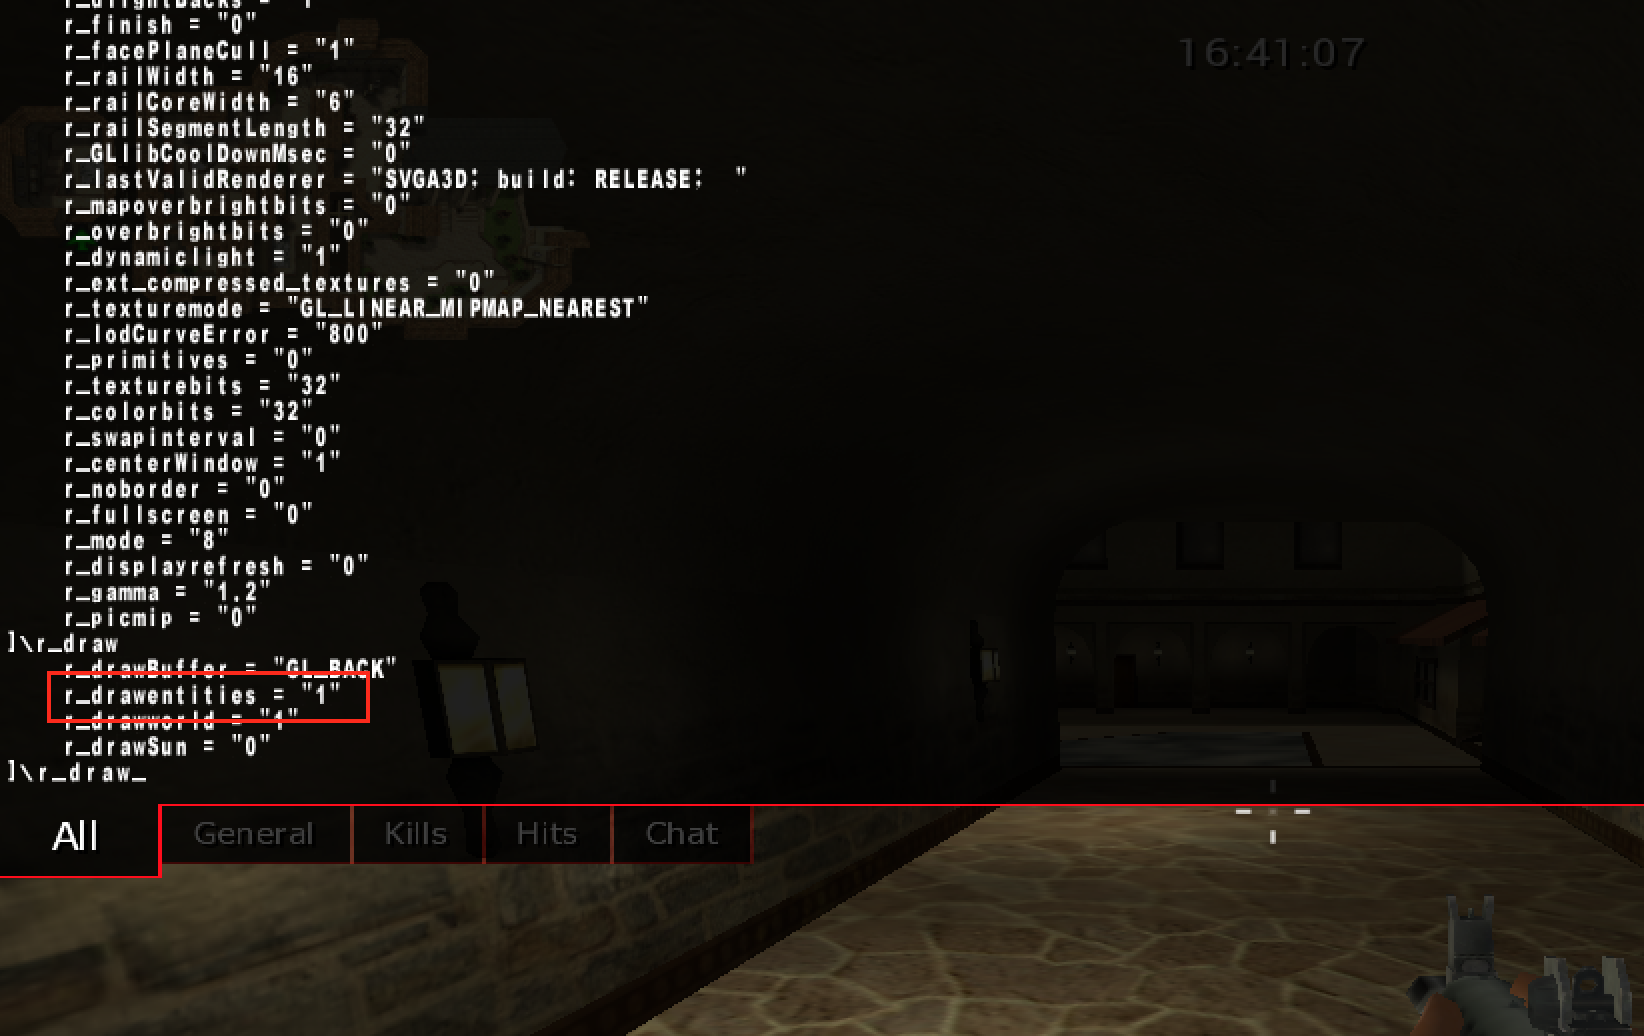
The most important command to us is r_drawentities. By setting this value to 0, entities are not drawn in the game, including our player:
We can assume that the game’s code looks something like:
if(r_drawentities == 1) {
  draw_entities();
}
To find this code, we will use Cheat Engine to find the address of the variable holding the r_drawentities value. We can switch the value of r_drawentities in the console from 0 to 1 to narrow this value down. Then, we can use a breakpoint on access in x64dbg to locate the code that accesses this value. The breakpoint should pop at the following code:
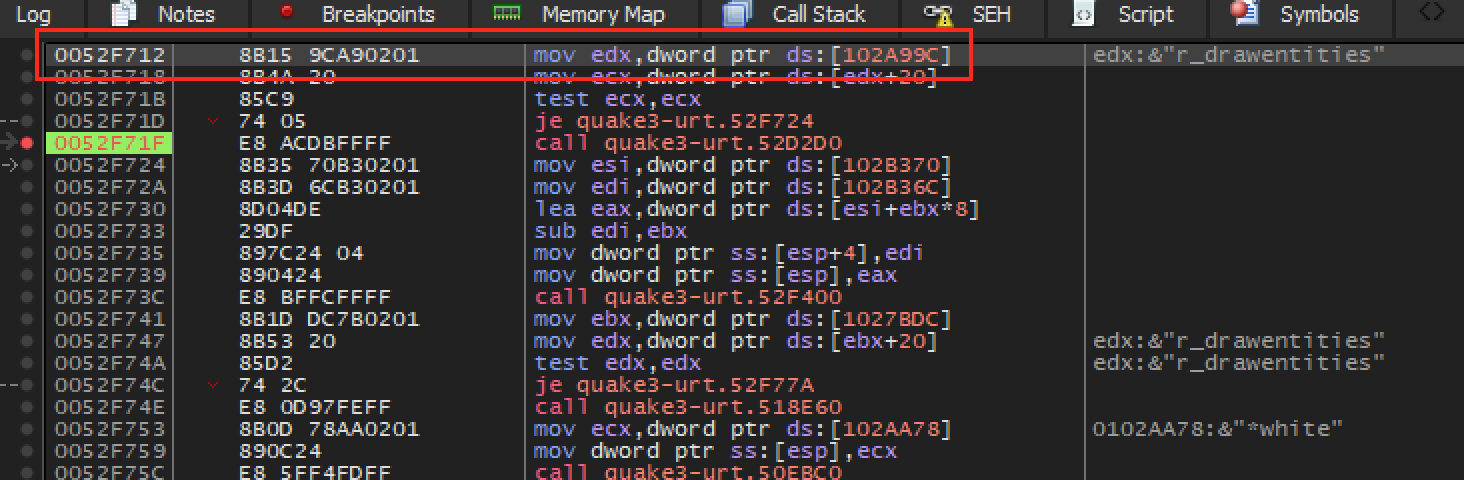
We can see that the value of r_drawentities is loaded
into ecx and then tested. Testing a register against
itself compares that register’s value to 0. If the value is equal to 0,
the game jumps over the call at 0x52F71F.
This call is most likely responsible for drawing entities in the game. We
can confirm this by nop’ing out this call. When it is
nop‘d, the game will not draw any entities.
Entities and Rendering
If we step inside the call at 0x52F71F, we
see the following code:
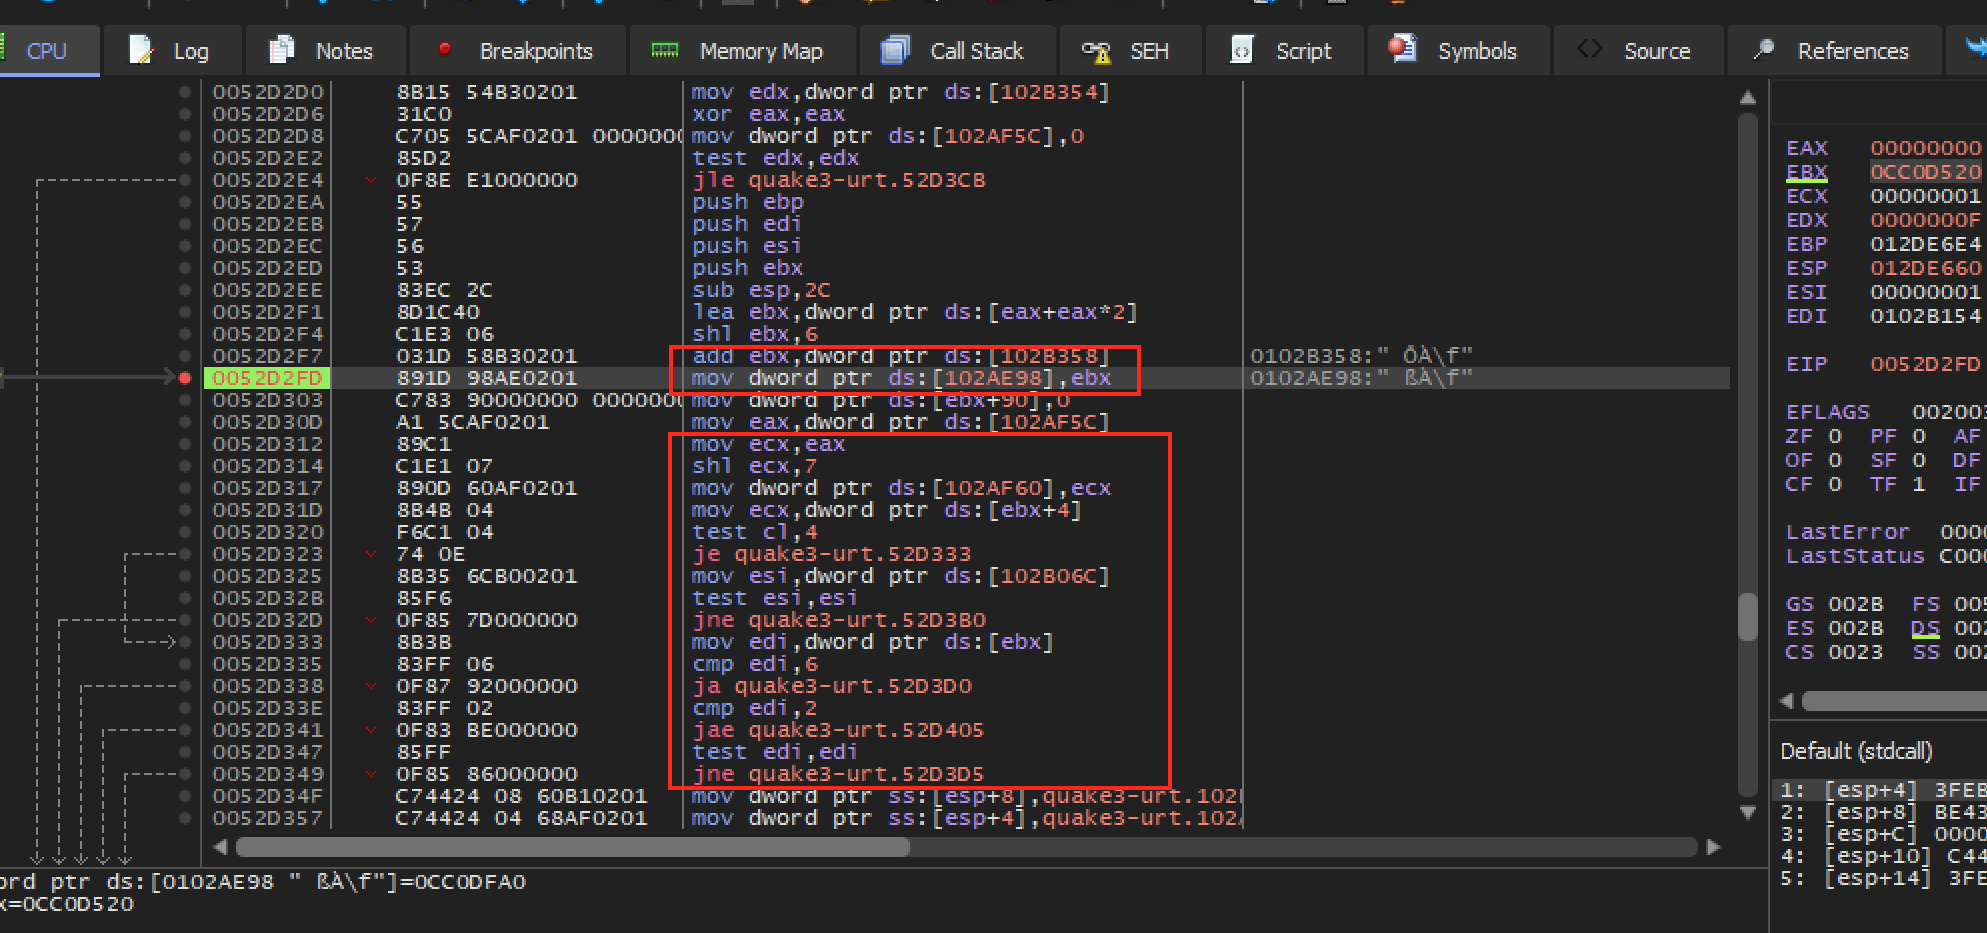
We can see in the second highlighted block that values are loaded into
several registers and compared to certain values. If these values are
equal, the game jumps to different locations and executes different
rendering code. If we look closely, we can see that the registers are
based on values of the address held in ebx. If we look up
at the first highlighted block, we find the closest location in which
ebx is set. We now know that at address
0x52D2FD, ebx contains what is most likely
the current entity to render. If we set a breakpoint at this address and
observe ebx’s address in the dump, we see a chunk of
data:
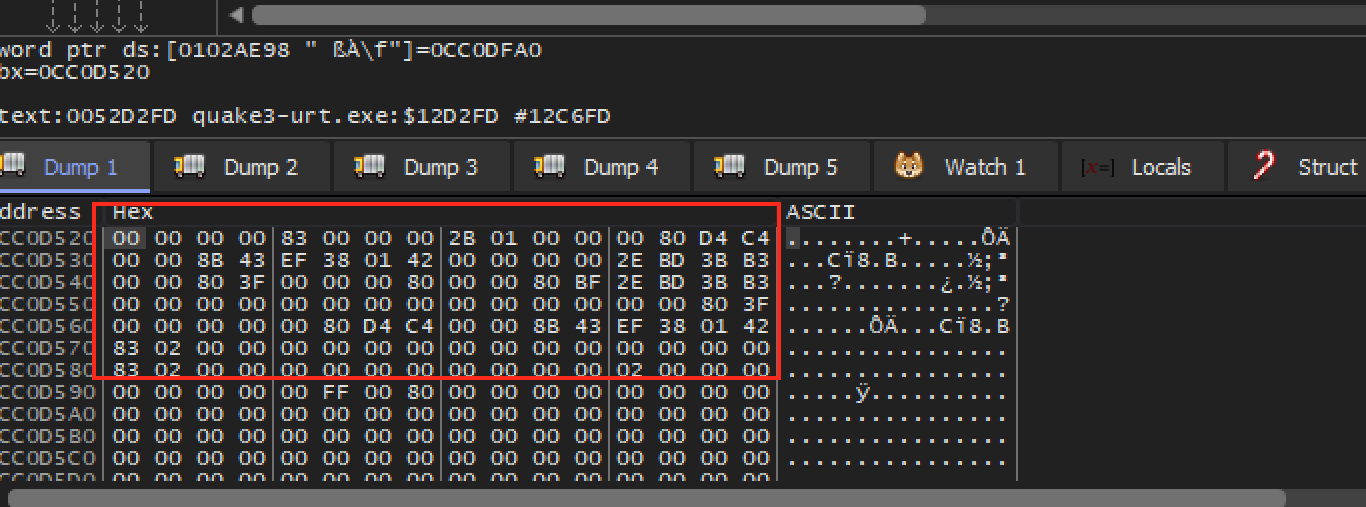
Since this chunk of data is isolated from other data and in one continuous section, we can assume that it represents a structure of some type. For example, it might look something like:
struct entity {
  int type;
  int render_type;
  float location[3];
  ...
}
To determine what location of the structure holds the render type, we must reverse this structure.
Reversing the Entity Structure
There are many ways to reverse an unknown structure in a game. One way is to build up a dataset of valid values and then make inferences based on these values. For example, if all the structures contain one member that constantly increases, we can assume that this member is being used as a counter of some type.
In this case, our goal is not to fully reverse the entity structure, but
to only reverse enough to find the render type variable. Since we have
located the code responsible for drawing entities, we can set a breakpoint
in that code and observe entity structures. Like we discussed in the last
section, at address 0x52D2FD, ebx holds the
address of the current entity to render.
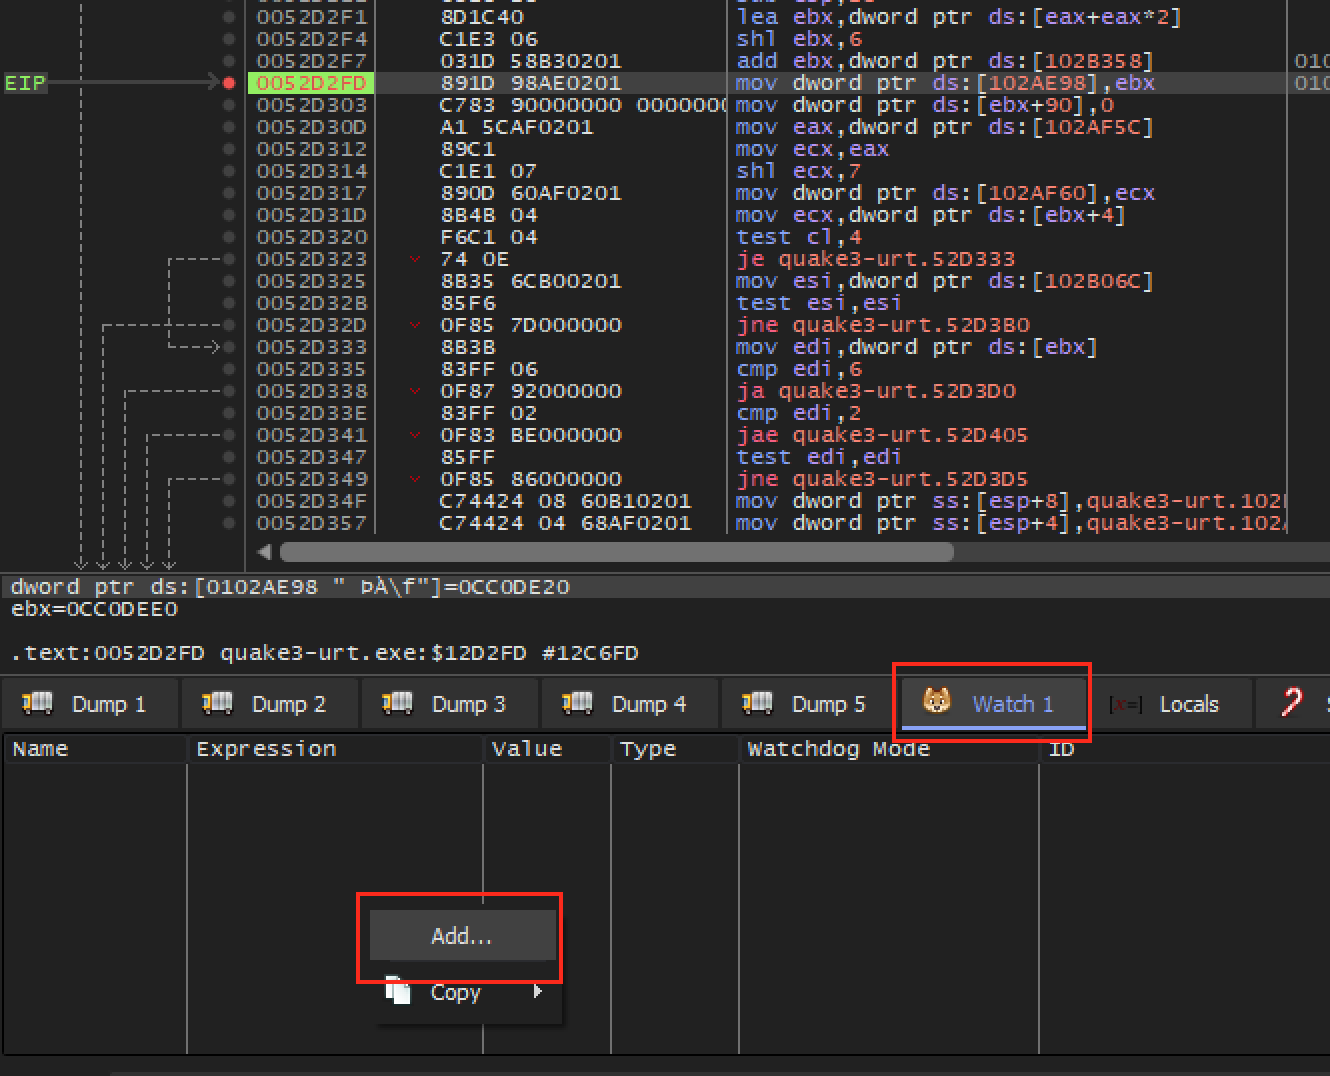
You will notice that each time our breakpoint is hit, ebx contains a different value. While we could manually follow ebx in the dump each time the breakpoint is hit, a more convenient way is to use the Watch feature of x64dbg. Adding an expression to the Watch panel allows us to observe it independently of the dump. In this case, we can watch the expression [ebx] and always view the current value of the address in ebx.
To add a value to watch, open up the Watch panel (near the dumps), right-click, and choose Add:
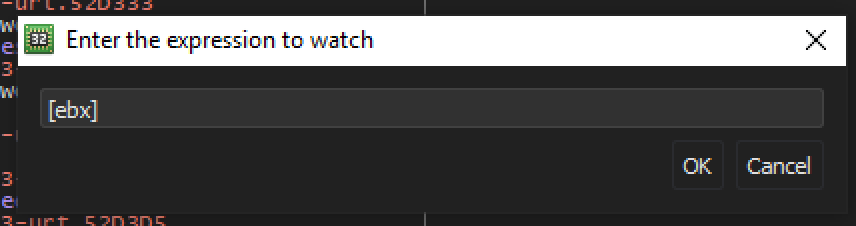
In the modal that appears, type your expression. In this case, we want to start with just [ebx]:
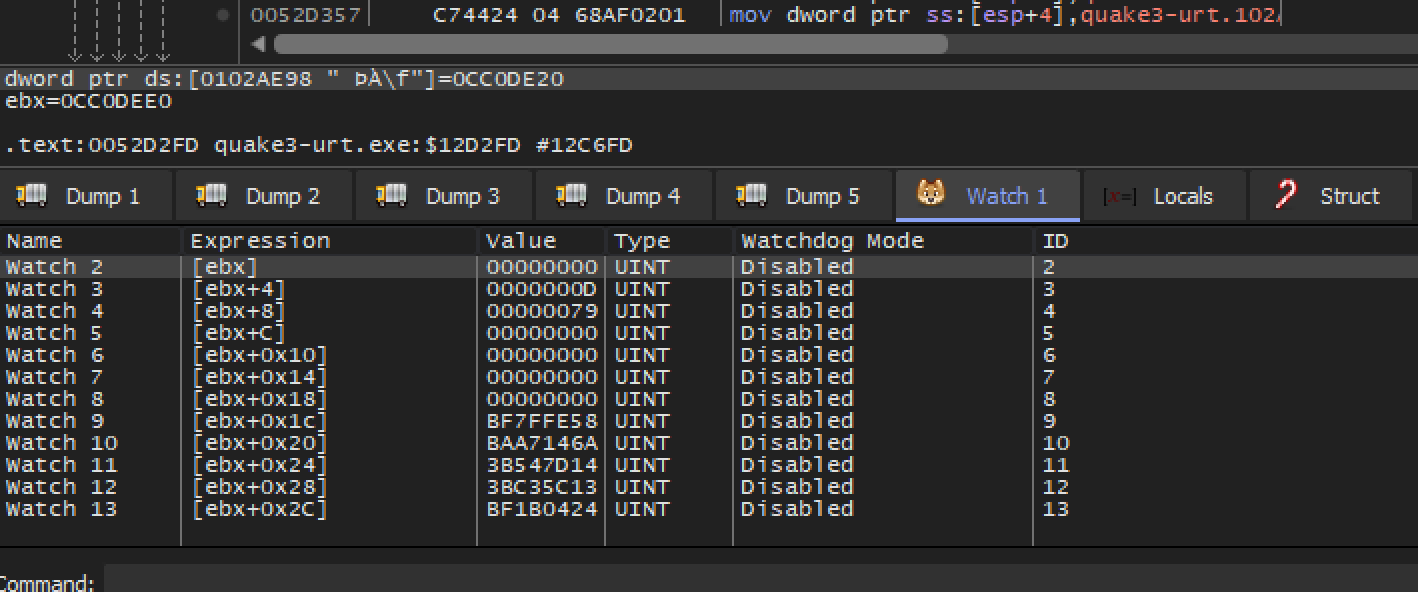
We want to also observe the first chunk of the entity structure. For now, we will assume that all these values are 4 bytes long. Add watches for [ebx+4] through [ebx+2C]. After you are finished, the Watch panel should look like:
With all of this set up, disable your breakpoint and load into a map with water. The map Abbey has a fountain near the top-left of the map. Make sure you are facing the water and can see the ground beneath it.
With all of this set up, re-enable your breakpoint at
0x52D2FD and it should pop instantly. After observing the
value of the watch panel, continue execution. After observing many
iterations, you should start to notice some trends.
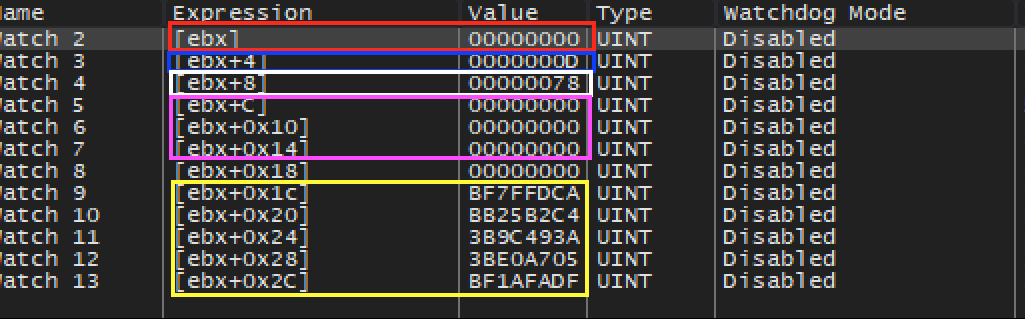
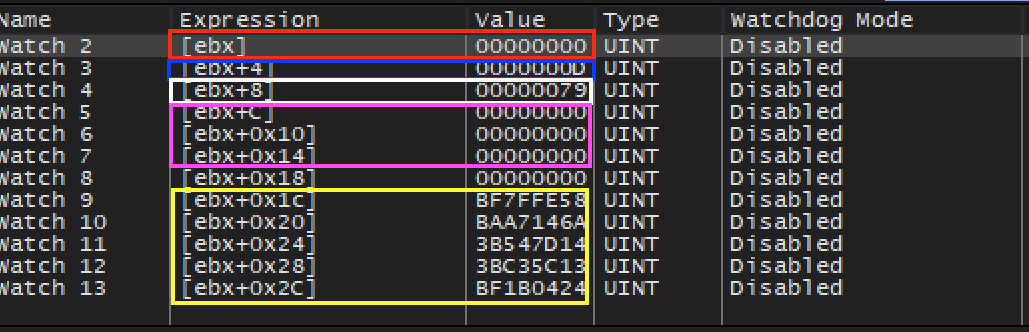
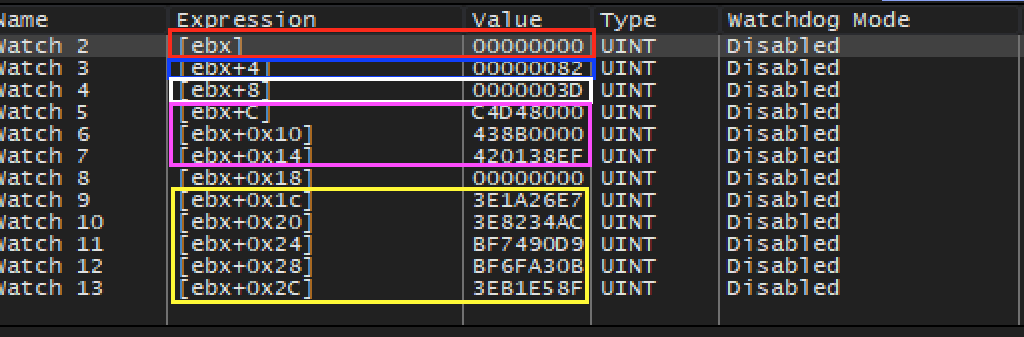
The value of [ebx] (red) always appears to be 0. The
value of [ebx+4] (blue) appears to alternate between
0xD, 0x40, 0x82, and
0x83. The value of [ebx+8] (white) appears
to increase consistently, from 0x79 to 0x80 to
0x81, and so on. The values highlighted in pink appear to
alternate between seemingly random values and 0. Likewise, the values
highlighted in yellow appear to be random, yet consistently tied to
[ebx+8].
All this data can be overwhelming, but we can make sense of it by eliminating values we do not care about. We know that we have at least three entities on the screen: our player model, our weapon, and the water. We can assume there are probably other entities, such as doors, as well. Since most of these entities share many similarities, we want to look for data that is relatively consistent between at least two entities. However, we also know that some of the entities should not share this value.
With this model, we can eliminate [ebx] (red), since it
is always 0. We can also eliminate [ebx+8] (white), since
it is unique for each entity. Both the values in pink and yellow appear
unique for each object. This leaves us with
[ebx+4] (blue), which alternates between
0xD, 0x40, 0x82, and
0x83. For now, we will guess that this is our rendering value
and investigate each value.
Modifying Rendering Value
If we set the value of [ebx+4] for each entity, it will
be overwritten the next time the draw entities function is called. It
appears that the entity is being loaded into ebx from
another location. Therefore, the easiest way for us to explore our assumed
rendering value is by hooking the location 0x52D2FD and
setting [ebx+4] for every entity. We could create this
code cave in x64dbg, but to make it easier for us to test multiple values,
we will create our hook in a DLL.
We will use the same hooking structure discussed in the
Code Caves & DLL’s lesson. Our hook will be at
0x52D2FD, since we know ebx will contain the
correct value at that point. Our hook itself will be relatively simple: we
will save the registers, set the value of [ebx+4],
restore the registers, and then execute the original
mov instruction:
DWORD ret_address = 0x0052D303;

__declspec(naked) void codecave() {
  __asm {
    pushad
    mov dword ptr ds:[ebx+4], ???
    popad
    mov dword ptr ds:[0x102AE98], ebx

    jmp ret_address
  }
}
For our first value, let’s start on the highest end and try
0x83:
mov dword ptr ds:[ebx+4], 0x83
Once the DLL is injected and you are back in the game, you will notice
that nothing appears to change. Likewise, if you try 0x40,
you might notice that some shadows seem different, but everything looks
pretty similar. Next, let’s try 0xD:
mov dword ptr ds:[ebx+4], 0xD
Immediately, you should notice that your character’s model now appears see-through in front of the camera:
This is a good sign that depth testing may have been disabled. Next, switch to third-person mode (cg_thirdperson) and add some bots. As you move around, you should notice that you can now see all bots through walls:

With this, we have successfully set the rendering value for all entities to disable depth testing. We can see that other entities, such as guns and stairs, appear through walls as well.
One improvement is to re-enable depth testing for our player model so that first-person mode is not corrupted. To do this, you will need to identify the player structure and your current player.
The full source code for this hack is available on github for comparison.