Target
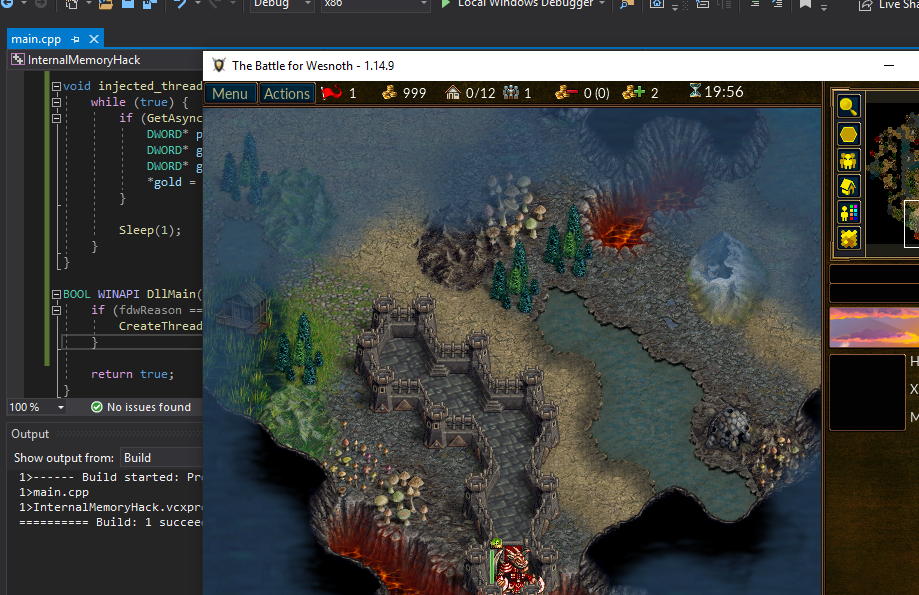
Our target in this lesson will be Wesnoth 1.14.9.
Identify
In this lesson, we will create a dynamic-link library (DLL) that will modify the player’s gold in Wesnoth. This DLL will modify the player’s gold every time the user presses a certain key.
Understand
In the previous lesson, we created an external C++ program that used ReadProcessMemory and WriteProcessMemory to modify the player’s gold. While these API’s are useful, they also have several limitations. Due to their definitions, they require us to cast parameters into a defined type. Their definitions make it easy to modify simple values like gold, but they make it difficult to read and write full classes or complex data types.
Since these API’s are executed from an external program, we would struggle to do things like listen to key presses from the game. In addition, if we wanted to create a code cave in the game, we would have to manually convert that code cave into its opcode representation. We would then need to find a memory location to place it at for WriteProcessMemory to work.
To bypass all of these limitations, we can instead inject a DLL into Wesnoth. Once injected, this DLL will be loaded into the game and can directly access the game’s memory through the use of pointers. We can also create threads that execute inside the game, allowing us to listen for user input and other events.
Creating DLL’s
First, create an empty project, this time named InternalMemoryHack. After the project is created, add a main.cpp file. The process to do these steps is identical to the previous lesson.
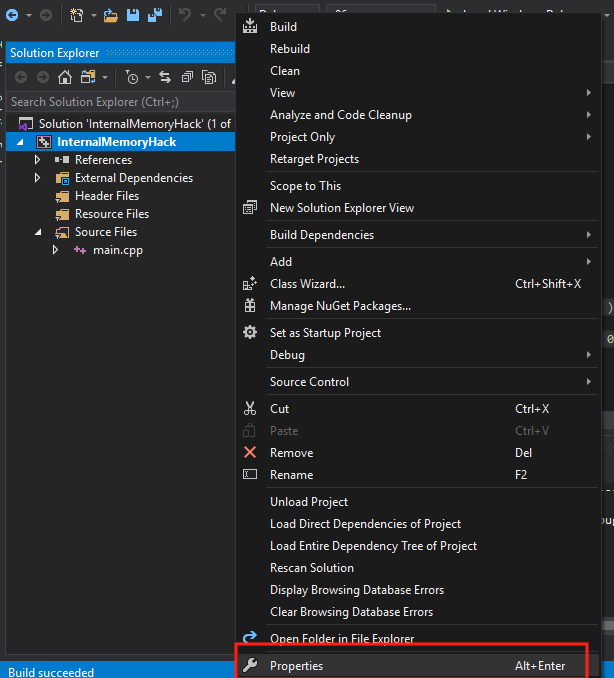
By default, empty projects in Visual Studios are set to build as executables. To build a DLL, we will need to change the project’s Configuration Type. This can be done in the project’s preferences. First, right-click on the project’s name and select the Properties menu item.
Next, under Configuration Properties, choose General. Then, change the Configuration Type from Application to Dynamic Library. Choose Apply and then hit OK to close the modal.
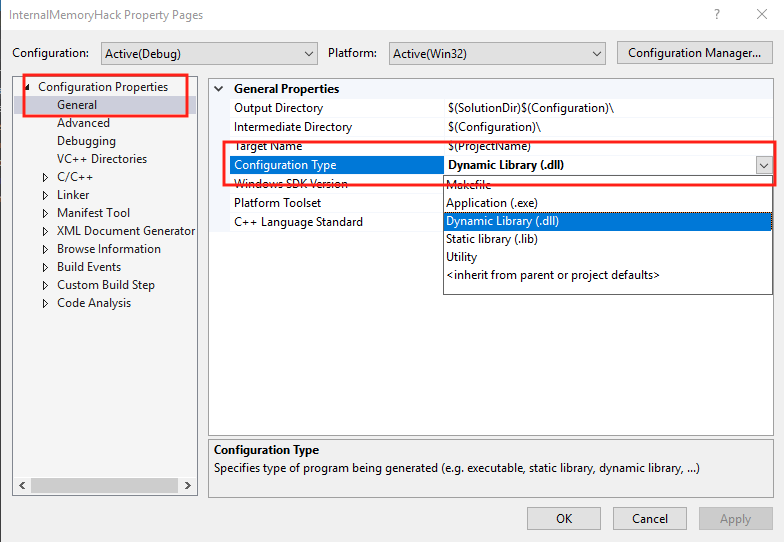
Our project will now be built as a DLL instead of an executable.
DLL Basics
DLL’s cannot be executed by themselves. Instead, they need to be loaded into an executable. DLL’s allow developers to create libraries of functions that can be loaded dynamically. These libraries can then be used across several executables and reduce the amount of code that developers need to write.
For example, user32.dll contains code that displays modals, alerts, and other Windows UI elements. Most executables released for Windows load this DLL automatically and gain access to this functionality without needing the original code. If Microsoft updates this code and changes how an alert box looks, all executables that load this library will benefit from this change.
DLL’s have several differences from normal executables. For our purposes, we need to know three of them:
- DLL’s have a DllMain function instead of a main function.
- This DllMain function is called when a process loads or unloads a DLL.
- DLL’s run inside their parent process. Variables declared in DLL’s are created in the parent’s memory.
The DllMain function has different parameters from a main function. Its definition is:
BOOL WINAPI DllMain(
    _In_ HINSTANCE hinstDLL,
    _In_ DWORD     fdwReason,
    _In_ LPVOID    lpvReserved
);
The fdwReason parameter contains the reason that the DllMain function was called. For example, when the DLL is loaded into a process, this parameter will hold the value of 1. This value is also defined by the constant DLL_PROCESS_ATTACH. To ensure that our code only executes once, we will check this parameter in our final hack.
Since DLL’s execute in another process’s memory, we will need to load them in some manner. In hacking, this is often known as injecting, as we are falsely loading our DLL into a process. It can often be hard to detect if a DLL has injected successfully. One approach is to attach a debugger to a process and observe all of the process’s loaded modules. However, this approach can be time-consuming and is not always feasible. Another approach is to create a DLL that will display an obvious indicator when it is injected. This is the approach we will use to test our DLL injection.
MessageBox
The Windows API has a function to display a message box in a process. The definition for this function is:
int MessageBox(
    HWND    hWnd,
    LPCTSTR lpText,
    LPCTSTR lpCaption,
    UINT    uType
);
However, due to how C++ handles parameter casting, we can ignore the types for these values. By calling the MessageBox function like below, we will display a blank message box with an Error title and no text.
MessageBox(0,0,0,0);
We can use this behavior to ensure that our DLL is injected successfully into Wesnoth. In main.cpp, add the following code:
#include <Windows.h>

BOOL WINAPI DllMain( HINSTANCE hinstDLL, DWORD fdwReason, LPVOID lpvReserved ) {
MessageBox(0,0,0,0);

return true;
}
This code will make our DLL display a message box inside the parent process whenever the DLL is loaded or unloaded. We will use this behavior to ensure that our DLL is being injected successfully. Build this code using the Build option to produce a DLL. This DLL will be placed in the location you specified when creating the project. By default on our lab machine, this will be C:\Users\IEUser\source\repos\InternalMemoryHack\Debug\InternalMemoryHack.dll.
Injecting DLL’s
DLL’s are normally loaded into a process through the use of the LoadLibrary API. However, since we are not modifying the original source code of the game, we will need to find another way to load our DLL into Wesnoth.
One approach we can use is a DLL injector. DLL injectors are external programs that create a thread inside the target process. This is done through the use of the API CreateRemoteThread. This thread then calls the LoadLibrary API inside the process. In the DLL Injector lesson, we will cover how to create a DLL injector.
For this lesson, we will use a feature of Windows that will inject user-defined DLL’s into every executable that is started. This feature is called AppInit_DLLs and can be controlled via the registry.
Since this feature is often used by malware, Windows 10 requires Secure Boot to be disabled for the feature to work. By default, VirtualBox does not support this feature and it will be disabled. If you are using actual hardware, you will need to disable it through the BIOS. Its current state can be determined through the System Information program:

Once Secure Boot is disabled, we need to modify the registry to enable AppInit_DLLs. This can be done by first opening up the regedit program. The Windows registry contains keys and values that change OS and individual program functionality. It is similar to the file system on Windows in that these keys and values are contained in paths. The path for the AppInit_DLL feature on 64-bit Windows computers is Computer\HKEY_LOCAL_MACHINE\SOFTWARE\WOW6432Node\Microsoft\Windows NT\CurrentVersion\Windows. Navigate to this location in regedit.
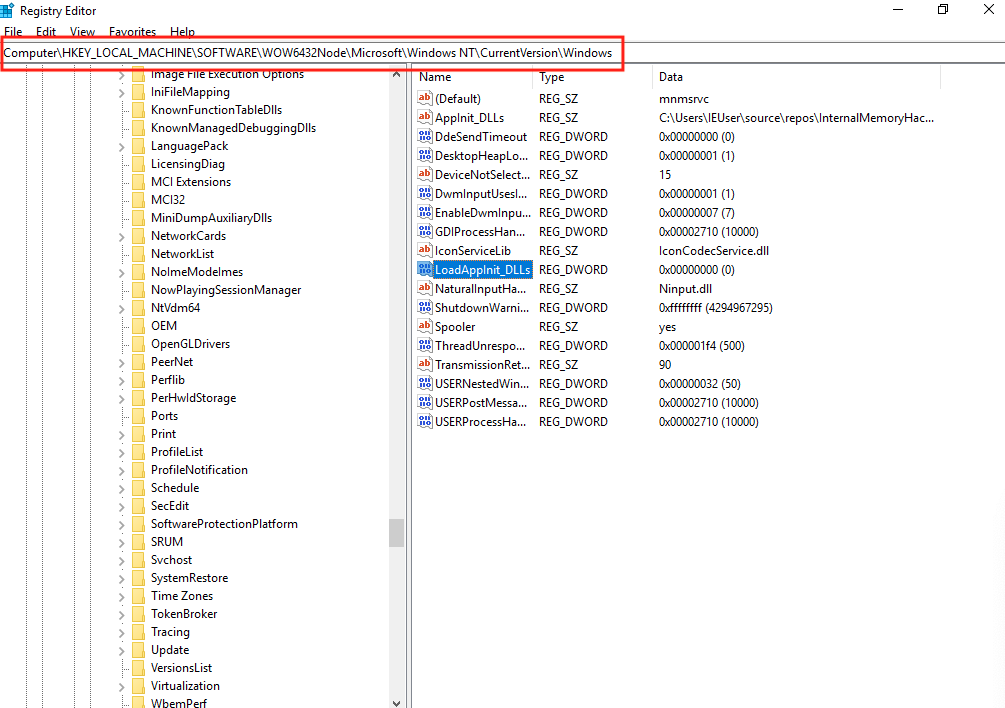
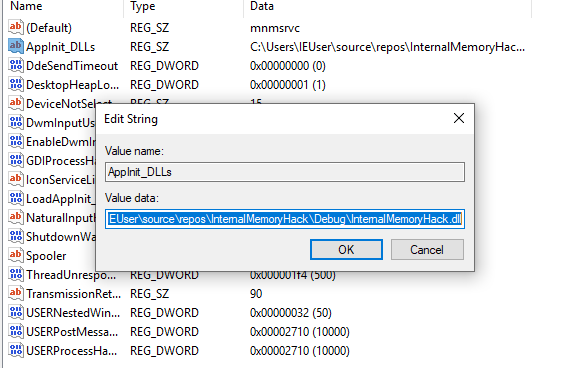
AppInit_DLLs will load any DLL’s specified in the AppInit_DLLs value into all started programs. Double-click on the AppInit_DLLs value and change the string to the location of our DLL:
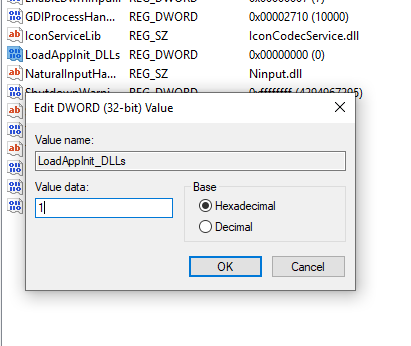
Next, we need to enable the feature by changing the value of LoadAppInit_DLLs. After making this change, our DLL will be loaded into every new process. When the value is set at 1, this feature will be enabled. When it is 0, this feature will be disabled.
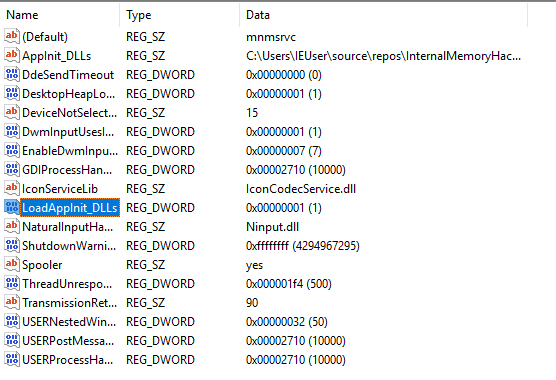
After these changes, the registry key should look like:
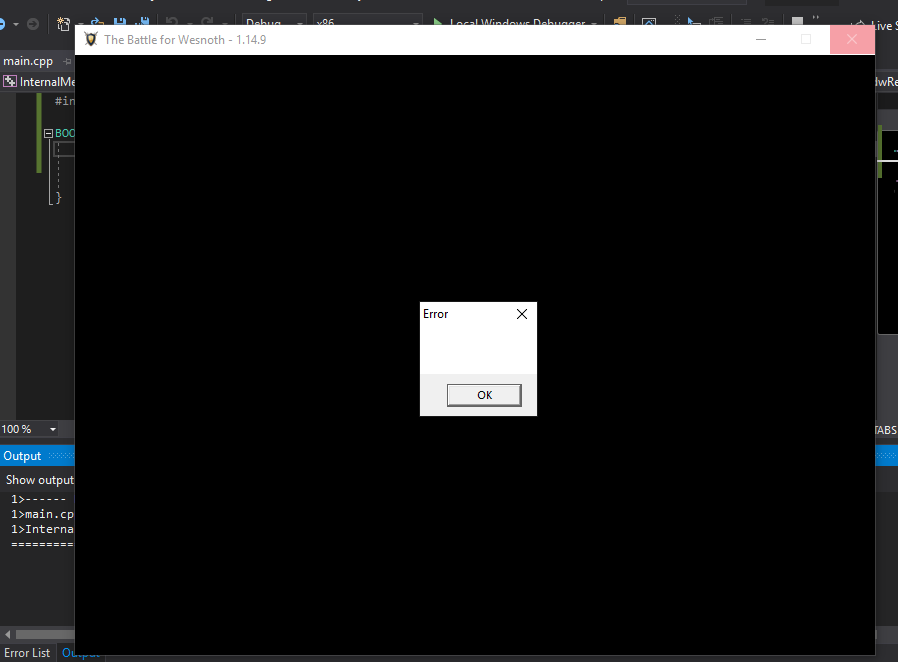
We can now start Wesnoth. Upon starting the game, several message boxes should appear, indicating that our DLL was injected successfully and is being both loaded and unloaded.
One important thing to remember is that AppInit_DLL will inject DLL’s into every started process. This includes the process spawned to build our DLL as we make changes. To avoid any issues, we will have to disable this feature when we build our DLL. Make sure, after testing the DLL, to set the value of LoadAppInit_DLLs to 0. After building our DLL, set this value back to 1 to re-enable DLL injection.
Creating Threads
Now that we have verified that DLL injection is working, we can start programming our hack. We want this DLL to wait for a user to press a key before changing the gold. To do this, we will create a thread in the Wesnoth process. This thread will run until the game is exited.
First, we will change our DllMain to only execute our code when our DLL is first loaded into the process. This will ensure that we only create one thread in the game. We can do this by checking the fdwReason parameter:
BOOL WINAPI DllMain( HINSTANCE hinstDLL, DWORD fdwReason, LPVOID lpvReserved ) {
    if (fdwReason == DLL_PROCESS_ATTACH) {
        // Code to execute when the process is loaded
    }

    return true;
}
To create threads in a process, we can use the CreateThread API. Its definition is:
HANDLE CreateThread(
    LPSECURITY_ATTRIBUTES   lpThreadAttributes,
    SIZE_T                  dwStackSize,
    LPTHREAD_START_ROUTINE  lpStartAddress,
    __drv_aliasesMem LPVOID lpParameter,
    DWORD                   dwCreationFlags,
    LPDWORD                 lpThreadId
);
Since we are creating a thread within Wesnoth with no special attributes, we can ignore most of these parameters. The only parameter we are concerned with is lpStartAddress, which represents the function we want to execute when the thread is started. Because this function does not need to return, we will create it as a void function.
void injected_thread() {

}

BOOL WINAPI DllMain( HINSTANCE hinstDLL, DWORD fdwReason, LPVOID lpvReserved ) {
    if (fdwReason == DLL_PROCESS_ATTACH) {
        CreateThread(NULL, 0, (LPTHREAD_START_ROUTINE)injected_thread, NULL, 0, NULL);
    }

    return true;
}
When loaded, this code will create a thread that will execute the injected_thread function and then exit. To ensure that our thread remains active, we will use an infinite while loop in our injected_thread function:
while (true) {

    Sleep(1);
}
while loops will execute until their condition is false. Since true can never equal false, this while loop will run until our thread is exited by the closure of the game. To prevent our thread from causing slowdowns, we can use the Sleep API to pause its execution for a millisecond.
Detecting Key Presses
To detect a keypress, we can use the GetAsyncKeyState API. This takes a single parameter, which is the key to check for. If the key is down, it will return true. Otherwise, it will return false. For this lesson, we will check for the user to press M:
while (true) {
    if (GetAsyncKeyState('M')) {
        // Change the player's gold
    }

    Sleep(1);
}
One important caveat about GetAsyncKeyState is that it will constantly return true if the key is held down. This will not affect us in this lesson, but if we want to toggle a value off and on in the future, we will need to account for this behavior.
Pointers
In the Programming Fundamentals lesson, we discussed pointers. Since our DLL is injected into Wesnoth, we can access memory in the game through the use of pointers. This allows us to bypass ReadProcessMemory and WriteProcessMemory. However, we will still use the same offsets and addresses that we used in the previous lesson.
First, we will get the player’s base address by reading the value at
0x017EED18:
DWORD* player_base = (DWORD*)0x017EED18;
This will declare player_base as a pointer to a
DWORD value. The location it will point at is our
player’s base address at 0x017EED18. We can then dereference
this pointer to “read” or retrieve this value. Using this, we can get our
game base address by adding an offset:
DWORD* game_base = (DWORD*)(*player_base + 0xA90);
Finally, we can dereference the game_base address and add an offset to retrieve our gold value. We can then dereference this gold value and set its value directly:
DWORD* gold = (DWORD*)(*game_base + 4);
*gold = 999;
After building the DLL and re-enabling LoadAppInit_DLLs, we can inject this hack into Wesnoth. Create a game and then hit the “M” key. After you move your camera, the gold value will be updated to our new value. The full code for comparison is available on github.