Target
Our target in this lesson will be Wesnoth 1.14.9.
Identify
In the previous lesson, we reversed the structure of a Wesnoth chat packet and identified the steps needed to reverse and create chat packets for the game. In this lesson, we will expand on this work to create a chat bot, a type of bot that will wait for and respond to certain commands.
Understand
In the previous lesson, we determined that the process to reverse a packet went like this:
- Retrieve the packet’s data.
- Split the data into two sections: size and compressed content.
- Decompress the second section.
We used that technique on a chat packet and retrieved structured data that looked like:
[message]
  message="a"
  room="lobby"
  sender="FFFAAAKKKEEE"
[/message]
Once we retrieved this data, we could make modifications and use a similar process to create a new packet:
- Compress the data section.
- Add the section’s length to the front of the data section.
- Send the packet with the new data.
Since we can write both of the above processes out as a series of concrete steps, we can create a program to automatically perform them for us. In the retrieval process, we can analyze the content of each retrieved packet and look for certain characters. If we identify these characters, we can act on them.
ZLib Installation
The data in the packets was compressed using gzip. While we could write our own functions to manage gzip’d data, there are external libraries that already provide functionality to compress and decompress gzip’d data in C++. External libraries generally contain two parts: header files to include in your code, and library files that contain the actual code. For this lesson, we will use a library called ZLib. Most of these libraries require additional installation steps to fully work, including ZLib.
To set up ZLib, first download the Complete package installer from their site under the zlib for Windows 9x/NT entry. Once installed, it should create a directory at C:\Program Files (x86)\GnuWin32.
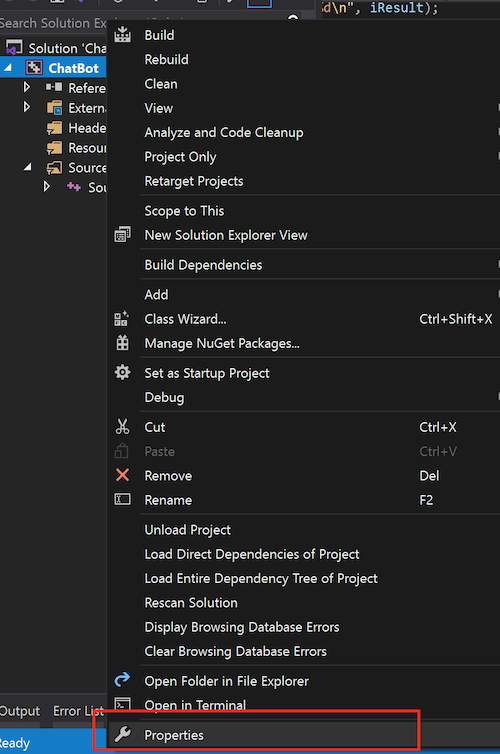
This installation placed several header and library files in this directory. To use these, we need to include them in our Visual Studio project. Open up Visual Studio and create a project. Once created, right-click on the project file and choose Properties:
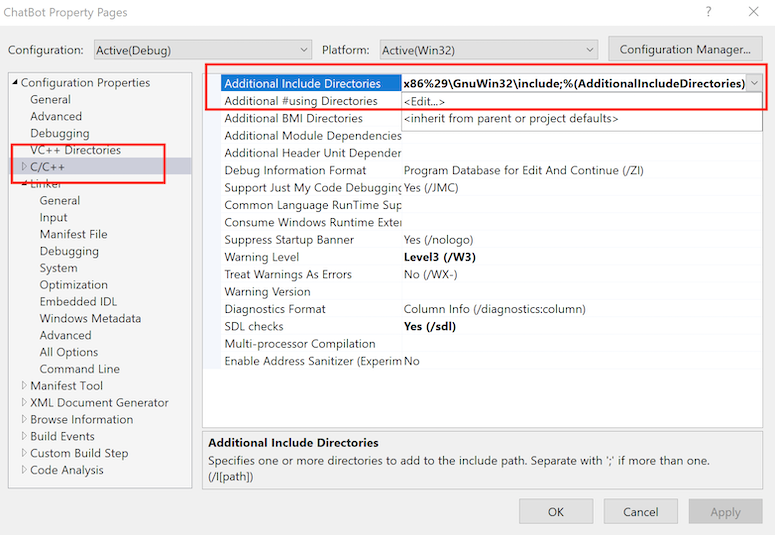
First, we will make sure that our project can find the ZLib include files. In the properties dialog, choose C/C++ -> Additional Include Directories -> Edit:
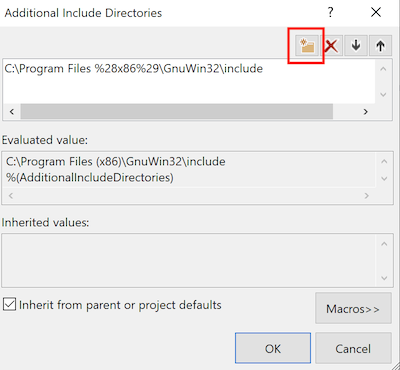
In the dialog box that appears, choose the New folder icon and browse to C:\Program Files (x86)\GnuWin32\include:
We can now include zlib.h inside our code, and the build process will be able to locate the file. However, as we have seen in previous labs, header files generally only contain function definitions and do not contain the majority of code. In ZLib, this code is stored in library files. We will include these library files in a similar manner.
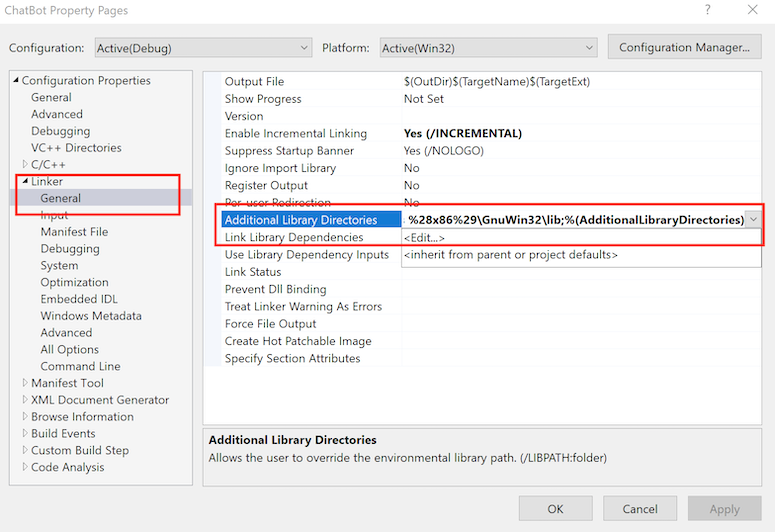
Select Linker -> General and then select Additional Library Directories -> Edit:
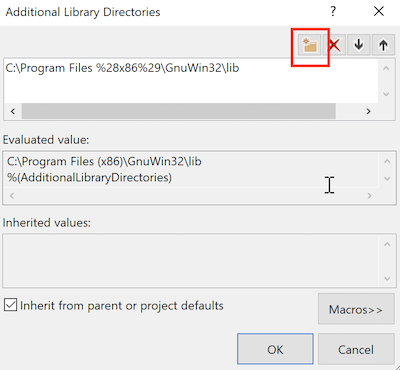
Like we just did, choose the New folder icon. This time, supply the path to the library folder at C:\Program Files (x86)\GnuWin32\lib:
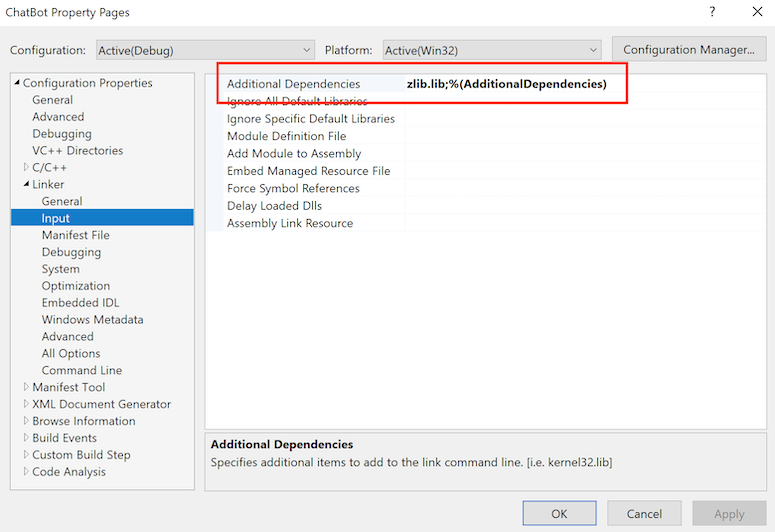
Now that we have loaded the library folder, we need to include the actual .lib file. In Linker -> Input, select Additional Dependencies and add zlib.lib in the dialog that appears:
With all this setup done, we can now include ZLib in our code like a regular header:
#include <zlib.h>
However, if we try to build this code, we will get the following build error:
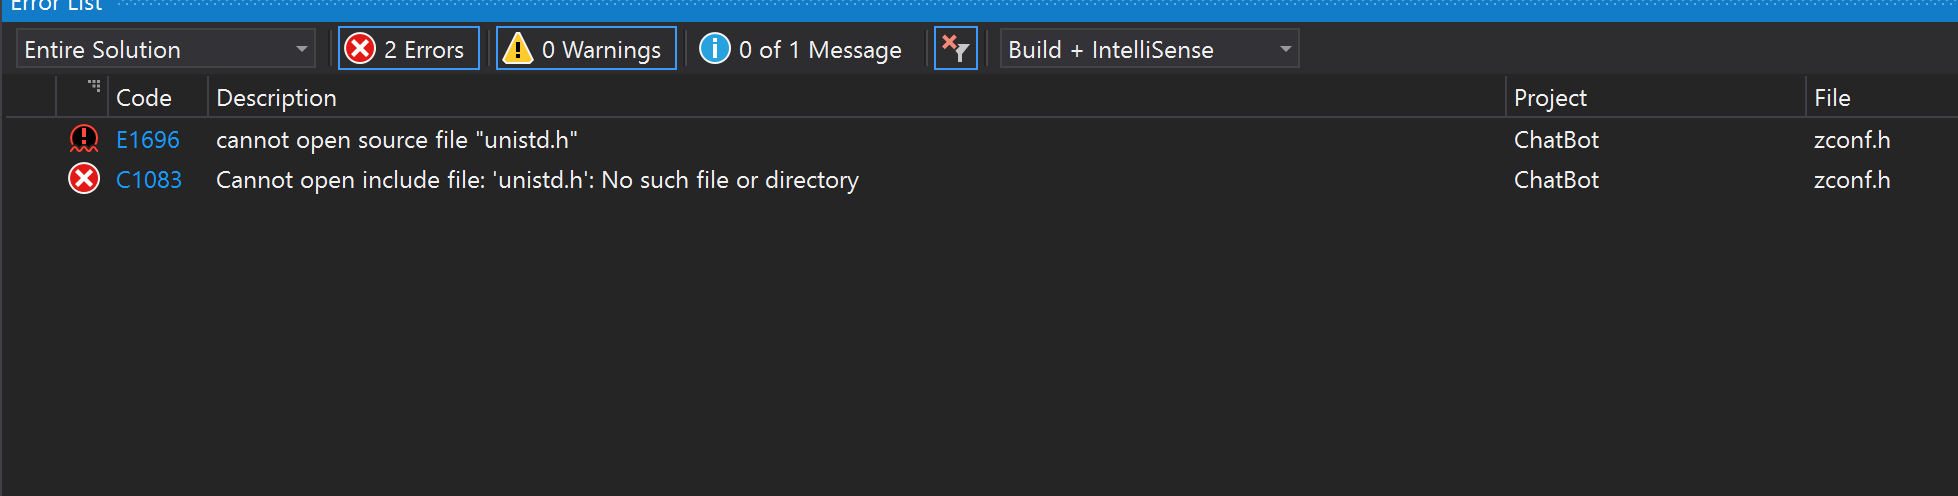
If we double-click on this error, we are directed to the following code block:
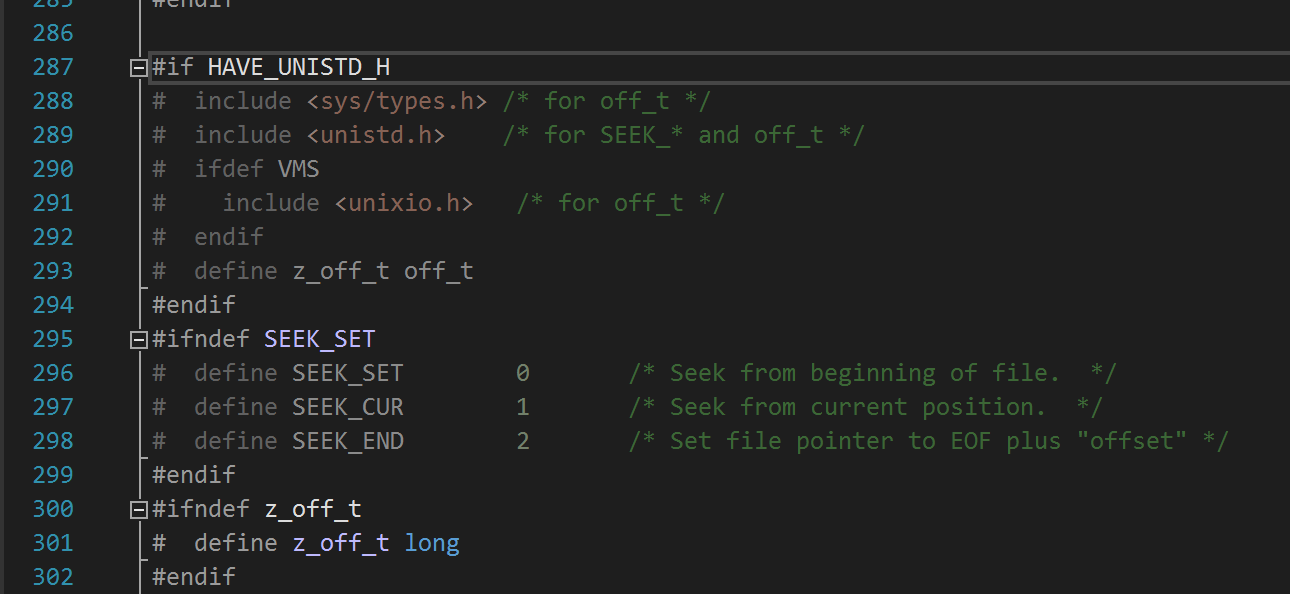
#if 1           /* HAVE_UNISTD_H -- this line is updated by ./configure */
#  include <sys/types.h> /* for off_t */
#  include <unistd.h>    /* for SEEK_* and off_t */
#  ifdef VMS
unistd.h is a Unix specific file. To fix this error, we can change the #if 1 to #if HAVE_UNISTD_H, like so:
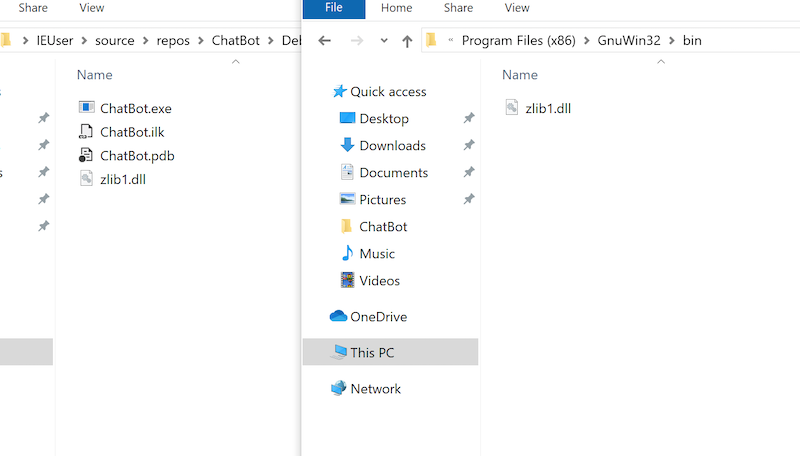
With these changes, our program will now build. However, if you run the program, you will encounter a missing DLL error. To fix this, copy over the zlib1.dll file to the running directory of your application:
We can now build and run programs that contain ZLib functionality.
Sending Data
Now that we can compress data in our code, we can create a function to send a Wesnoth-structured packet with whatever data we would like. To create the packet, this function will need our data and the length of this data. To send the packet, we will need a socket. With these requirements, we can create our function definition:
void send_data(const unsigned char *data, size_t len, SOCKET s) {
Based on the documentation, the easiest way to use ZLib to produce gzip’d data is to create a file with the compressed data. We can do this using the gzopen, gzwrite, and gzclose functions. These are similar to the regular file functions fopen, fwrite, and fclose. In our case, we will create a single compressed file, packet.gz, and write whatever data is passed into this file:
gzFile temp_data = gzopen("packet.gz", "wb");
gzwrite(temp_data, data, len);
gzclose(temp_data);
We can test our current implementation via:
const unsigned char version[] = "[test]hello[/test]";
send_data(version, sizeof(version), ConnectSocket);
Running this code will produce a packet.gz file in the same directory that you ran the program from. If you use gzip to decompress the packet.gz file, you will find that it contains [test]hello[/test], showing that our code works so far.
Our packet needs to contain the byte representation of this file. To retrieve this, we can read the file as a binary file:
#define DEFAULT_BUFLEN 512
...
FILE* temp_file = NULL;
fopen_s(&temp_file, "packet.gz", "rb");

if (temp_file) {
  size_t compress_len = 0;
  unsigned char buffer[DEFAULT_BUFLEN] = { 0 };
  compress_len = fread(buffer, 1, sizeof(buffer), temp_file);
  fclose(temp_file);
If you run this code and set a breakpoint after fclose, you will see that the buffer now contains the byte representation of the compressed file. We can use this to build our packet. We know that the first 4 bytes (a DWORD) of the packet represent the packet’s size. Since all of the chat packets are small, we only need to write the size to the last byte of this DWORD. Since buffers start at 0 in C, we reference this position with +3. We will write the buffer containing the compressed data after that:
unsigned char buff_packet[DEFAULT_BUFLEN] = { 0 };
memcpy(buff_packet + 3, &compress_len, sizeof(compress_len));
memcpy(buff_packet + 4, buffer, compress_len);
Next, we will use the code we have seen before to send a packet containing this data:
int iResult = send(s, (const char*)buff_packet, compress_len + 4, 0);
printf("Bytes Sent: %ld\n", iResult);
To verify that this method works, we will build off the code we wrote in the previous lesson. In this code, we sent three packets to connect to the server: an initial negotiation packet that contained 0’s, a packet containing our client’s version, and a packet containing our username.
We can use the same technique that we used to decode chat messages to decode these packets. For example, the packet containing our version looks like this after decoding:
[version]
  version="1.14.9"
[/version]
Instead of sending the packet’s bytes like we were doing, we can use our new function:
const unsigned char version[] = "[version]\nversion=\"1.14.9\"\n[/version]";
send_data(version, sizeof(version), ConnectSocket);
If you build and run this code, you will see that our bot will connect in the same way, verifying that our function works. We can build on this approach to send a custom username:
const unsigned char name[] = "[login]\nusername=\"ChatBot\"\n[/login]";
send_data(name, sizeof(name), ConnectSocket);
Finally, we can use the same method to send an initial chat message when we connect:
const unsigned char first_message[] = "[message]\nmessage=\"ChatBot connected\"\nroom=\"lobby\"\nsender=\"ChatBot\"\n[/message]";
send_data(first_message, sizeof(first_message), ConnectSocket);
This is the same chat message structure that we observed in the previous lab.
Retrieving Data
We can now send chat messages. For our chatbot to work, we also need to retrieve messages from the server and parse them for certain text. For this lesson, we will have our bot respond to any message that contains \wave with a chat message that says hello back.
At the bottom of the code from Microsoft is a loop that continuously checks for new packets. We can modify this to send retrieved packets to our own function, and, depending on the contents, send a chat message:
do {
  iResult = recv(ConnectSocket, (char*)recvbuf, recvbuflen, 0);
  if (iResult > 0)
    printf("Bytes received: %d\n", iResult);
  else if (iResult == 0)
    printf("Connection closed\n");
  else
    printf("recv failed with error: %d\n", WSAGetLastError());

  if (parse_data(recvbuf, iResult)) {
    const unsigned char message[] = "[message]\nmessage=\"Hello!\"\nroom=\"lobby\"\nsender=\"ChatBot\"\n[/message]";
    send_data(message, sizeof(message), ConnectSocket);
  }
} while (iResult > 0);
Our parse_data function will take a data buffer and its length, and return true if \wave is found.
bool parse_data(unsigned char *buff, int buff_len) {
Like we described above, this function will do the same steps as the send_data function, but in the opposite order. First, we will extract the compressed data from the packet and write it to a file:
unsigned char data[DEFAULT_BUFLEN] = { 0 };
memcpy(data, buff + 4, buff_len - 4);

FILE* temp_file = NULL;
fopen_s(&temp_file, "packet_recv.gz", "wb");

if (temp_file) {
  fwrite(data, 1, sizeof(data), temp_file);
  fclose(temp_file);
}
With the compressed data saved, we can use the gzopen and gzread to read the decompressed data into a variable. We will then write this variable to the terminal using fwrite:
gzFile temp_data_in = gzopen("packet_recv.gz", "rb");
unsigned char decompressed_data[DEFAULT_BUFLEN] = { 0 };
gzread(temp_data_in, decompressed_data, DEFAULT_BUFLEN);
fwrite(decompressed_data, 1, DEFAULT_BUFLEN, stdout);
gzclose(temp_data_in);
Finally, we will check if the data contains the text \wave using strstr. This function returns a positive value if the second parameter is included in the first parameter. It returns 0 if not. Because of this, we can return the value of the search and use that to signify to our calling code that the text was found:
return strstr((const char*)decompressed_data, (const char*)"\\wave");
The full source code for this lesson is available on github for comparison.