Note: The pointers provided in this lesson will likely be incorrect. The code will likely have to be updated to use the pointers and offsets you identify.
Target
Our target in this lesson will be Flare 1.12, an ARPG that shares many characteristics with games like Diablo. Like our other targets so far, this game is free, open source, and not protected by any anti-cheat.
Identify
To acquire gold and experience in Flare and other APRGs, players need to repeatedly kill enemies. Our goal in this lesson is to write a bot that will automatically locate enemies on the screen and send our player to attack them. While we will only kill enemies in this lesson, this same approach can be expanded on to gather any dropped items.
Understand
To write a farming bot, we first need to locate three items in memory:
- Our player’s position
- An enemy’s position
- Our mouse or cursor position
Once we have located these items, we can determine the direction from our player to the enemy. In games like Flare and Diablo, you move by clicking on a spot. Therefore, we can set our cursor position to the direction facing the enemy and send a click event. We will place this logic in some sort of loop to continually adjust direction as the enemy and player move.
Locating Player Position
We will begin by finding our player’s X and Y position. First, start Flare and create a new character. The first area in the game has no enemies and is perfect for finding our position. While we do not know the exact value of the player’s position, we can assume that the position is most likely stored as a float value. As such, we will scan for an Unknown value type with the Value Type set to Float.
After the first scan, move your character down on the map and change the scan type to Increased value and filter the results. Then, move your character up on the map and change the scan type to Decreased value. Repeat this process until you have approximately 150 results left.
At this point, all of our results will contain the same value and we will be unable to filter our result set further. However, we know that only one of these addresses must store the true value of the player’s position. We will have to identify this address manually. To quickly do this, bring all the results down to the bottom pane. Then, select roughly half of the addresses and set their value to another value:
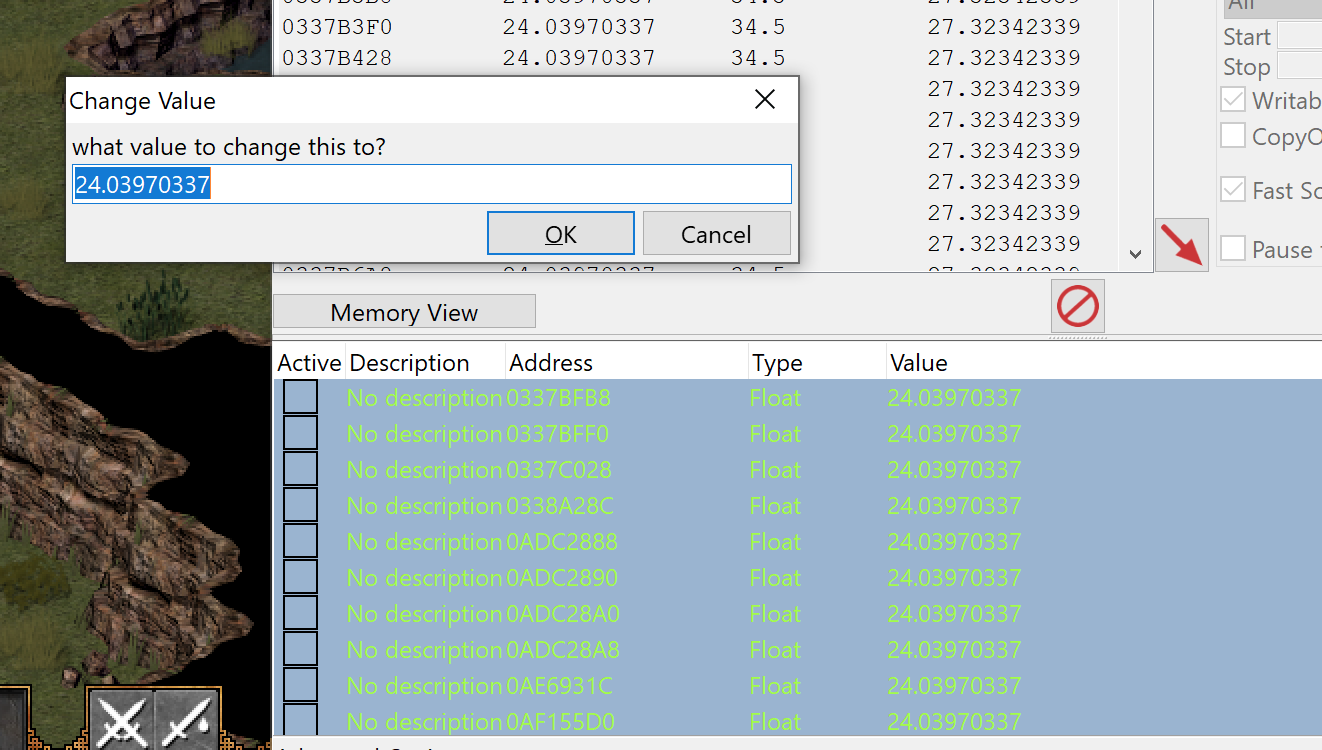
If your character in game suddenly teleports to a different position, you
know that the true address is somewhere in the selected addresses. If not,
you know that none of these addresses hold the player’s position and can
be deleted. Using this process, you can quickly trim down the list of
addresses and find the one responsible for the player’s position. In this
lab, the address identified was 0x0AE6931C. Due to DMA, your address will most likely be different.
With the address identified, we can use Cheat Engine’s Find out what writes to this address option, which will attach a debugger to the process to determine what code is altering the memory:
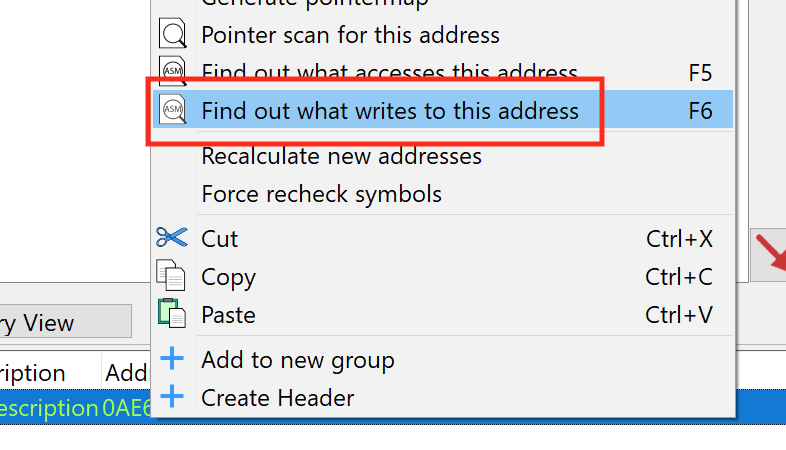
With this set, go back into Flare and move your character around the screen. You should see that a single location is writing to the address. Like in the Macro Bot lesson, your address will most likely be different due to code being dynamically loaded in this game.
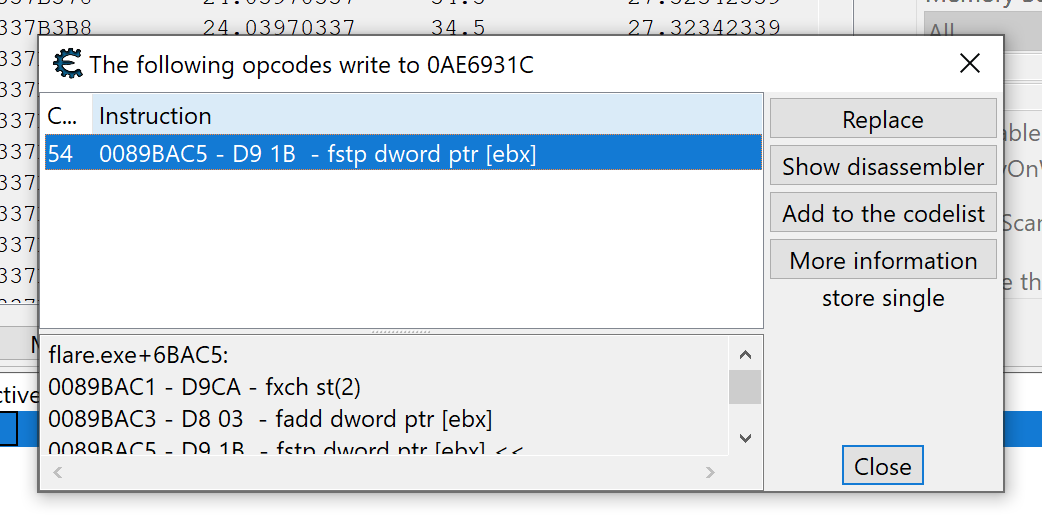
Close Cheat Engine and start x64dbg. After attaching it to Flare, view the code at the location you identified in Cheat Engine.
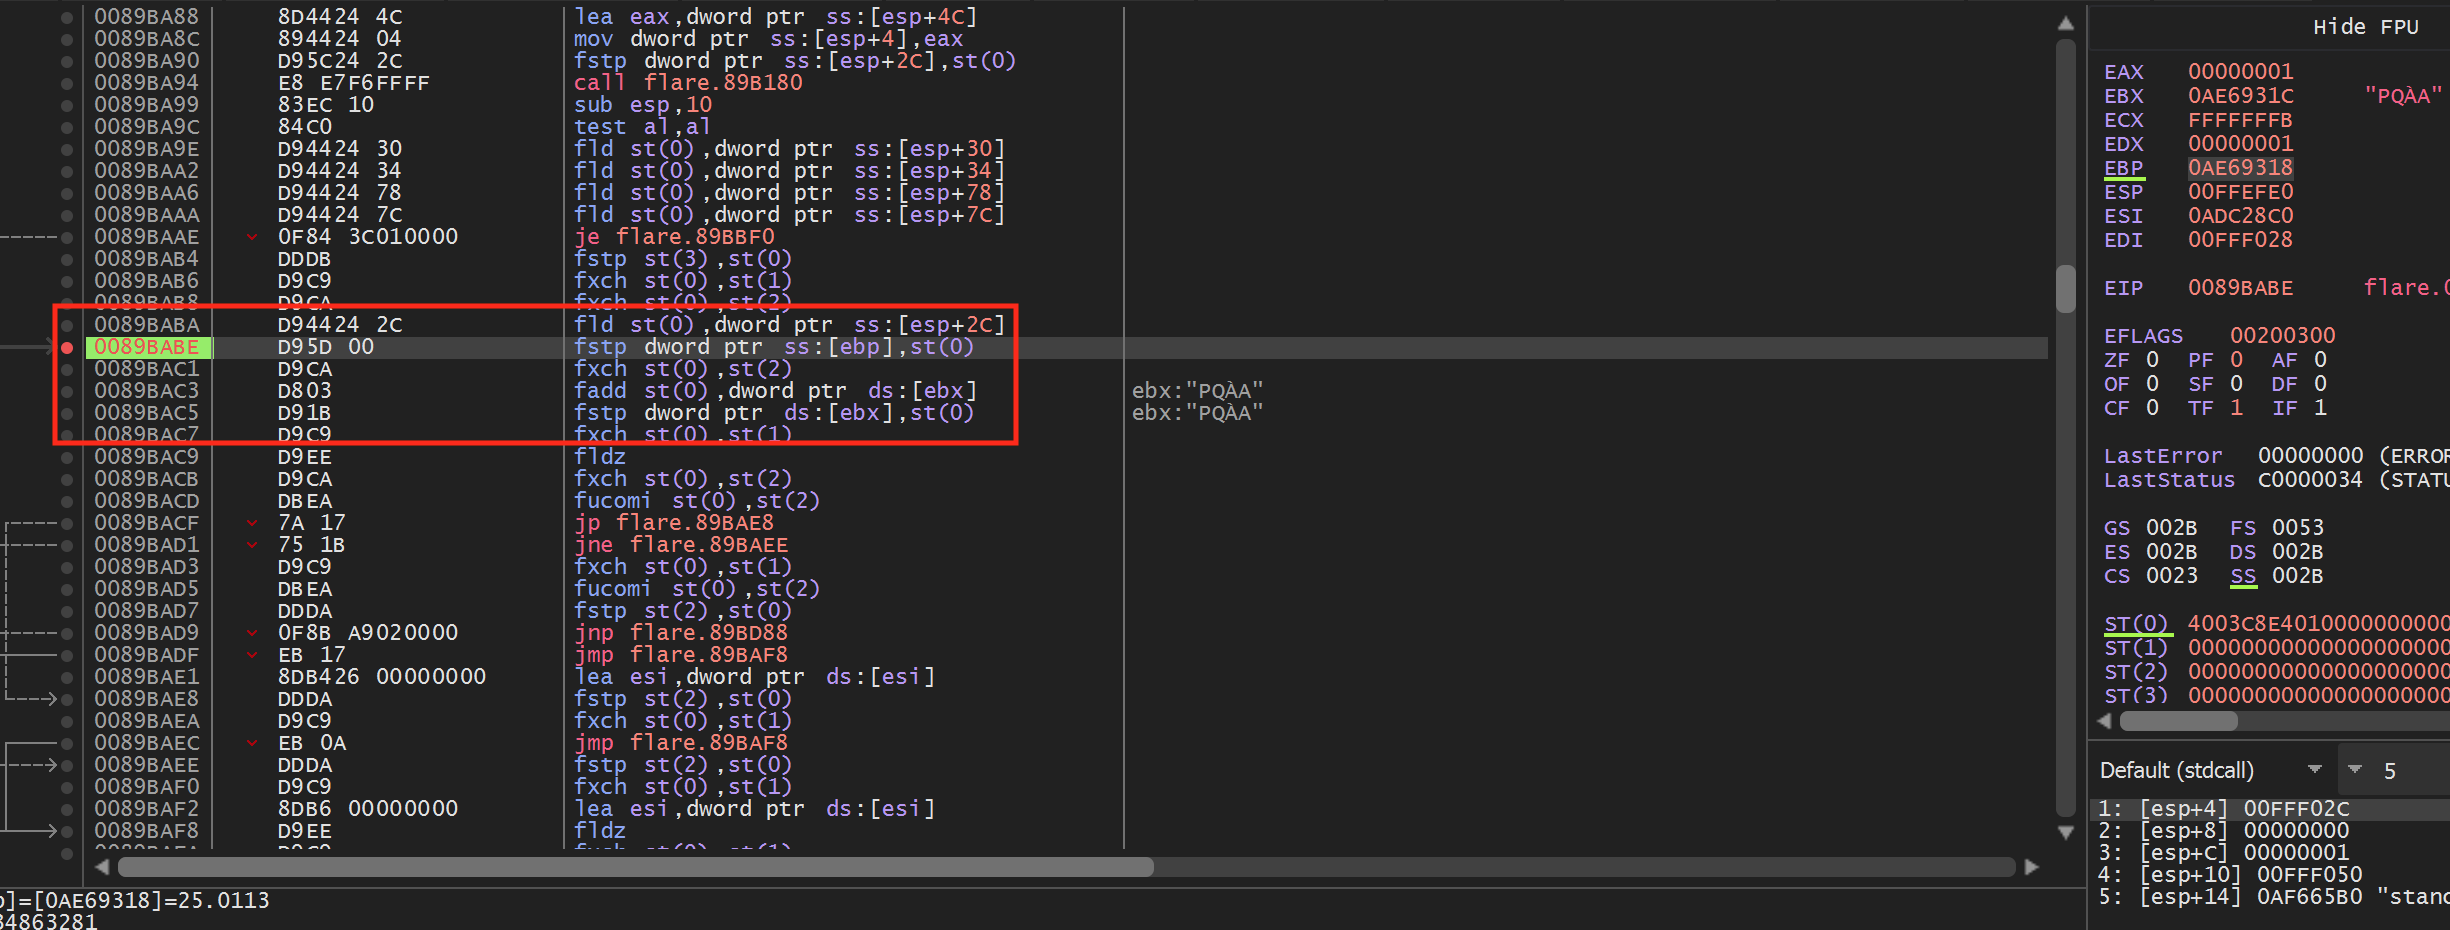
When assembled, floating point numbers are treated uniquely and have several instructions associated with them. For this lesson, we will only need to understand the fstp instruction. This instruction operates like a mov instruction and copies the value in st0 to the other address specified (like dword ptr ds:[ebx]). st0 is a special float-point register. We will examine floating point operations more in the No Recoil lesson.
From the highlighted code above, we can see that floating point values are placed in ebp and ebx. If we set a breakpoint on the fstp dword ptr ss:[ebp],st(0) instruction and then move our character, our breakpoint will pop. After popping, right-click on ebx and choose Follow in dump. You will see values similar to the following in the Dump section:
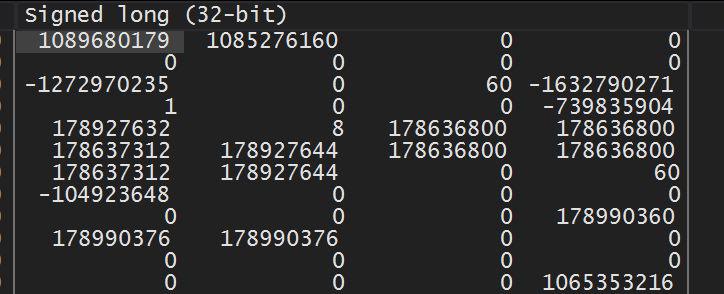
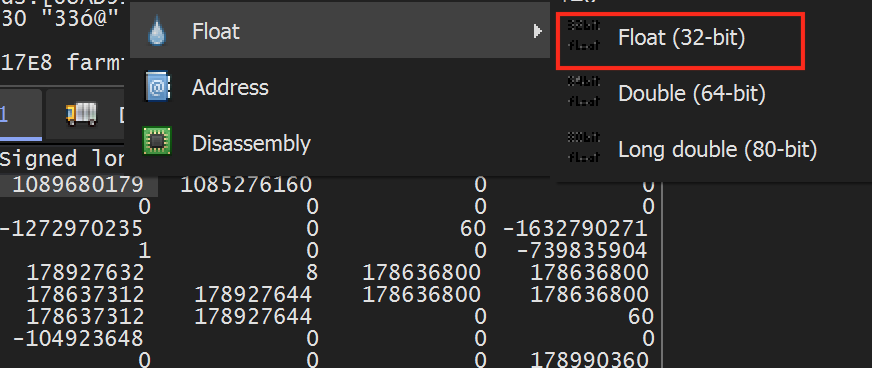
These values represent the DWORD representation of the float values. We can view the floating point value by right-clicking on the value and choosing Float -> Float (32-bit):
Doing so will reveal the values we have seen before in Cheat Engine:
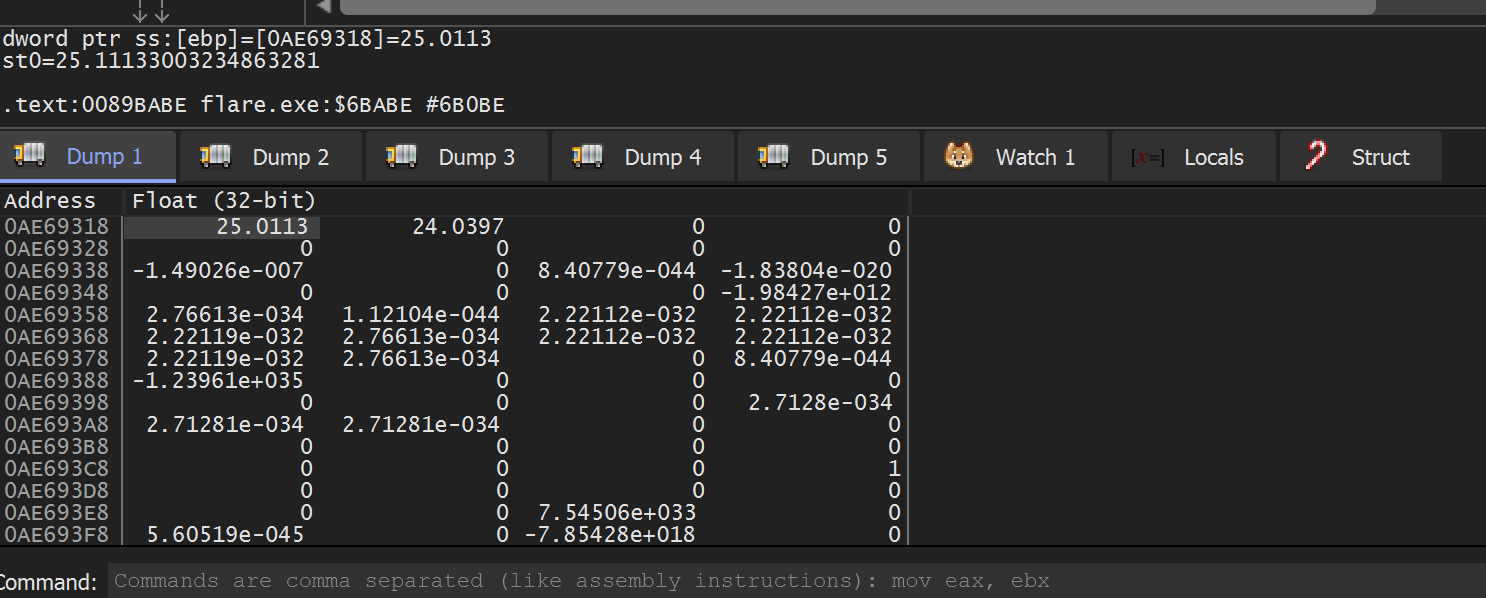
From this, we can assume that at this point in execution, ebp and ebx hold the X and Y position of the player.
Flare Coordinates
If you move directly up and down in Flare, you will notice that both the X and Y position values change. Likewise, if you move left and right, both of the values change as well. We would expect only one of the values to change in both of these cases. As such, we need to briefly examine the coordinate system in the game.
Flare, like many ARPGs, is rendered in an isometric perspective. For our purposes, this effectively means that the X and Y axes are rotated 45 degrees, like so:
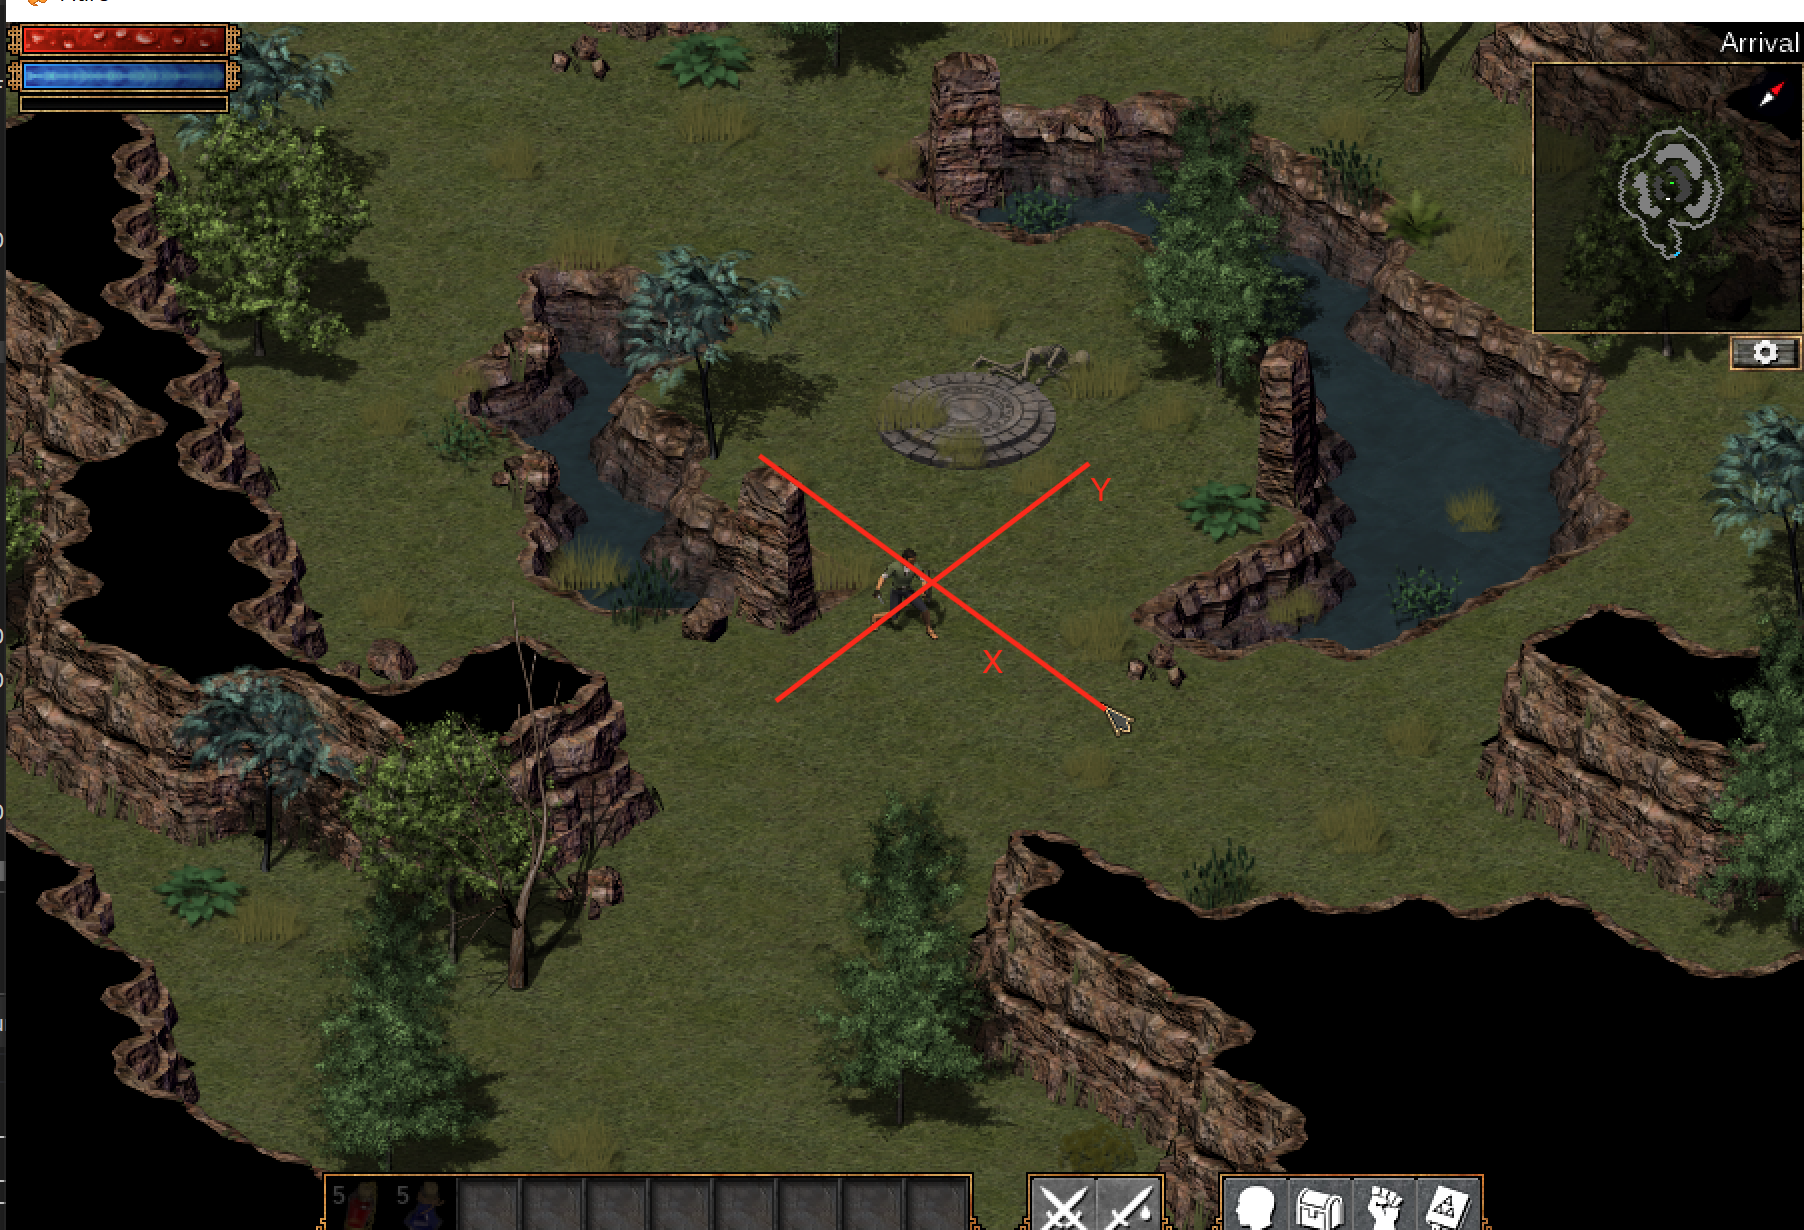
If you move your character along these axes, you will notice only one value changes.
Locating Enemy Position
The code we identified in the previous section appeared lower-level, due to the amount of floating point operations and the lack of branching or call instructions. If we consider the function chain in Flare, it may look like:
game_loop()
  handle_input()
    update_character()
      update_position()
Our identified code is most likely located in the update_position() method. Often games will reuse lower-level code like update_position() for multiple entities. For example, the function chain for updating enemies make look like:
game_loop()
  handle_input()
    update_enemies()
      update_position()
If Flare is using this model, we can use the code we located when searching for our player to also locate our enemies. This will not be the case with every game, but it is worth trying to make reversing easier.
First, set a breakpoint again on the fstp instruction we identified previously. In Flare, move your character around the screen to make the breakpoint pop. When it does, execute until return and step over to go up a single level of code:
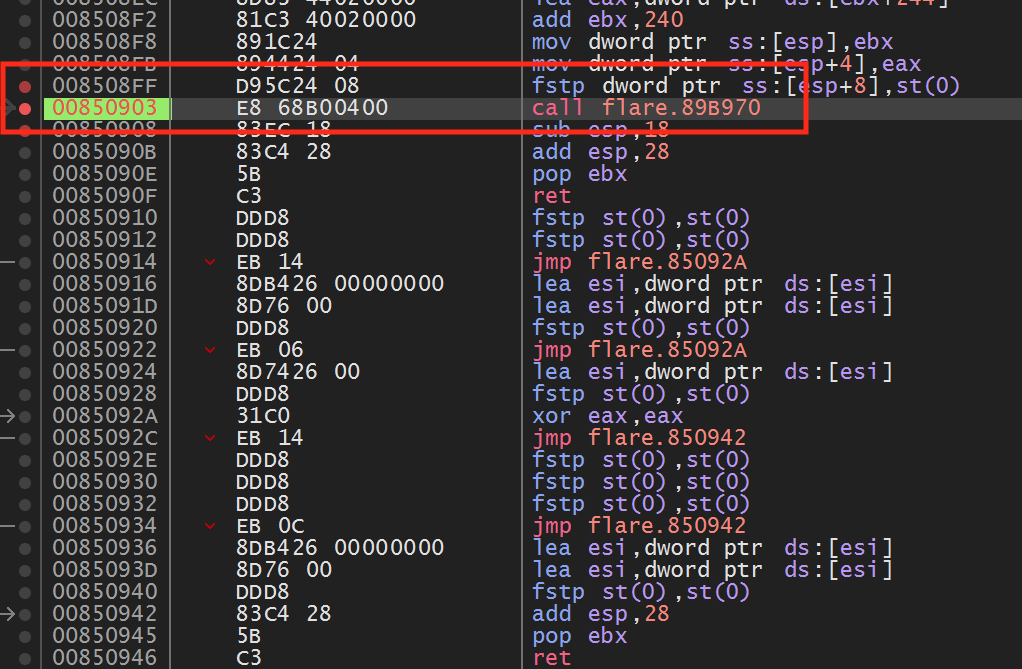
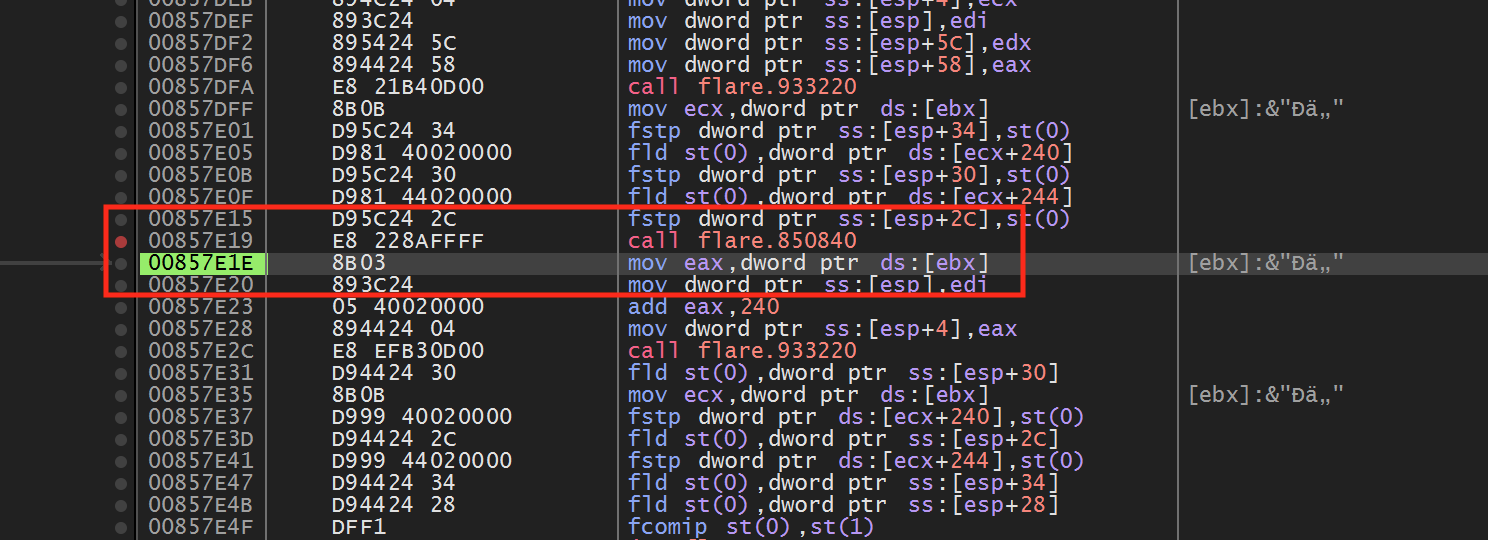
If we look above the call, we see the following code:
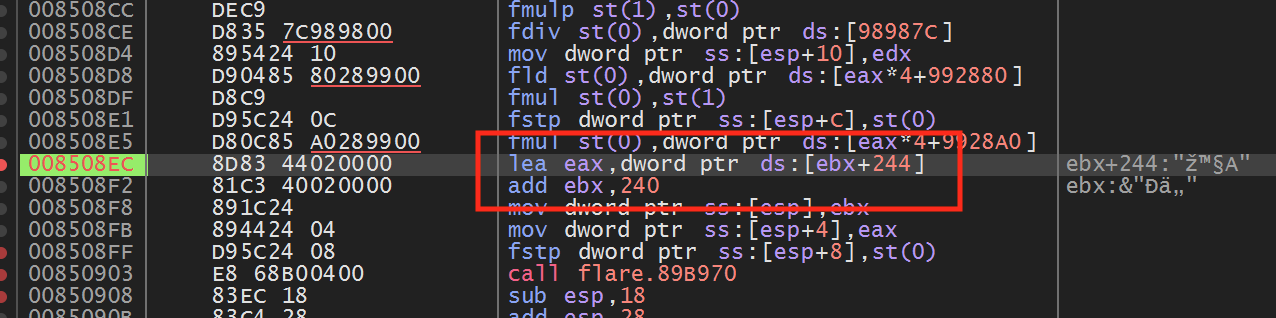
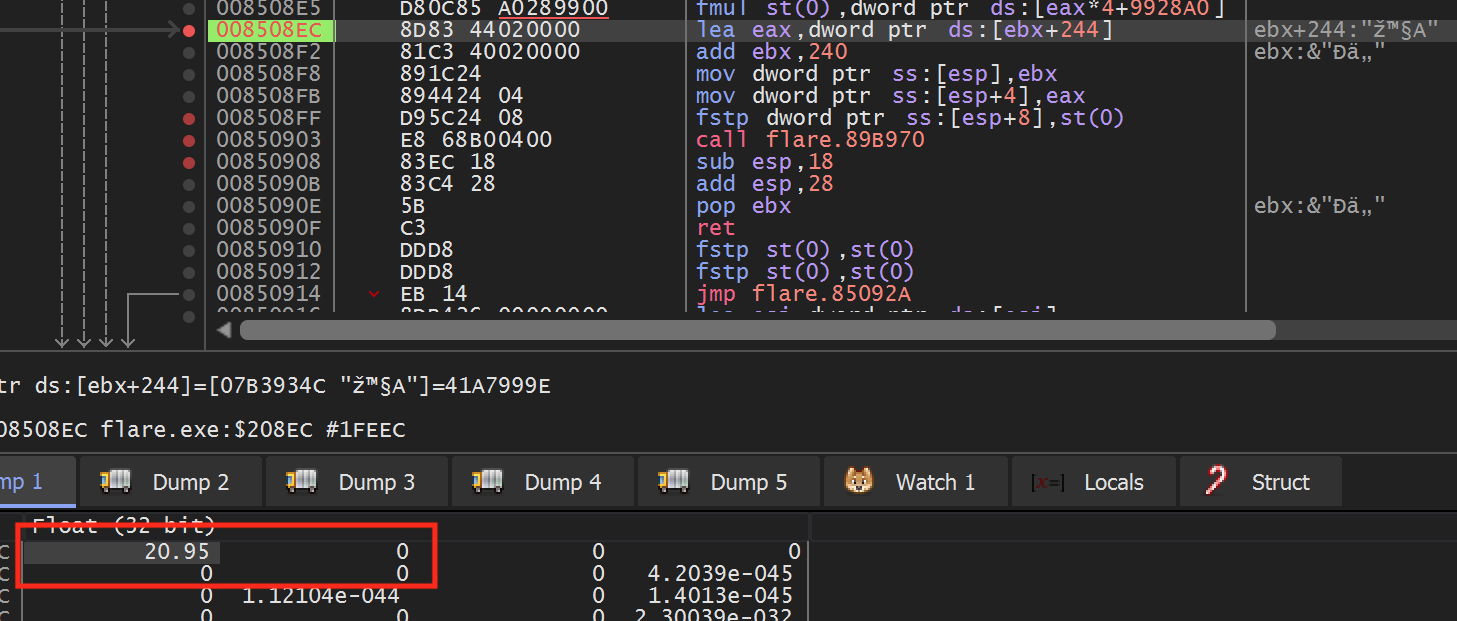
Examining the highlighted code, we see that eax and ebx are set to values within 4 bytes of each other. This matches the distance we observed between the X and Y positions. If we set a breakpoint on the add ebx, 240 instruction and view ebx in the dump, we can confirm that eax and ebx contain our player’s X and Y position.
Next, disable the breakpoint and go back into Flare. In game, move to the next screen, which has several enemies. Once there, stop moving your player and re-enable the breakpoint on the add ebx, 240 instruction. After a bit, the breakpoint should pop again. If you examine eax and ebx in the dump, you should see that they are at a different address from our player’s X and Y position, but contain similar values:
The fact that this code is called for both players and enemies indicates that the game shares this code and calls it from different locations. We can observe this behavior by first disabling the breakpoint and moving our character back to the first screen with no enemies. Then, re-enable the breakpoint and move your character to cause it to pop. Once it does, use execute until return and step over to navigate up a level to the calling code for the player:
Then, disable the breakpoint and move your character back to the screen with the enemies. Do the same process as above to make the breakpoint pop again and then navigate up a level. You will notice that this location is different from the player’s position:
We will use these differences when programming our hack to determine enemy positions.
Locating Mouse Position
With our player and enemy positions now located, we need to locate our mouse position in memory. This will allow us to set the mouse position toward the enemy when we write our hack.
Windows has several API’s to manipulate the mouse position inside a window, like SetCursorPos. This API takes two ints as X and Y parameters. As a result, we know we can scan for a Value Type set to 4 Bytes.
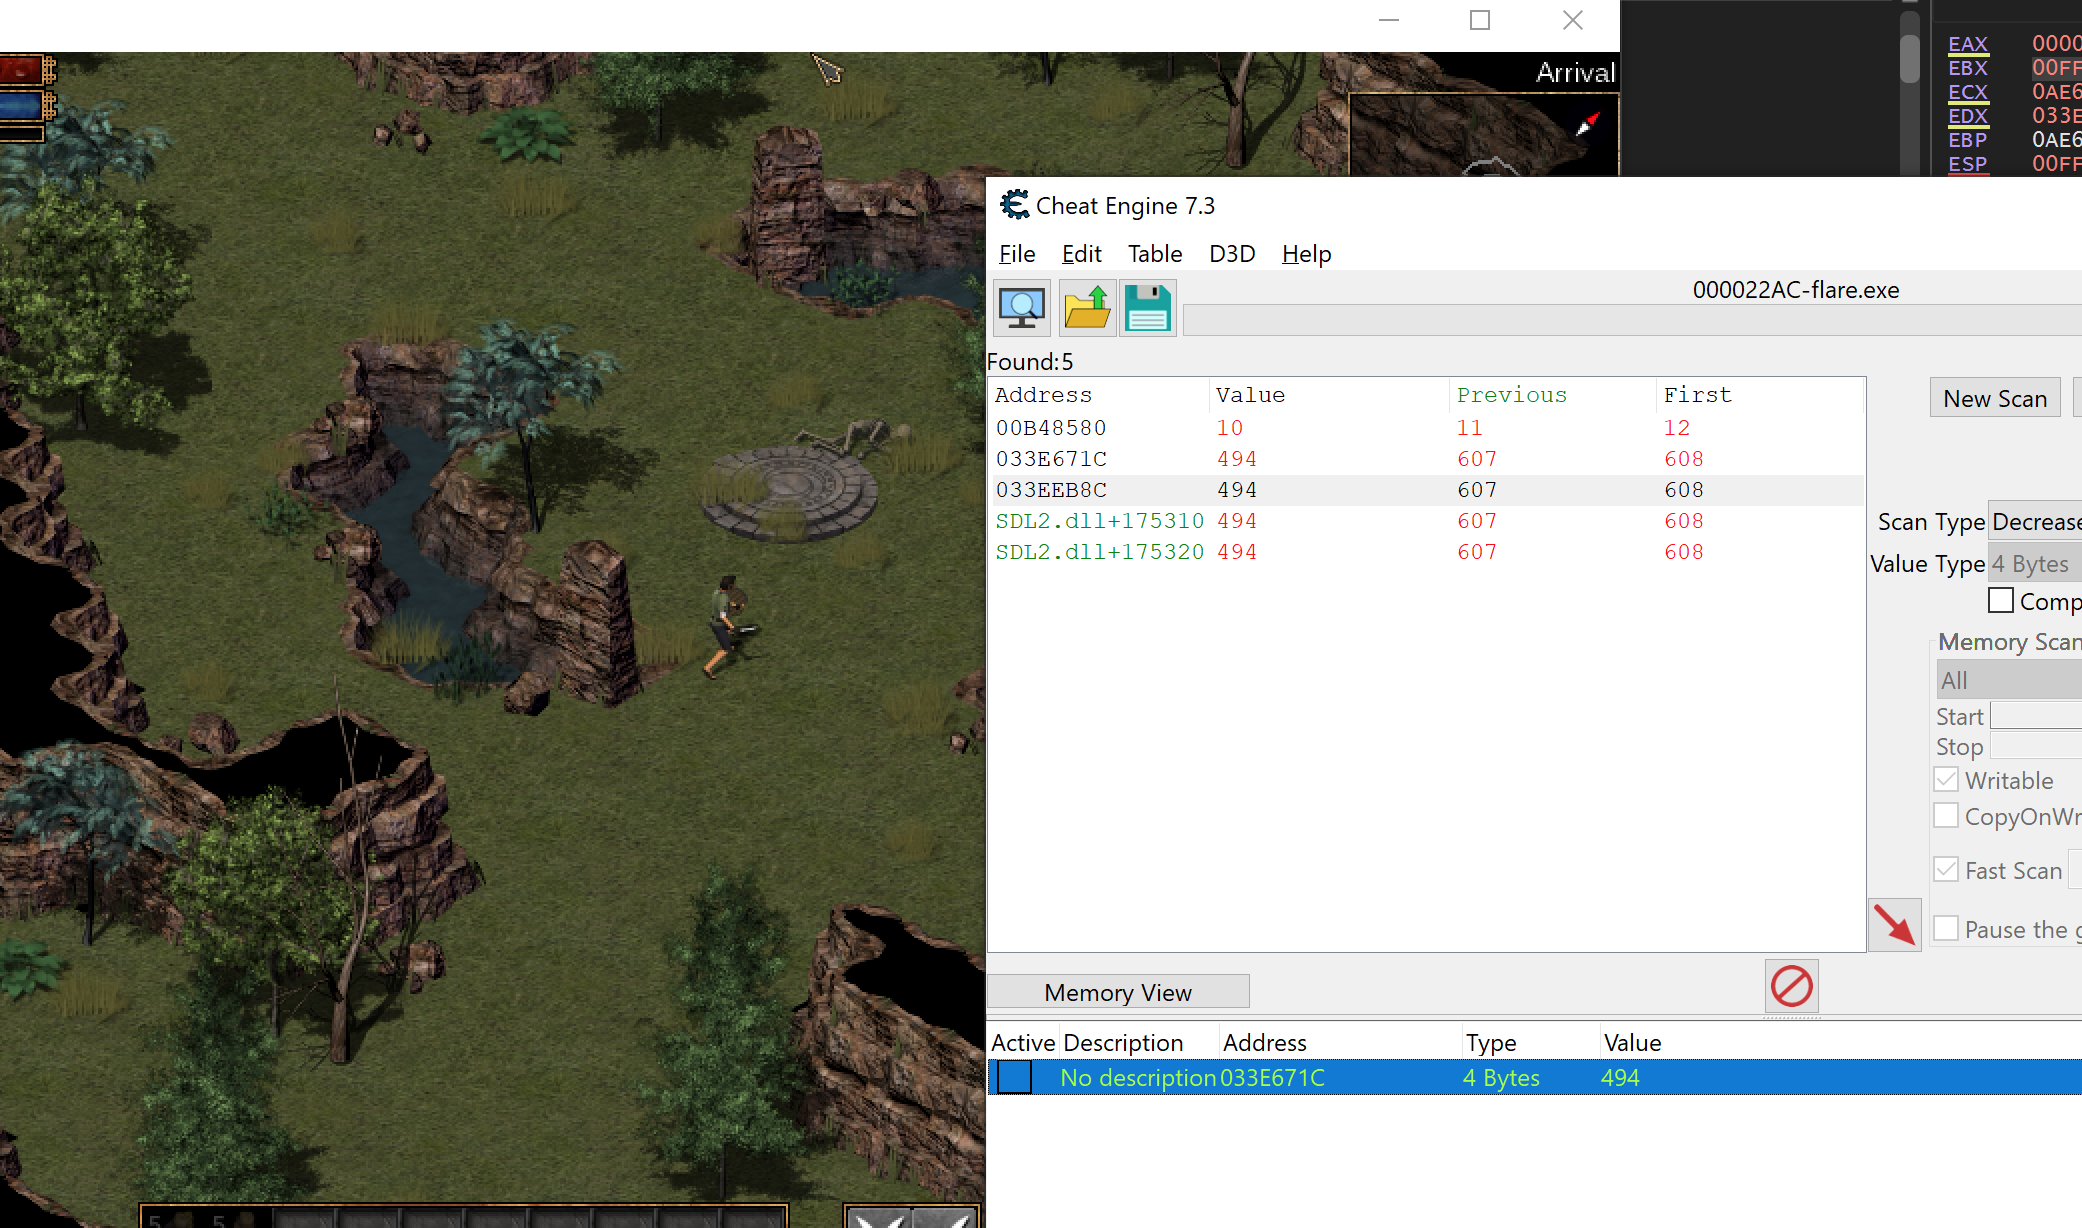
Start with a scan for an Unknown value type. Then, move your cursor to the right and search for Increased value. When you get to the edge of the window, move your cursor to the left and search for Decreased value. Eventually, you should narrow down your results to a few addresses:
You can determine the exact address by changing each entry and observing when the cursor moves. Then, like we have done in previous lessons, set a breakpoint on write on this address and move your mouse in Flare. The breakpoint should pop immediately at the following location:
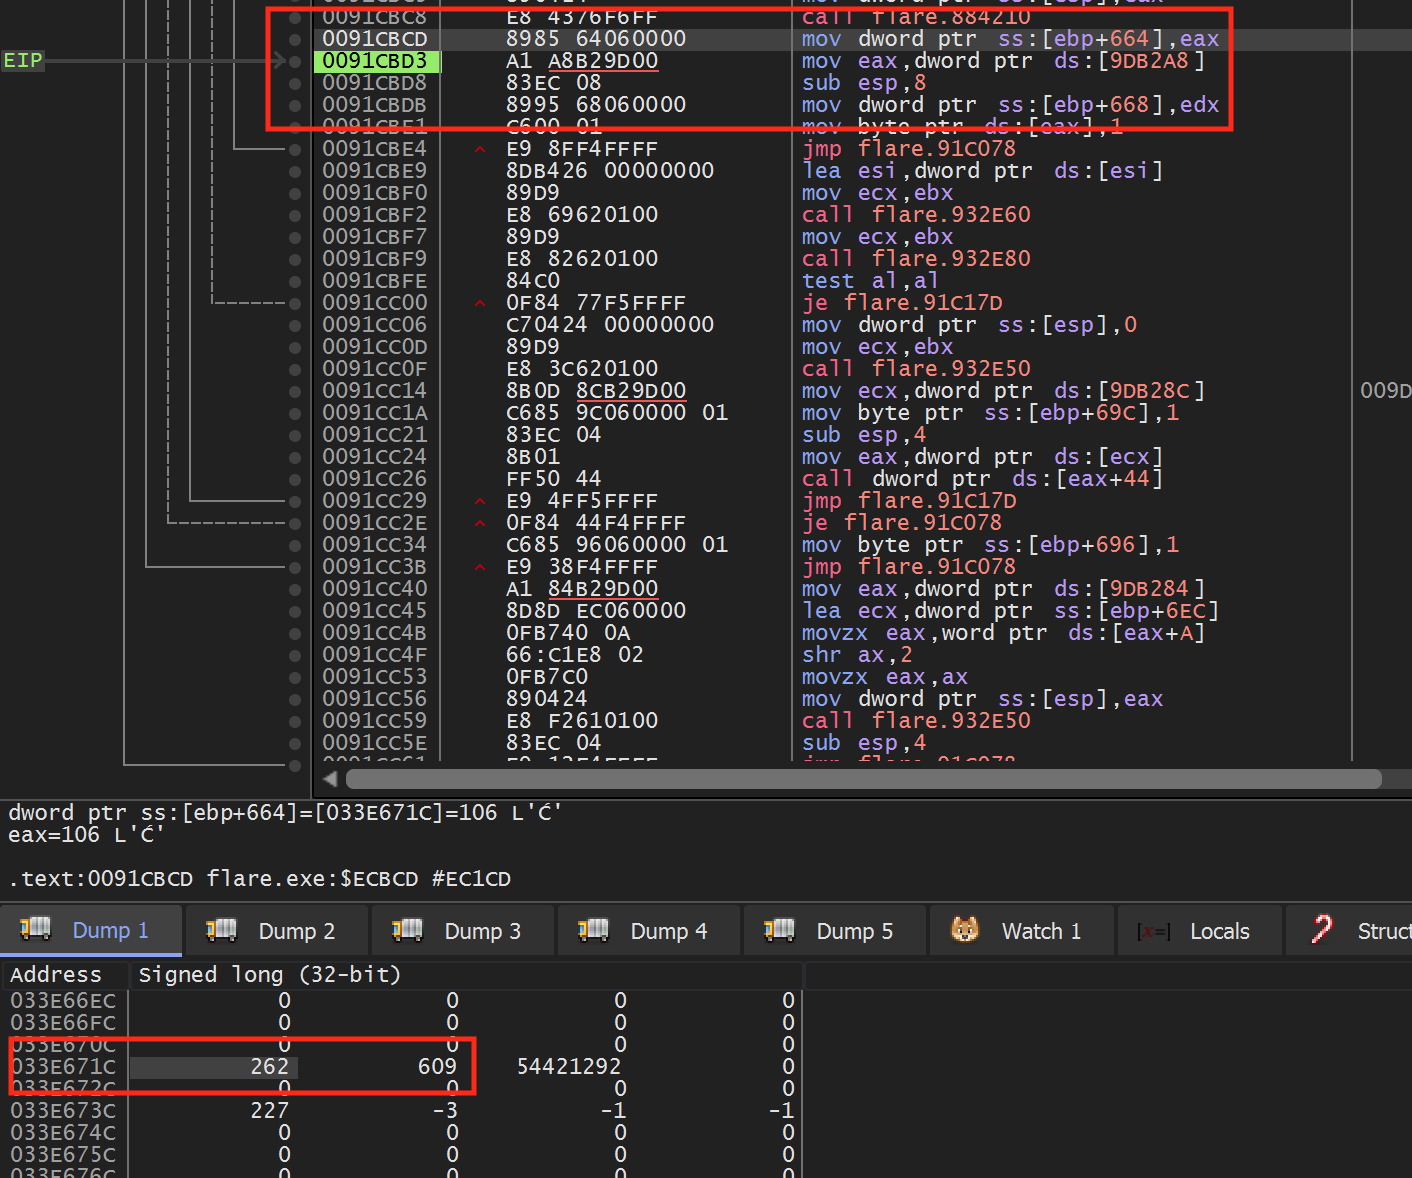
If you look at ebp+0x644 in the dump, we can see that the X and Y coordinates of the mouse are stored right next to each other.
Hooking and Dynamic Code
With these locations identified, we can begin to program our hack. For this hack, we will use 3 code caves:
- A code cave to retrieve the mouse’s X and Y coordinates.
- A code cave to retrieve the player’s X and Y coordinates.
- A code cave in the update_position method to retrieve enemy X and Y coordinates.
We will then create a thread that will check to see if the current entity in the update_position method is a player or an enemy. If it is an enemy, the thread will set our mouse X and Y coordinates to the direction of the enemy.
Like we initially saw in the Macro Bot lesson,
Flare also loads its code dynamically. As a result, we will need to offset
the addresses we identified above from the base address of the module. For
the addresses in this lesson, the base address of the Flare.exe module was
0x00830000. For our code caves, we will redirect the
following 3 instructions:
- Mouse -
0x91CBC8call 0x884210 - Player -
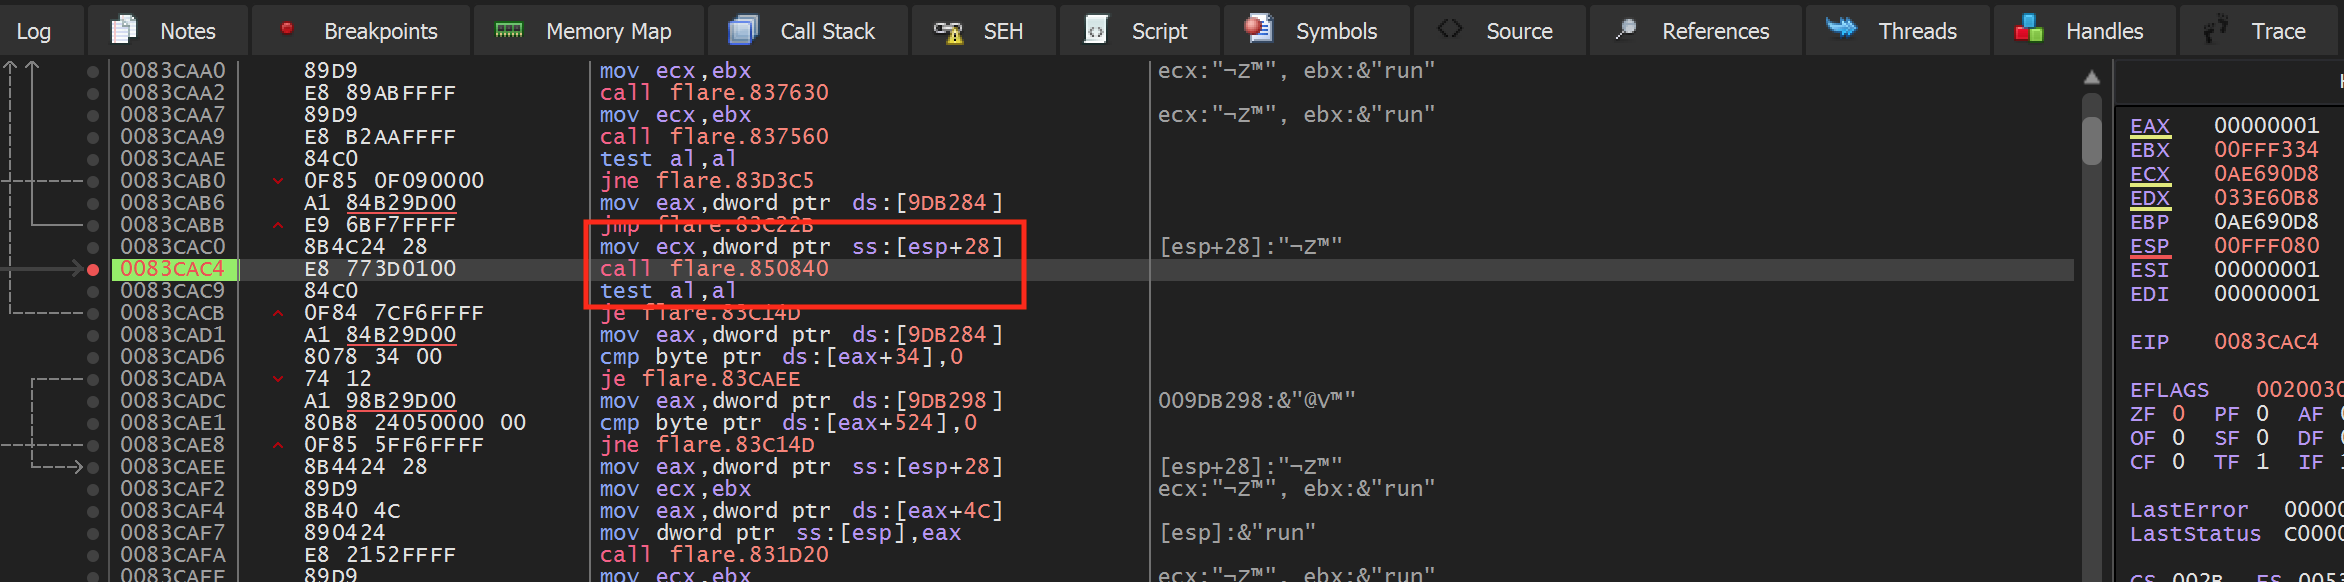
0x83CAC4call 0x850840 - Loop -
0x89BA94call 0x89B180
All of these instructions are close to instructions we identified when reversing in the previous section of this lesson.
First, we will begin the DLL structure we have seen in previous lessons:
#include <Windows.h>

BOOL WINAPI DllMain(HINSTANCE hinstDLL, DWORD fdwReason, LPVOID lpvReserved) {
  DWORD old_protect;

  if (fdwReason == DLL_PROCESS_ATTACH) {
    //hooking code
  }

  return true;
}
Then, identically to how we have created hooks in previous lessons, we will hook the 3 instructions identified above:
HANDLE flare_base;

DWORD mouse_call_address;
DWORD mouse_return_address;

DWORD player_call_address;
DWORD player_return_address;

DWORD loop_call_address;
DWORD loop_return_address;

...
if (fdwReason == DLL_PROCESS_ATTACH) {
  //hooking code
  flare_base = GetModuleHandle(L"flare.exe");

  // mouse hook
  mouse_call_address = (DWORD)flare_base + 0x54210;

  unsigned char* hook_location = (unsigned char*)((DWORD)flare_base + 0xECBC8);
  mouse_return_address = (DWORD)hook_location + 5;

  VirtualProtect((void*)hook_location, 5, PAGE_EXECUTE_READWRITE, &old_protect);
  *hook_location = 0xE9;
  *(DWORD*)(hook_location + 1) = (DWORD)&mouse_codecave - ((DWORD)hook_location + 5);

  // player hook
  player_call_address = (DWORD)flare_base + 0x20840;

  hook_location = (unsigned char*)((DWORD)flare_base + 0xCAC4);
  player_return_address = (DWORD)hook_location + 5;

  VirtualProtect((void*)hook_location, 5, PAGE_EXECUTE_READWRITE, &old_protect);
  *hook_location = 0xE9;
  *(DWORD*)(hook_location + 1) = (DWORD)&player_codecave - ((DWORD)hook_location + 5);

  // game loop hook
  loop_call_address = (DWORD)flare_base + 0x6B180;

  hook_location = (unsigned char*)((DWORD)flare_base + 0x6BA94);
  loop_return_address = (DWORD)hook_location + 5;

  VirtualProtect((void*)hook_location, 5, PAGE_EXECUTE_READWRITE, &old_protect);
  *hook_location = 0xE9;
  *(DWORD*)(hook_location + 1) = (DWORD)&loop_codecave - ((DWORD)hook_location + 5);
To wrap up our DllMain function, we also want to create our thread:
CreateThread(NULL, 0, (LPTHREAD_START_ROUTINE)injected_thread, NULL, 0, NULL);
Mouse Code Cave
When our mouse code cave executes, ebp+0x664 holds the cursor’s X position and ebp+0x668 holds the cursor’s Y position. Our code cave will retrieve these values and assign two pointers to their location, mouse_x and mouse_y:
DWORD* mouse_x = NULL;
DWORD* mouse_y = NULL;

__declspec(naked) void mouse_codecave() {
  __asm {
    call mouse_call_address
    pushad
    mov eax, ebp
    add eax, 0x664
    mov ebx, ebp
    add ebx, 0x668
    mov mouse_x, eax
    mov mouse_y, ebx
    popad
    jmp mouse_return_address
  }
}
Player Code Cave
In a similar manner to our mouse code cave, when our player code cave executes, ecx+0x240 holds the player’s X position and ecx+0x244 holds the player’s Y position. Our code cave will retrieve these values and assign two pointers to their location:
float* player_x = NULL;
float* player_y = NULL;

__declspec(naked) void player_codecave() {
  __asm {
    pushad
    mov eax, ecx
    add eax, 0x240
    mov player_x, eax
    add eax, 4
    mov player_y, eax
    popad
    call player_call_address
    jmp player_return_address
  }
}
Loop Code Cave
Our loop code cave will hook the location that is shared between the player and enemy methods for updating a position. When this code cave executes, ebx will store the Y position of the player or enemy and ebx - 4 will store the X position. Like the previous two code caves, we will assign pointers to these addresses:
float* enemy_x = NULL;
float* enemy_y = NULL;

__declspec(naked) void loop_codecave() {
  __asm {
    pushad
    mov eax, ebx
    sub eax, 4
    mov enemy_x, eax
    mov enemy_y, ebx
    popad
    call loop_call_address
    jmp loop_return_address
  }
}
Bot Thread
With all of our pointers assigned, we can finally create the main logic of the bot. This thread will constantly check to see if all the pointers are assigned. If they are, the thread will then check to make sure that the character being updated is not the player. As a last check, we make sure that the “M” key is being held down so that our bot can be toggled:
void injected_thread() {
  while (true) {
    if (player_x != NULL && player_y != NULL && enemy_x != NULL && enemy_y != NULL
    && player_x != enemy_x && player_y != enemy_y
    && mouse_x != NULL && mouse_y != NULL && GetAsyncKeyState('M')) {
      // move player
    }

    Sleep(1);
  }
}
If all these conditions are met, we know that an enemy is moving on the same screen as our player and we want to start moving our player toward the enemy. In this lesson, our bot will try to take a direct path to the enemy, as this is the easiest logic to implement. For a more complete farming bot, we would need to make sure to guide our player character around obstacles.
Movement in Flare, like most ARPGs, is done by clicking in the direction you want to move. Our bot will move in four directions, based on the axes we discussed earlier:

Since we are taking a direct path, we can set the mouse cursor based on the enemy’s position relative to our player. For example, if the enemy is to the left of us, we will set our mouse cursor to the left of our player. The mouse position values can be retrieved by hovering the mouse over the highlighted positions above and viewing the value at the mouse address in the dump of x64dbg:
if (*enemy_x < *player_x) {
  *mouse_x = 490;
}
else {
  *mouse_x = 560;
}

if (*enemy_y > *player_y) {
  *mouse_y = 270;
}
else {
  *mouse_y = 330;
}
Finally, we will use the SendInput API to send a left mouse down event to the game. SendInput takes an array of input events, which allows you to send multiple events. This can be useful if we want to do multiple actions at once, such as attacking and then casting a spell. In this lesson, we will only send one input, which is the mouse down or mouse up event:
input.type = INPUT_MOUSE;
input.mi.dwFlags = MOUSEEVENTF_LEFTDOWN;
SendInput(1, &input, sizeof(INPUT));
We can now build this DLL and inject it into our game. In game, move to a screen with an enemy and hold down the “M” key. Your character should run toward the enemy and attack when close enough.
The full source code for this lesson is available on github.