Target
Our target for this lesson will be Assault Cube 1.2.0.2.
Identify
Our goal in this lesson is to create an aimbot, a type of hack that automatically aims at other players.
Understand
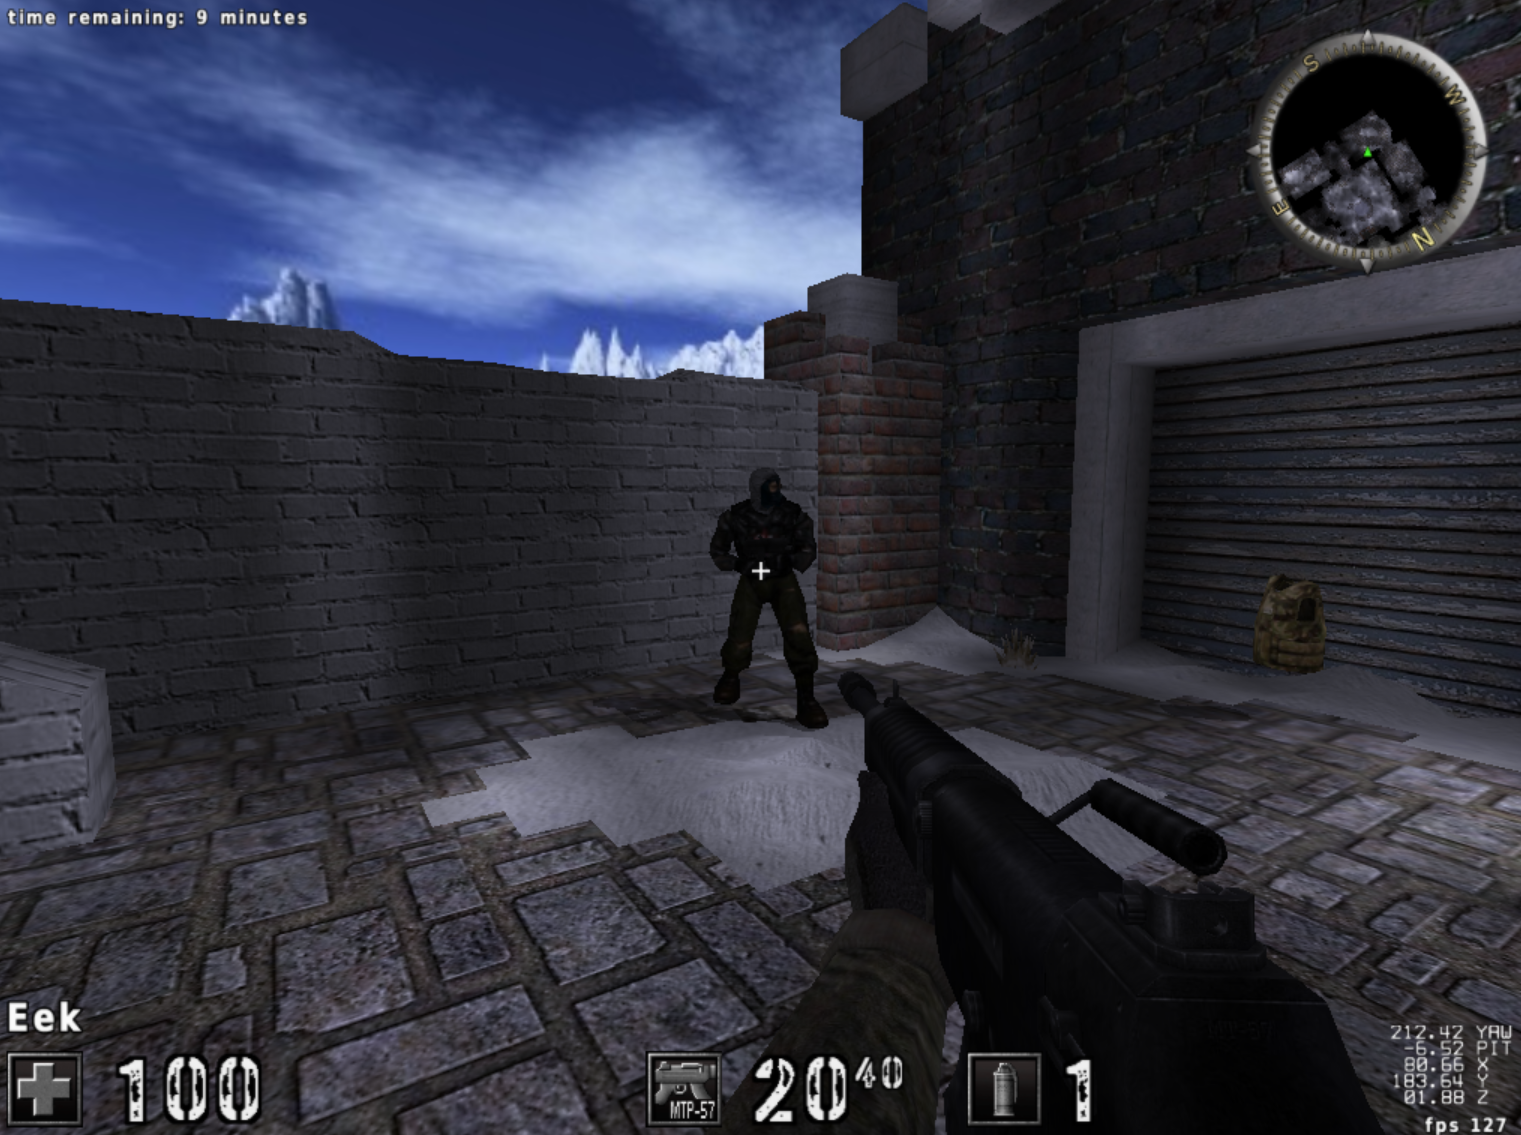
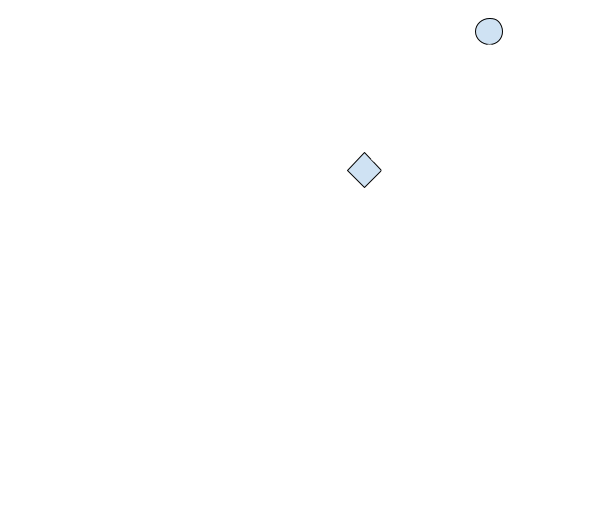
The core fundamentals of an aimbot rely on trigonometry. Take the following scene from our target game, Assault Cube:
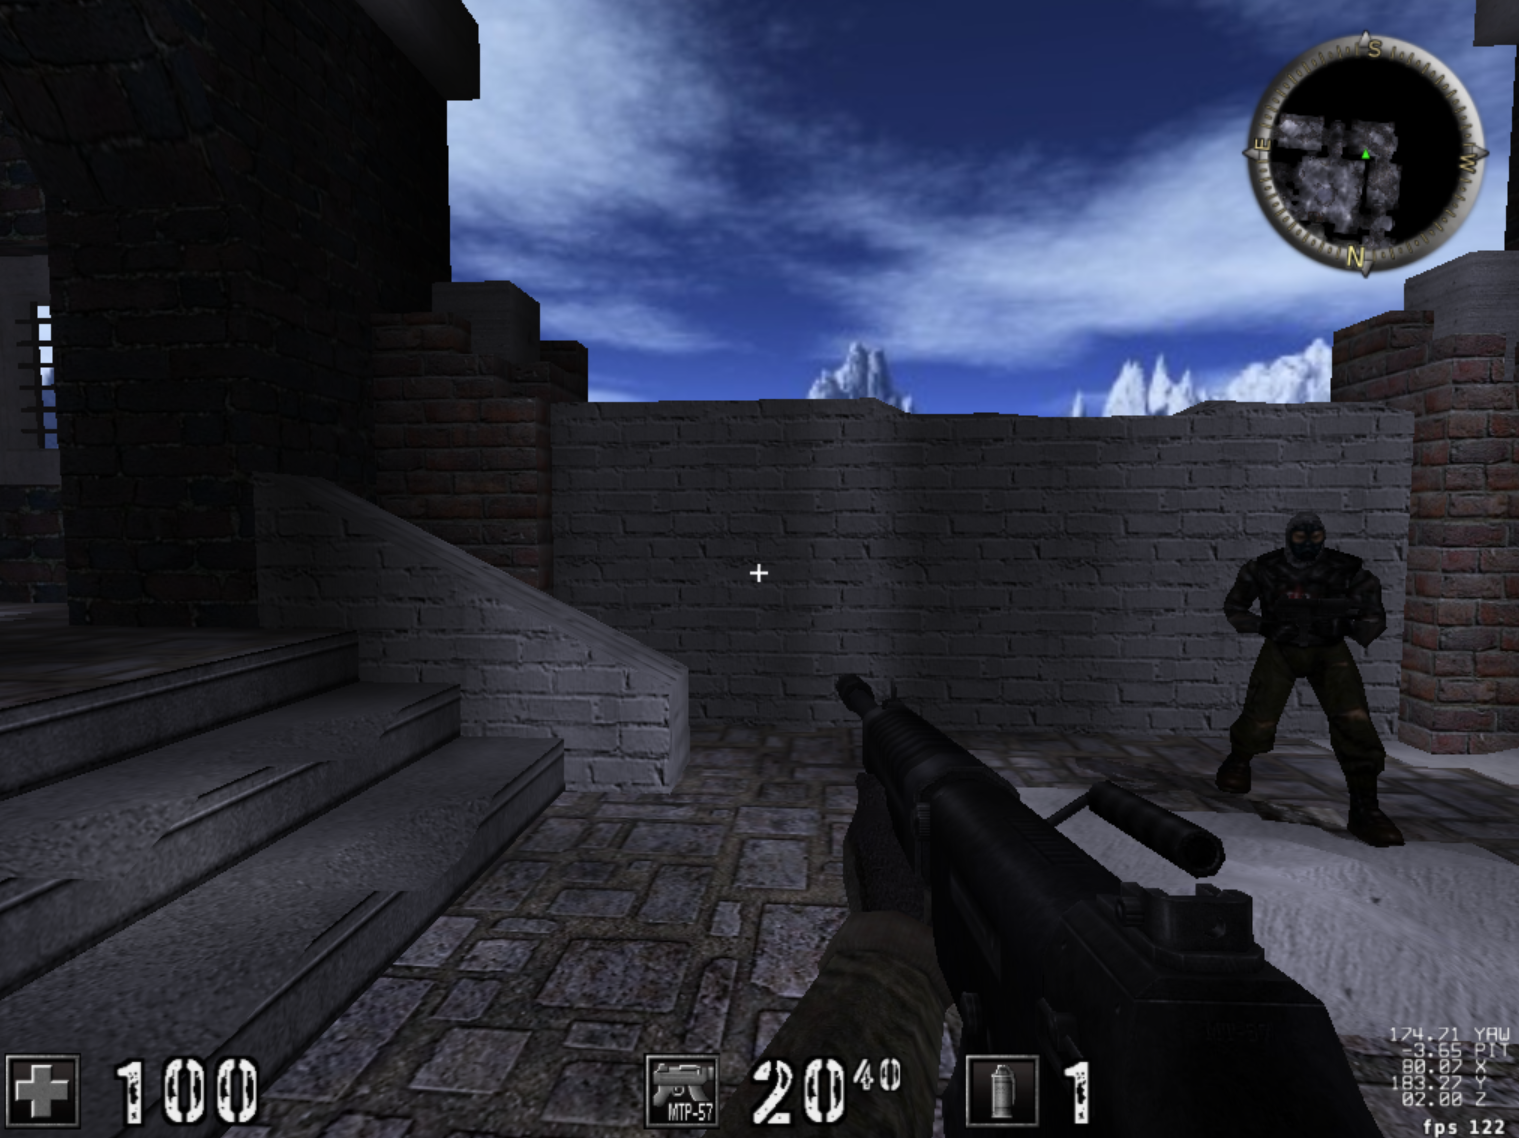
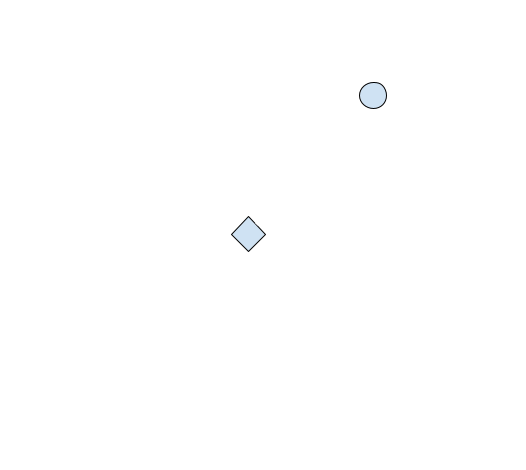
Focusing on just our in-game player and the enemy, this scene can be mapped onto a 3D graph that looks like:
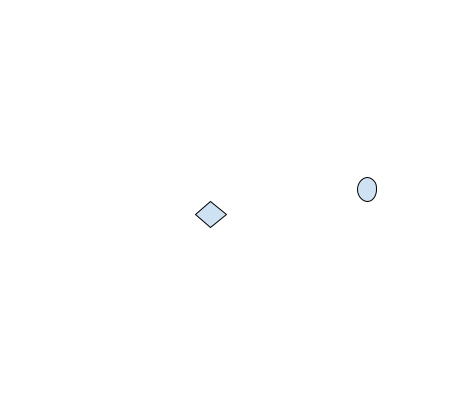
To simplify, we can convert this into a 2D graph by fixing our perspective and eliminating one of the axes. By choosing a top-down perspective, we can eliminate the Z axis. The resulting graph would look like:
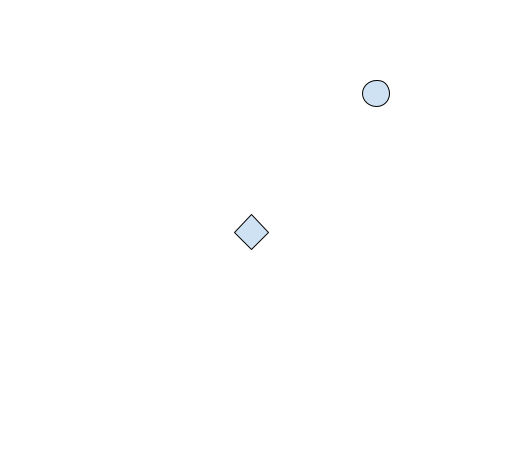
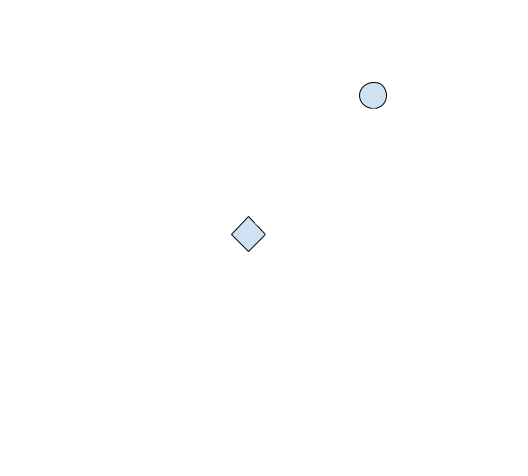
Every first-person or third-person shooter allows the player to look left and right to aim. For example, in our first screenshot, our player is looking straight ahead. On our 2D graph, this would look like:
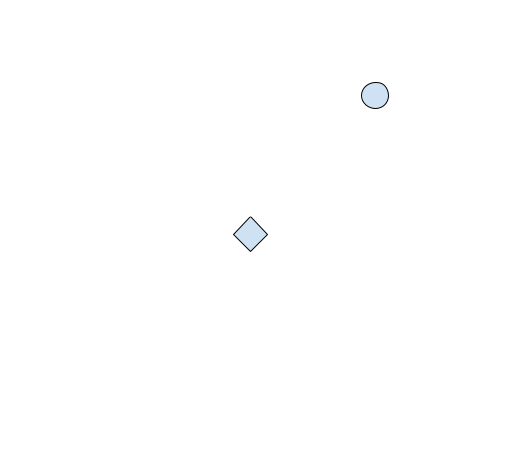
If we are looking at an enemy, like so:
Then our graph would change to look like:
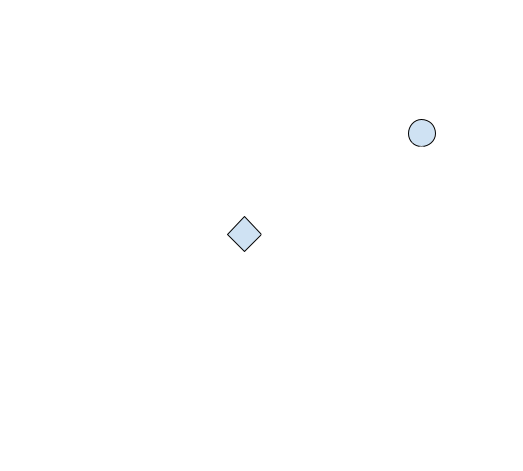
Games represent this left and right value as an angle. They can represent this angle in multiple ways, such as a vector, a radian, or a degree. However, for our current example, we will assume the view angle is represented in degrees. To create an aimbot, we need to find a way to calculate this angle for an enemy. We can do this by first creating a right triangle using our player’s position and the enemy’s position:
If we knew the value of θ, we could use the tangent operation to determine the ratio between the opposite (7 above) and adjacent (5 above) sides. In our case, we have the opposite and adjacent sides and want to determine θ. To do this, we can calculate the inverse tangent or arctangent. The arctangent will then represent the angle we need to set our player’s aim to aim at an enemy.
However, this will only correctly aim to the left and right. To aim up and down, we will need to do a similar operation for the Y and Z axes.
Before we can do any of this, though, we will need to locate where the game stores enemies. Then, we will need to locate where the game stores our player. Finally, we will need to reverse the player structure to locate the X, Y, and Z members in the structure, as well as the view angle members.
Locating Enemies
To locate enemies in the game, first create a game with 8 bots and set them to idle. Typically, games will store enemies in a list and hold a static location to this list. In the previous lesson, we found the game code responsible for displaying a player’s name when you hovered over that player. To do this, the game must have code inside that function that iterates over the enemies in the game and retrieves their names. This was the code we located in the last lesson:
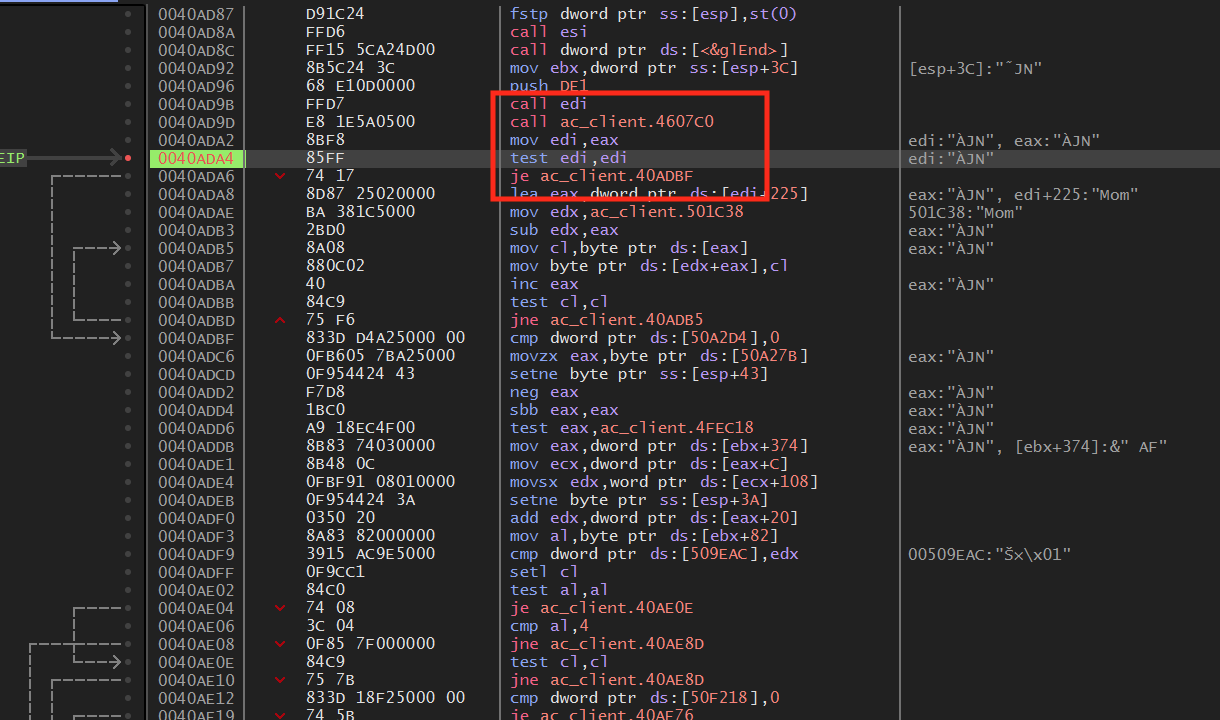
When reversing this code, we determined that the call to
0x4607c0 at 0x40ad9d was responsible for loading
the current player looked at into eax. If we step into
this call, we can see that a call at the
end is responsible for getting this value:
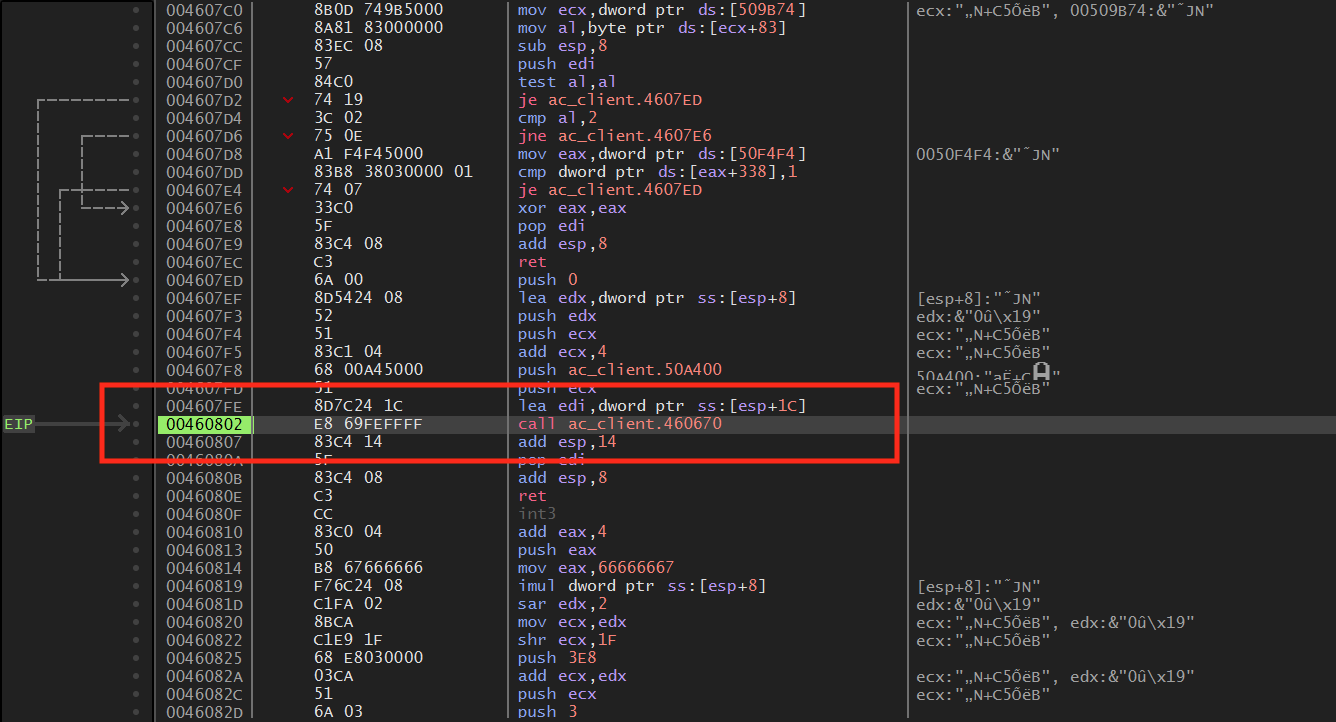
Stepping into this call, we can see that it is rather long with many loops and conditionals. As we step through the code, you will notice the following line:
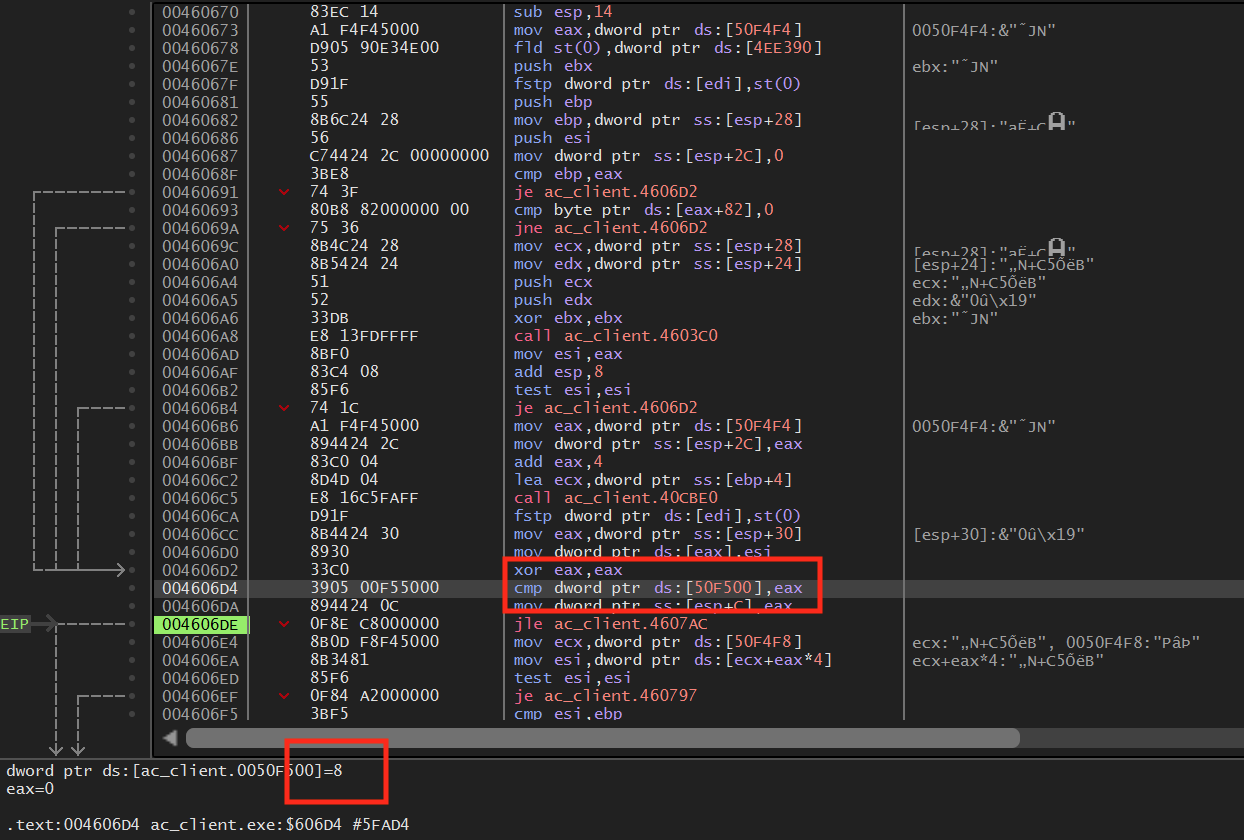
From this, we can determine two things. The first is that [0x50f500] will hold the current number of players in the game. We will need this value later when we are iterating through all the players to aim at them. The second is that eax is being compared to this value, with a jmp below that executes if eax is less than this value. This means that we are most likely in code responsible for looping through all the active players. A few lines below, you will notice the following code:
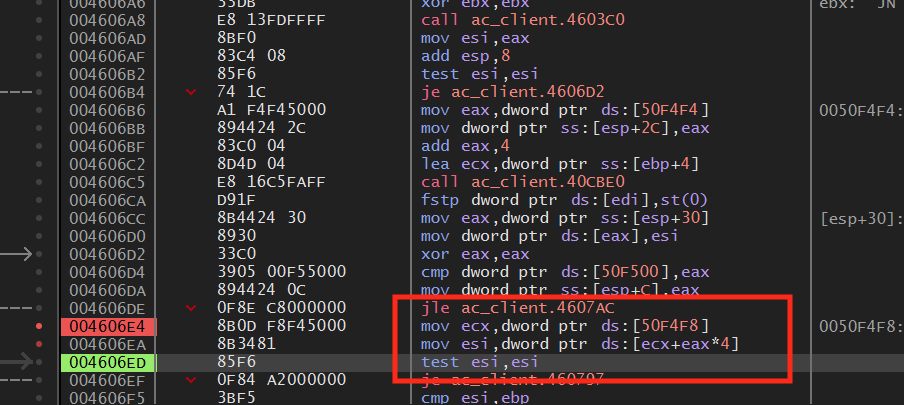
This code is loading a static memory address into ecx and then retrieving a new address based on that address’s value combined with an offset from eax. This new value is then loaded into esi. The first time this loop occurs, the value of esi is 0:
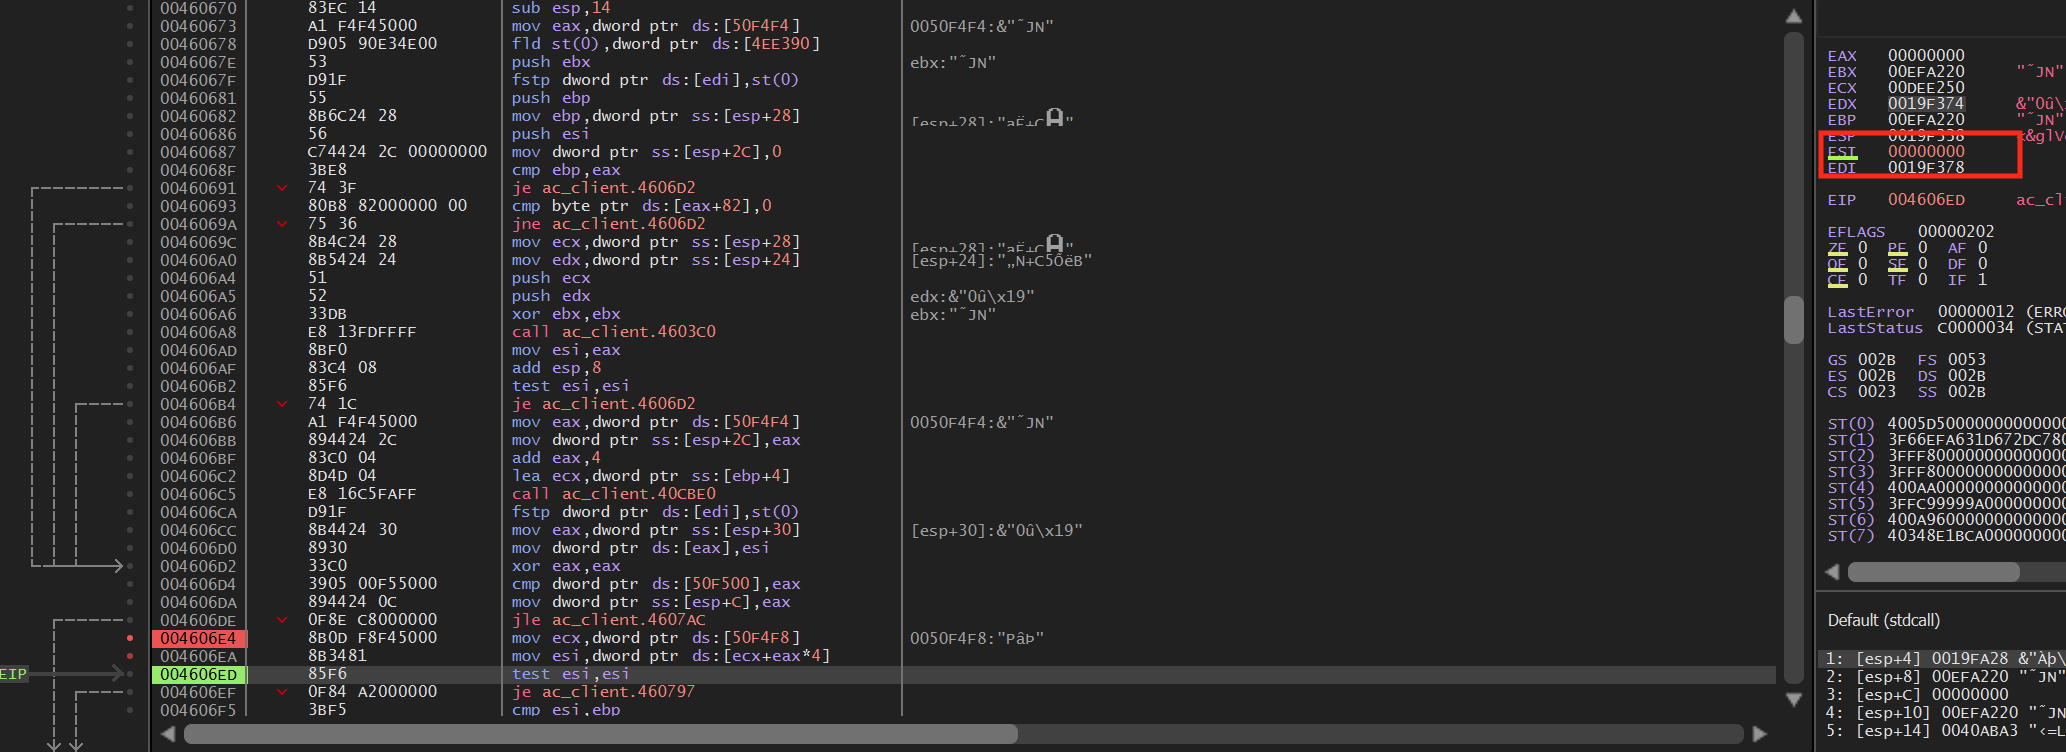
However, if we continue and execute the loop again, esi holds a different value:
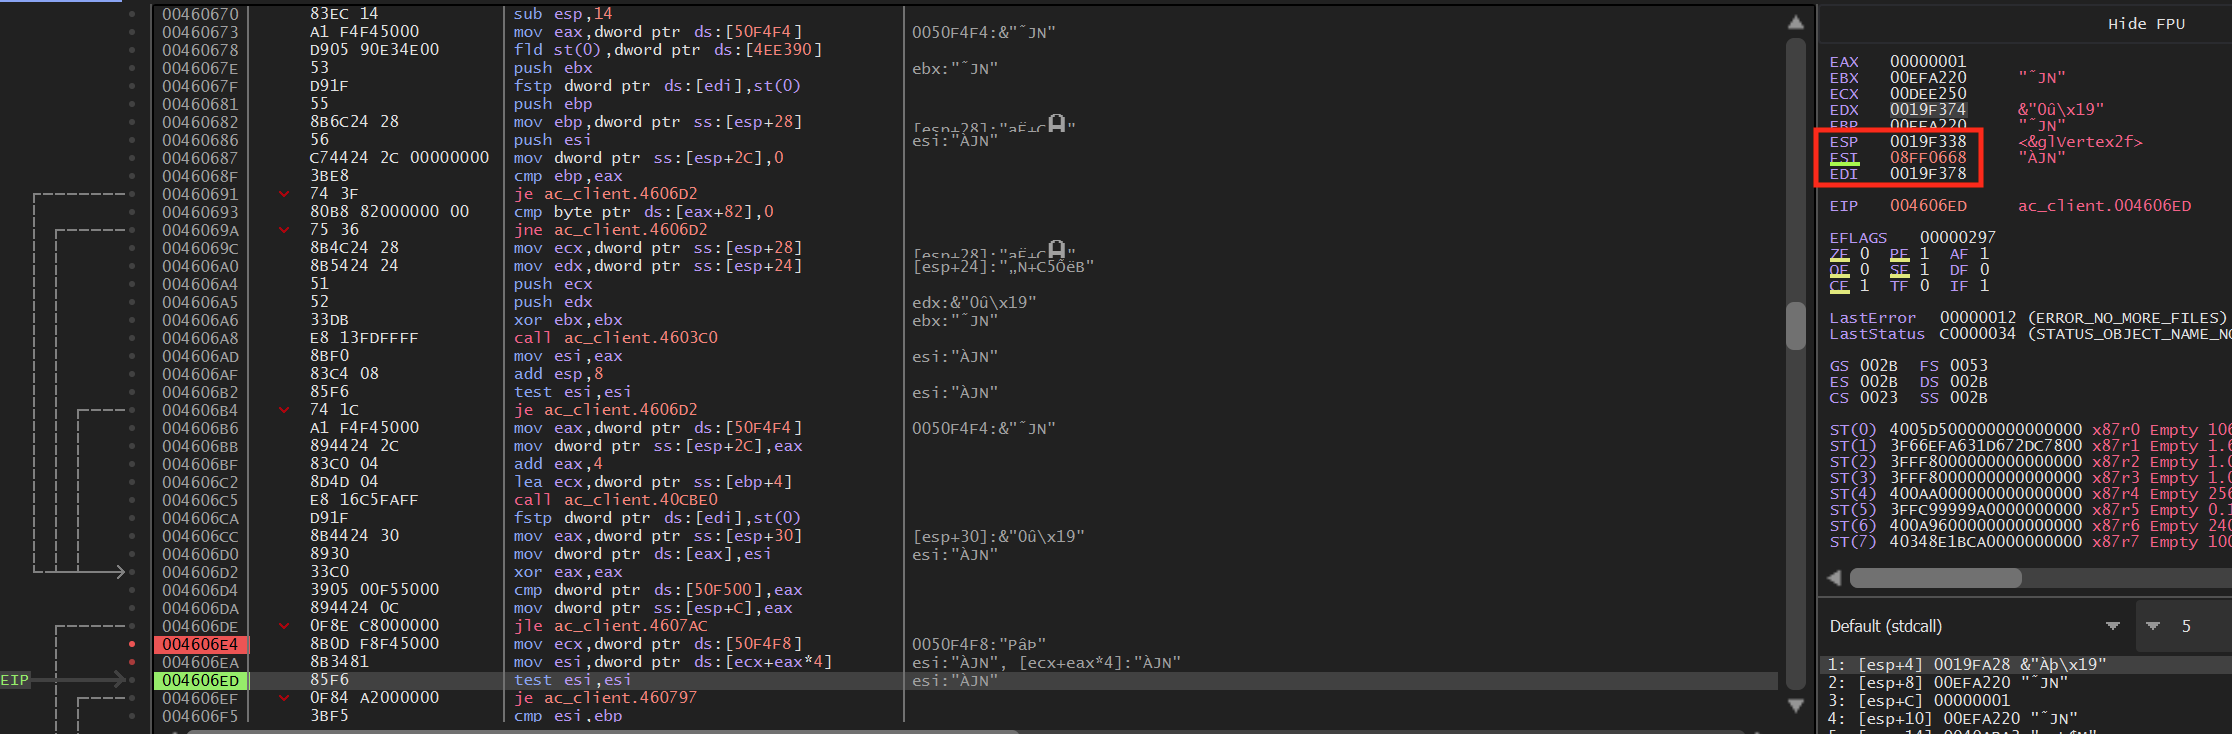
If we examine esi’s value in the dump, we can see that it is always near an address that holds a player’s name:
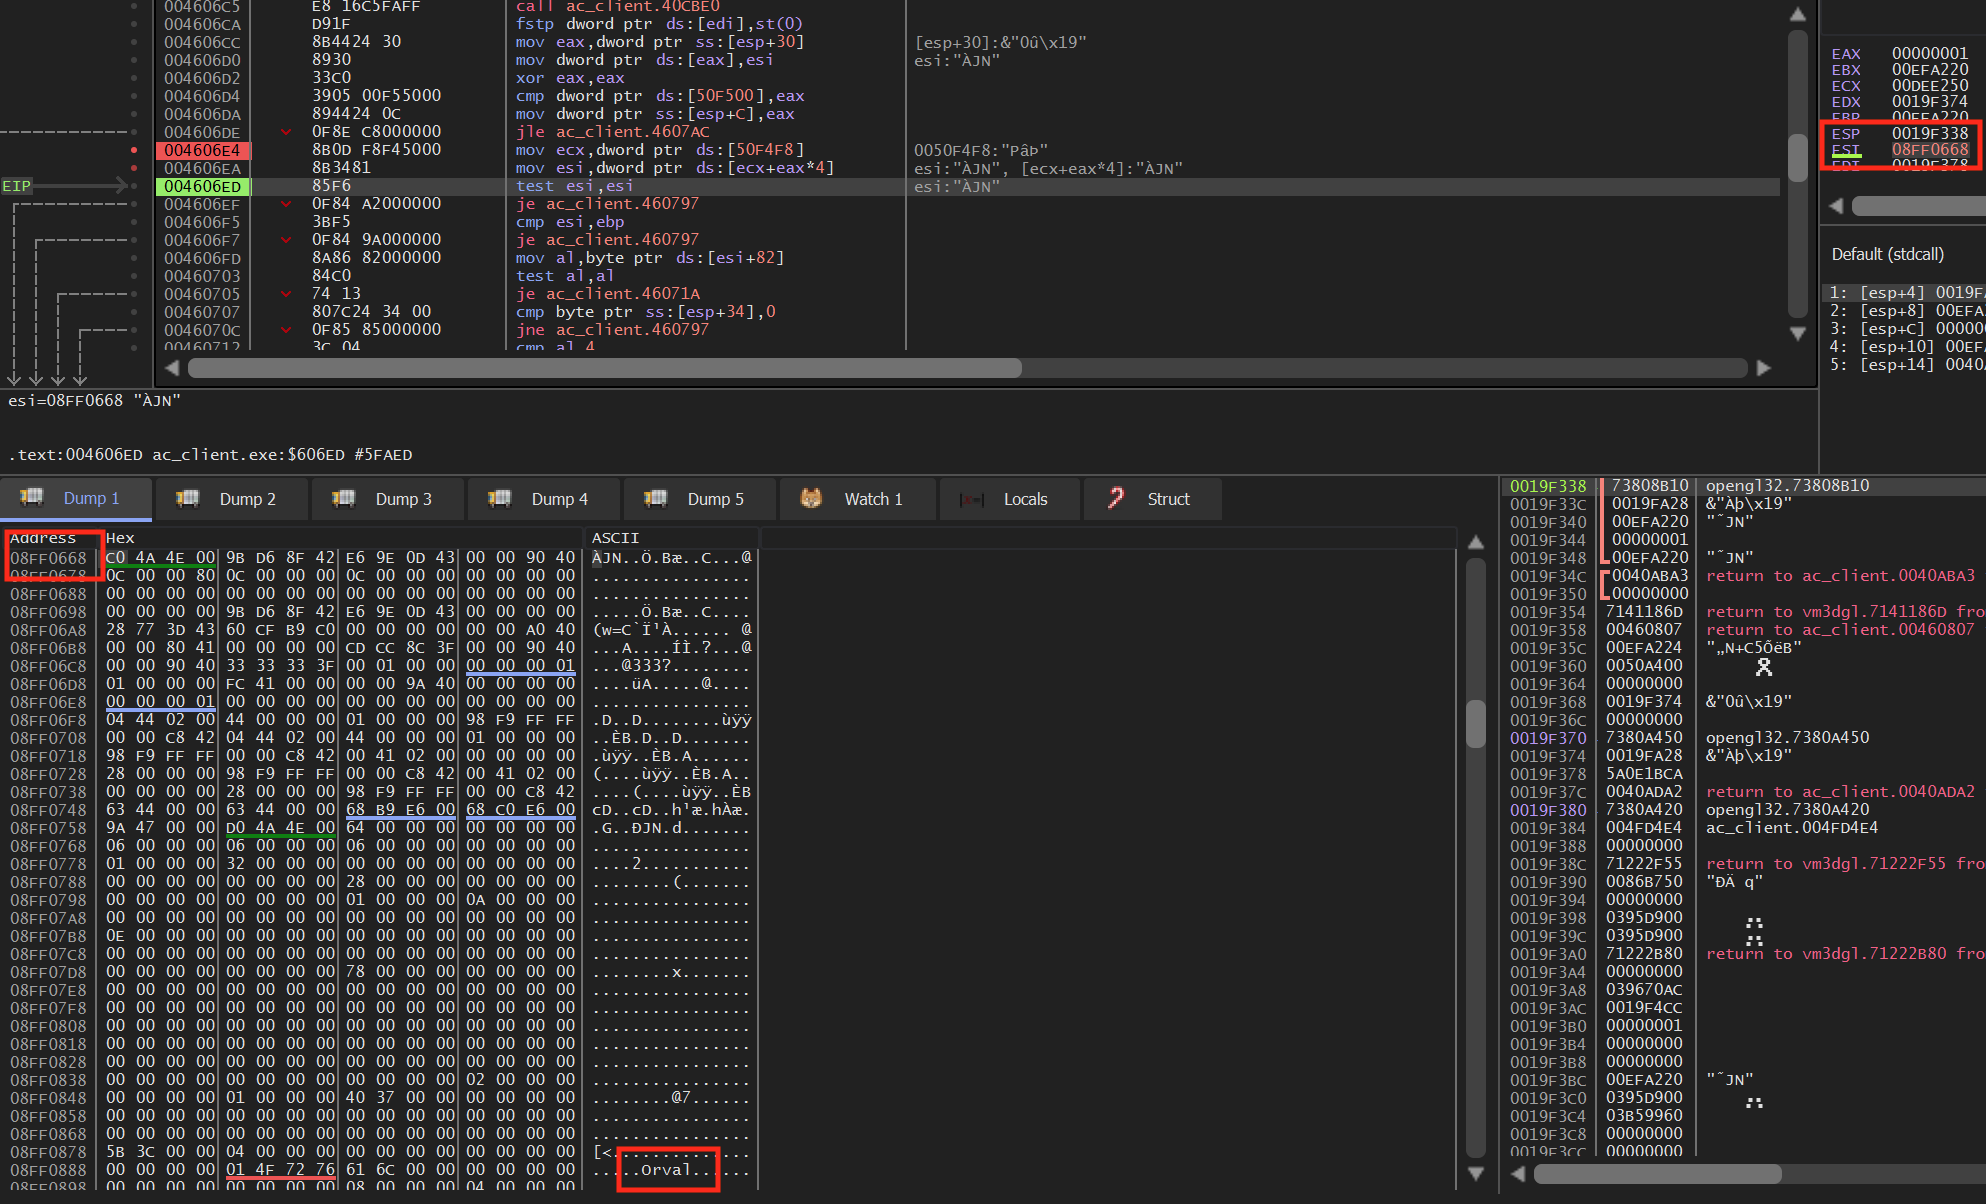
This is most likely the enemy player’s structure in memory, as one of the values that will be held in this structure is the player’s name. For now, we have identified that the list of enemies is held at [0x50f4f8], with each enemy being at [[0x50f4f8] + 4,8,C…]. Once we find our player’s structure, we will reverse exactly how the player structure is laid out in memory.
Locating Our Player
Next, we need to locate where our own player is stored in memory. Since we can never look at ourselves, we need to find our player in a different manner. Many games have a way to print your current position and view angle to the screen. In Assault Cube, this can be done with dbgpos 1. When turned on with showstats 1, the output looks like:
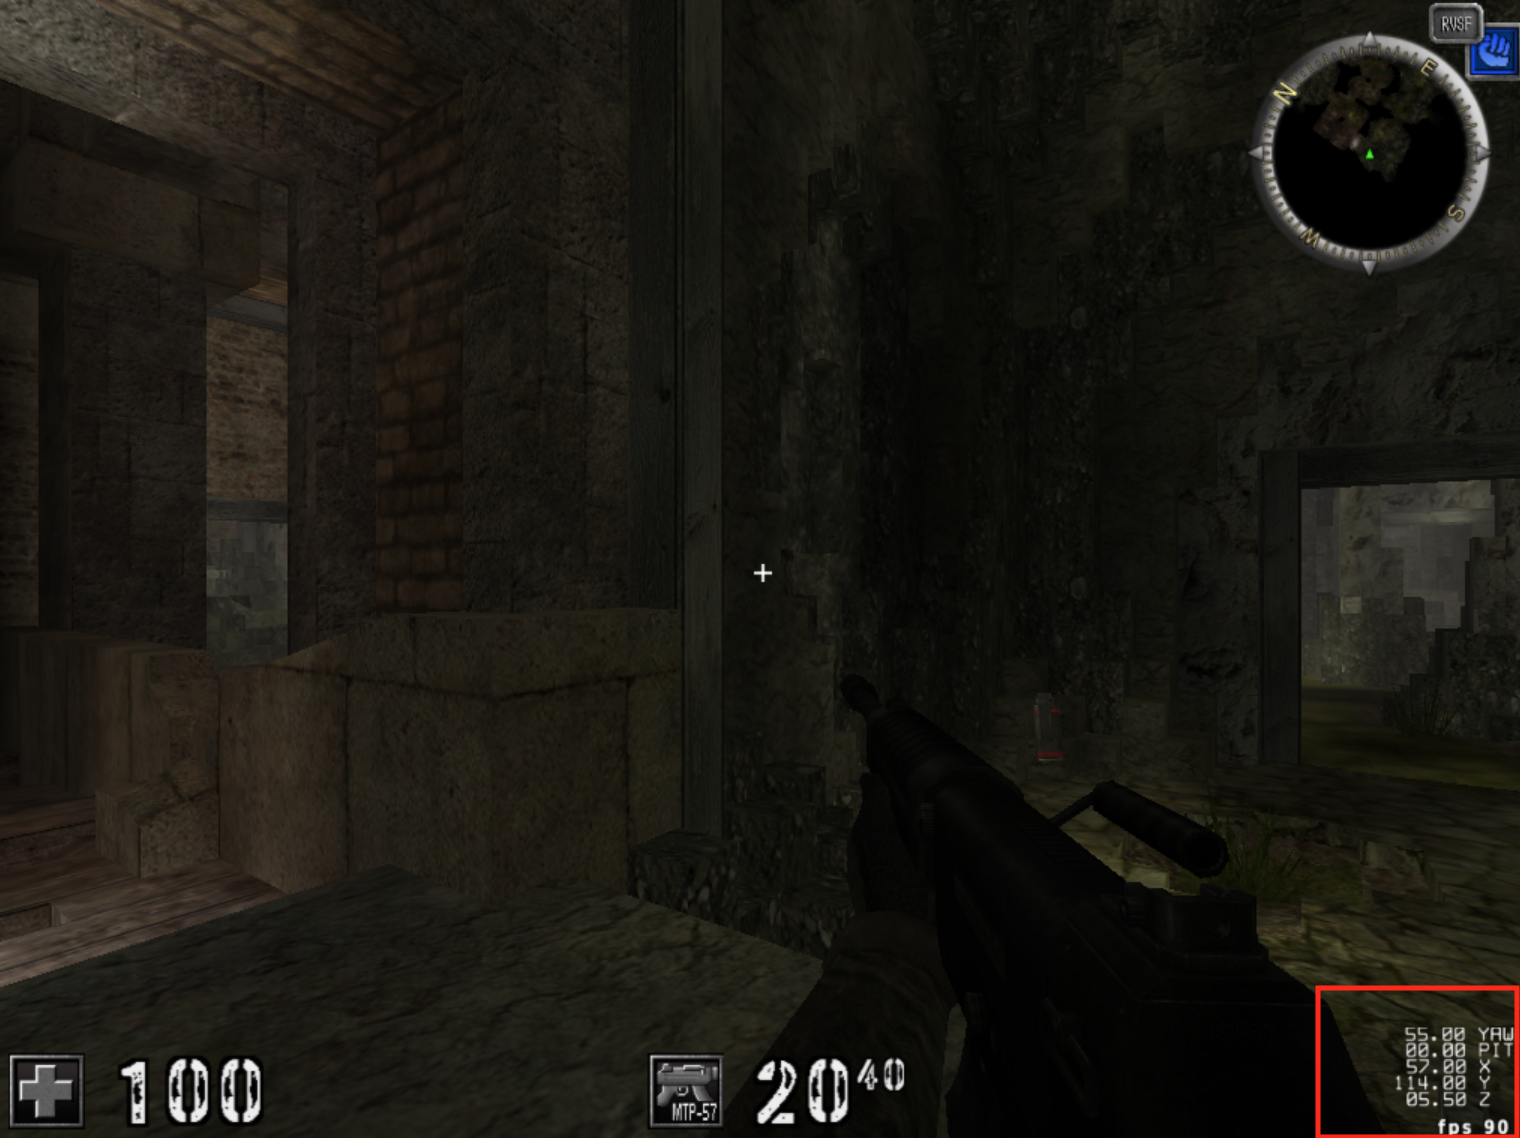
If your target does not have this feature, you will instead have to search for unknown values and then filter while carefully moving your mouse or player in a single direction. In Assault Cube, it looks like our view angle is represented by yaw (left and right) and pitch (up and down), with both values in degrees. We will need to keep this model in mind for later. For now, we know that our player structure will have to contain these values. In Cheat Engine, we can search for our yaw in memory and then see what accesses the address:
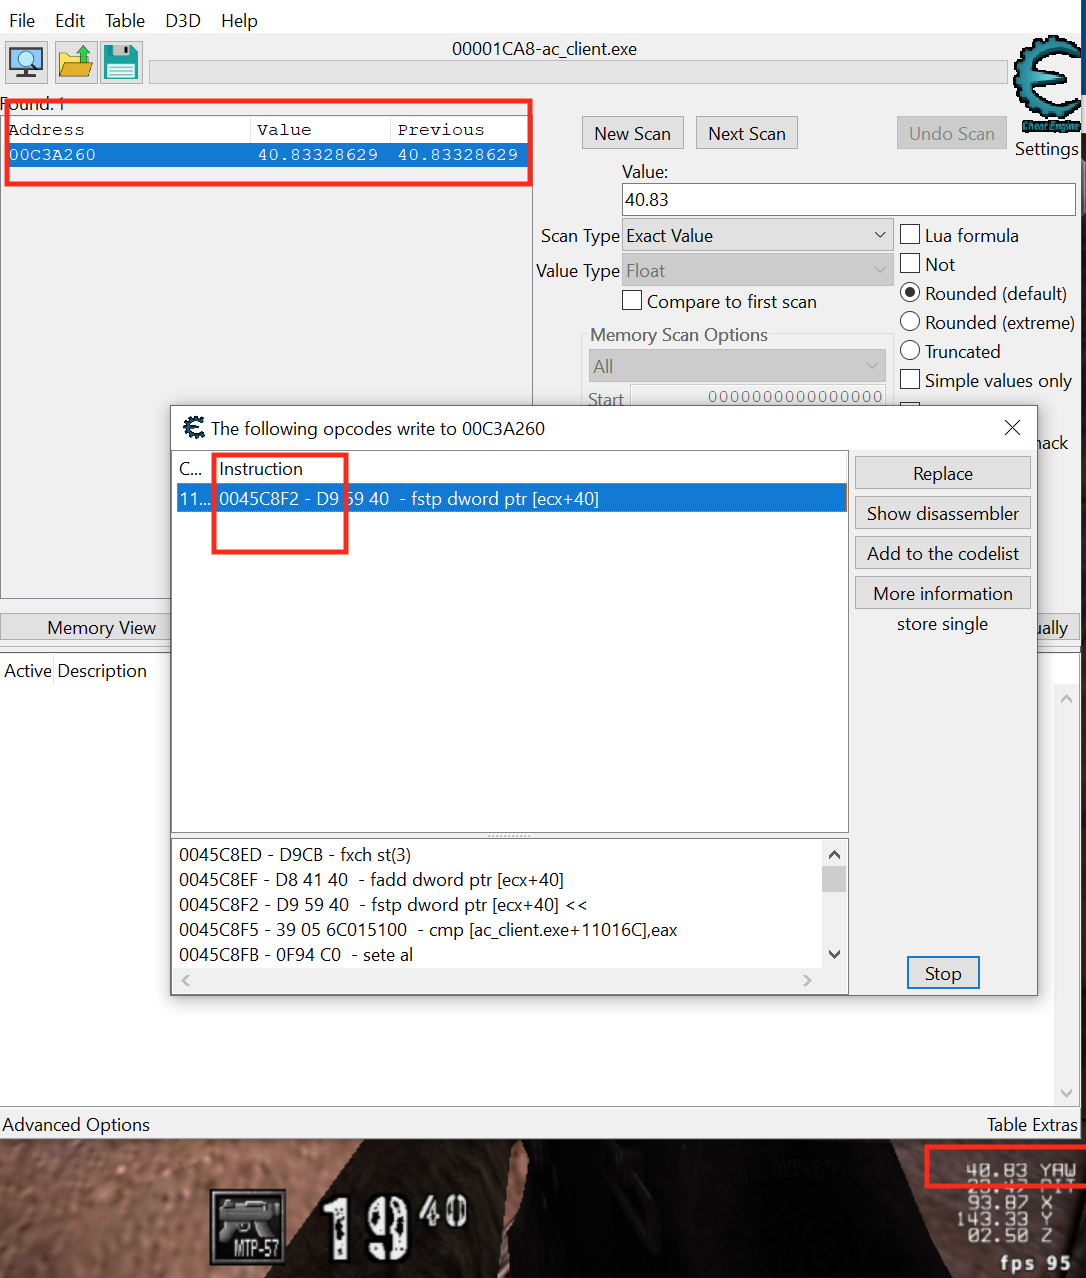
The fstp instruction copies a floating point number into the address specified. In this case, that address is based on ecx. If we examine this instruction in x64dbg and then view several lines above, we can find where ecx is being set:
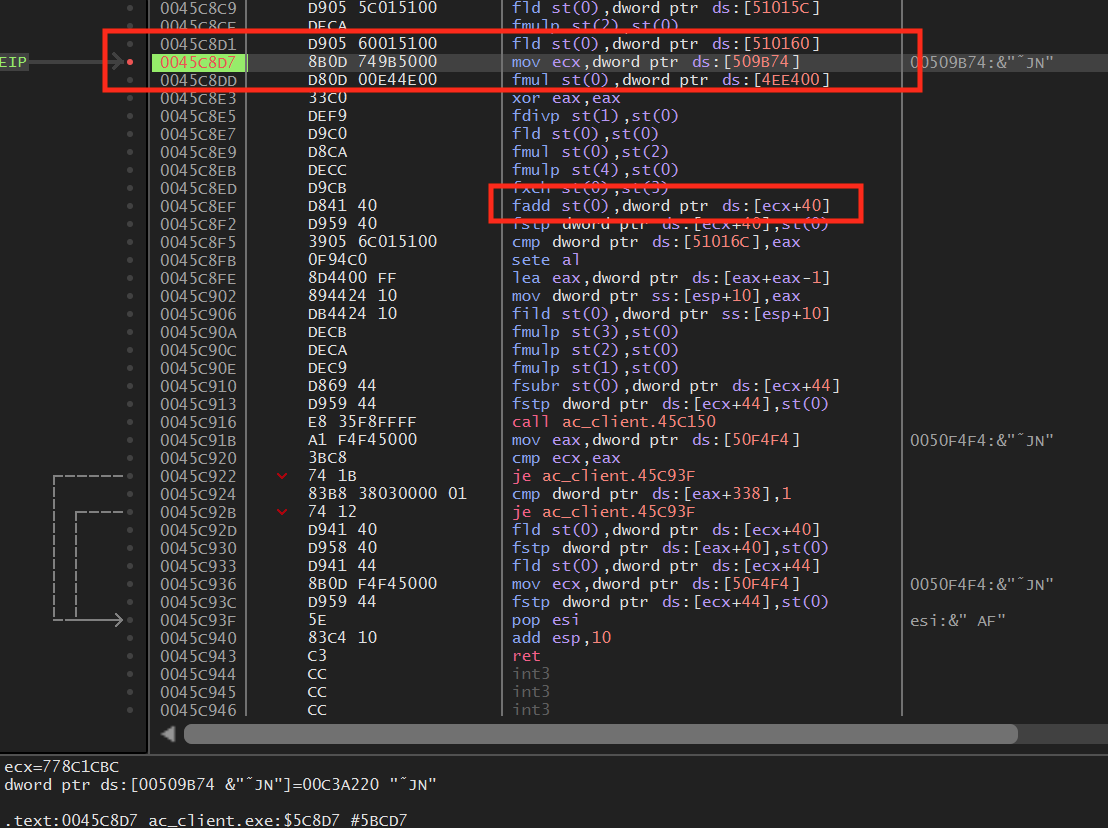
If we examine the memory pointed to by [0x509b74], we see a structure identical to what we observed with enemies, with our player’s name appearing near this address:
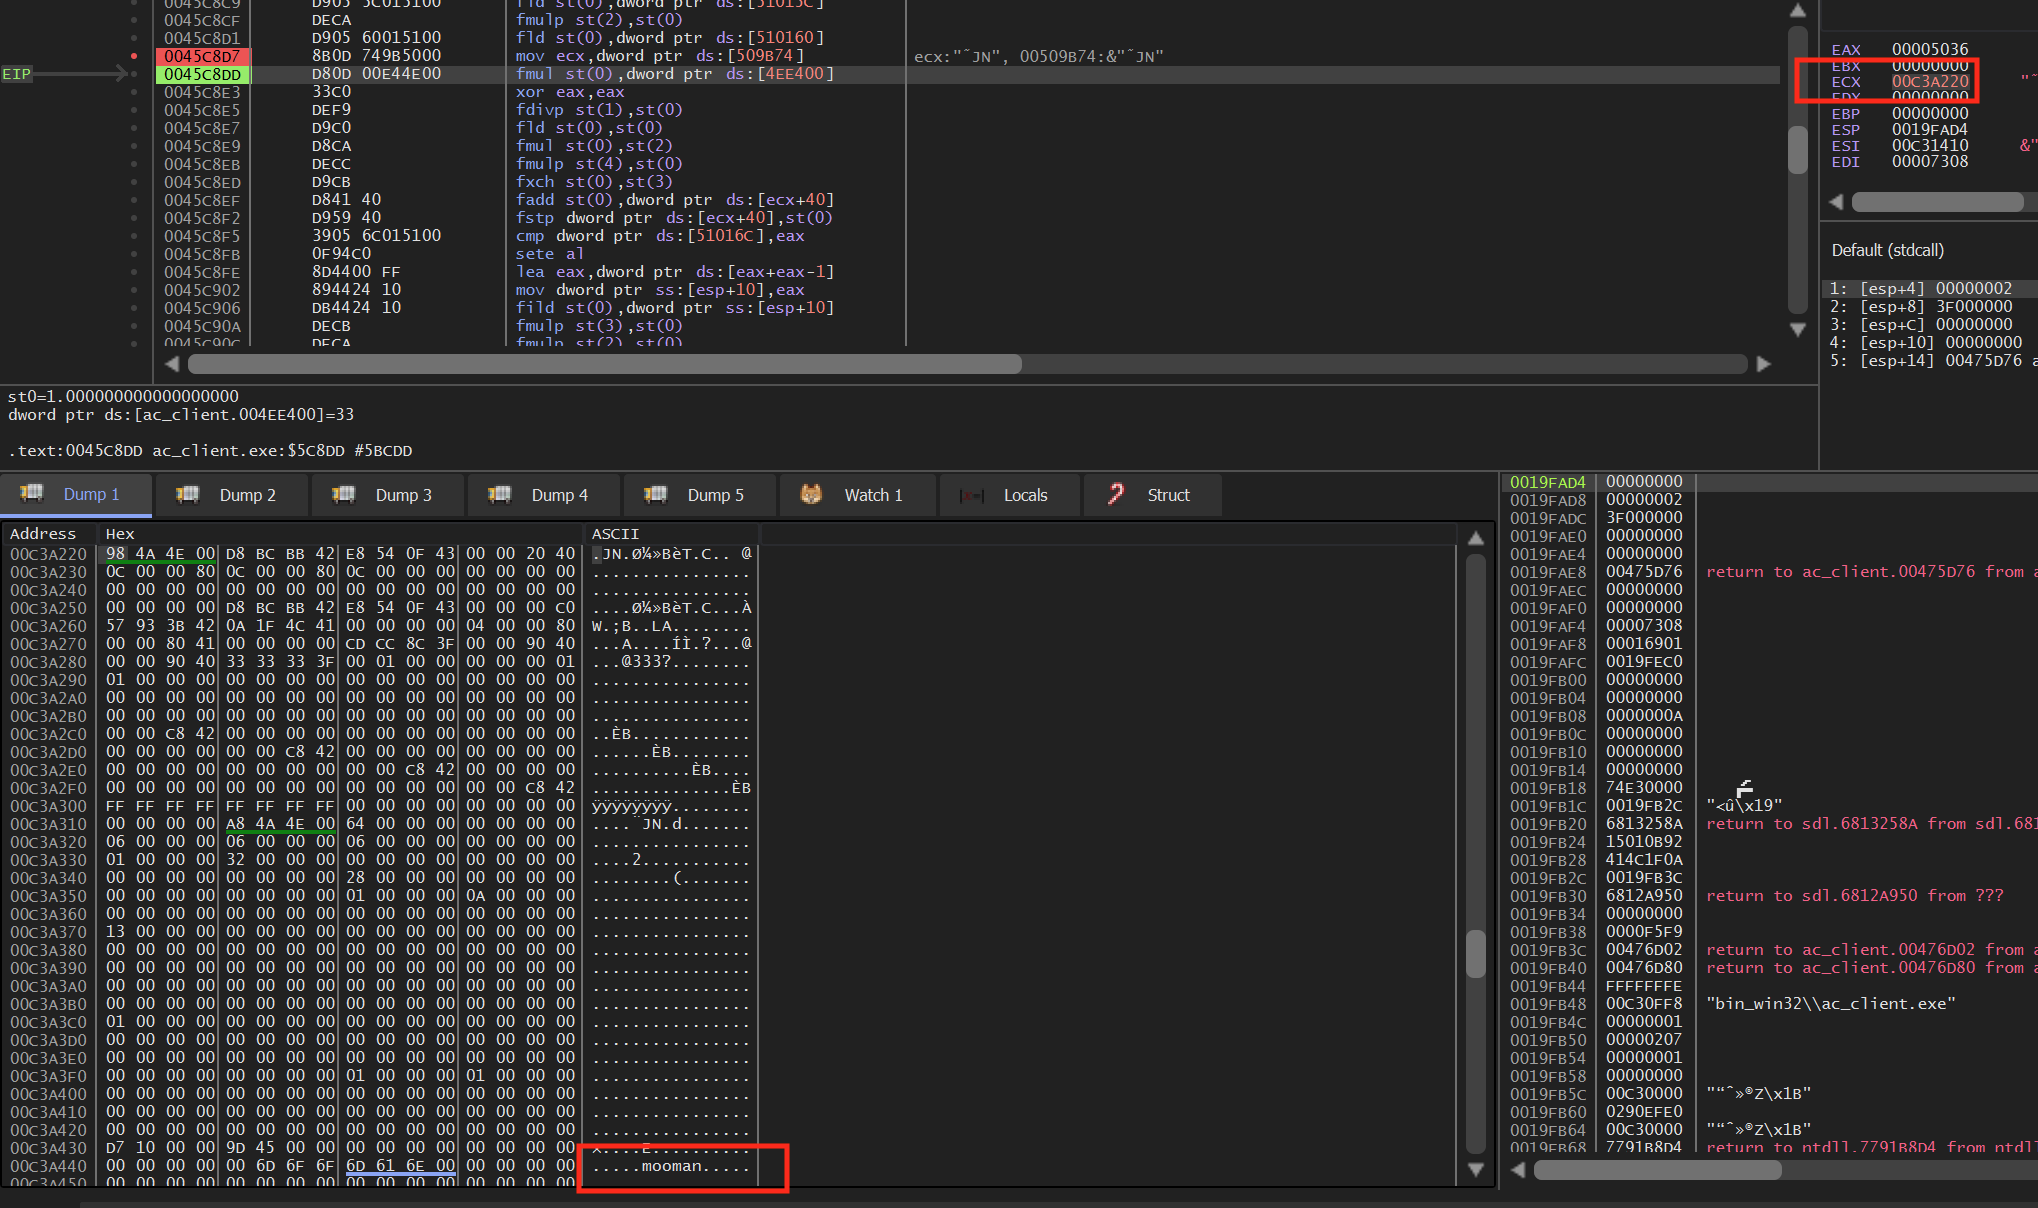
This most likely represents our player’s structure. Since we have more control over the values in this structure, we can begin reversing it.
Reversing Player Structure
We know that the game must store data about each player in memory. This data will generally be in a continuous section of memory. In C or C++, this would be represented as a structure or a class. For example, a game might define the Player structure like:
struct Player {
  float x;
  float y;
  float z;
  float yaw;
  float pitch;
  char model_texture_path[128];
  char name[128];
  bool alive;
}
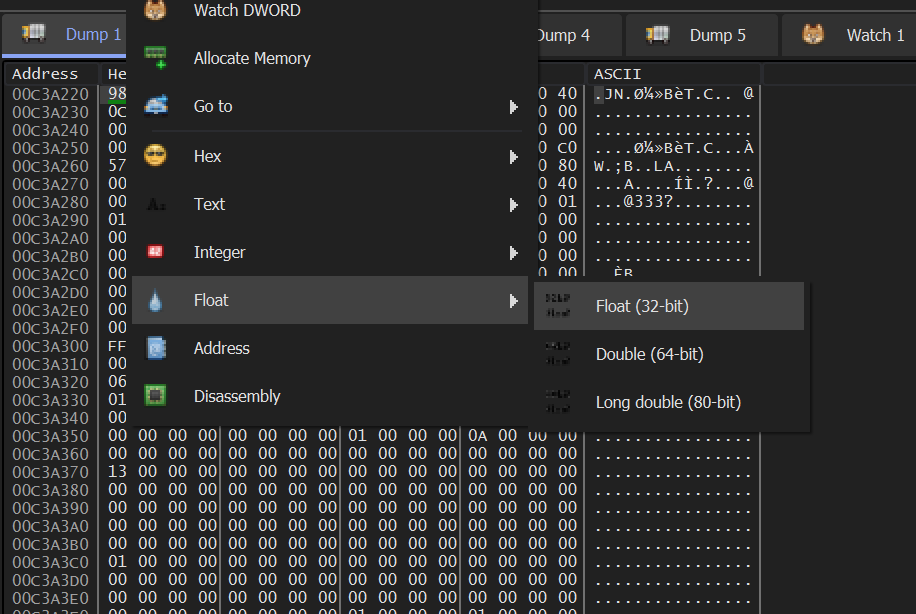
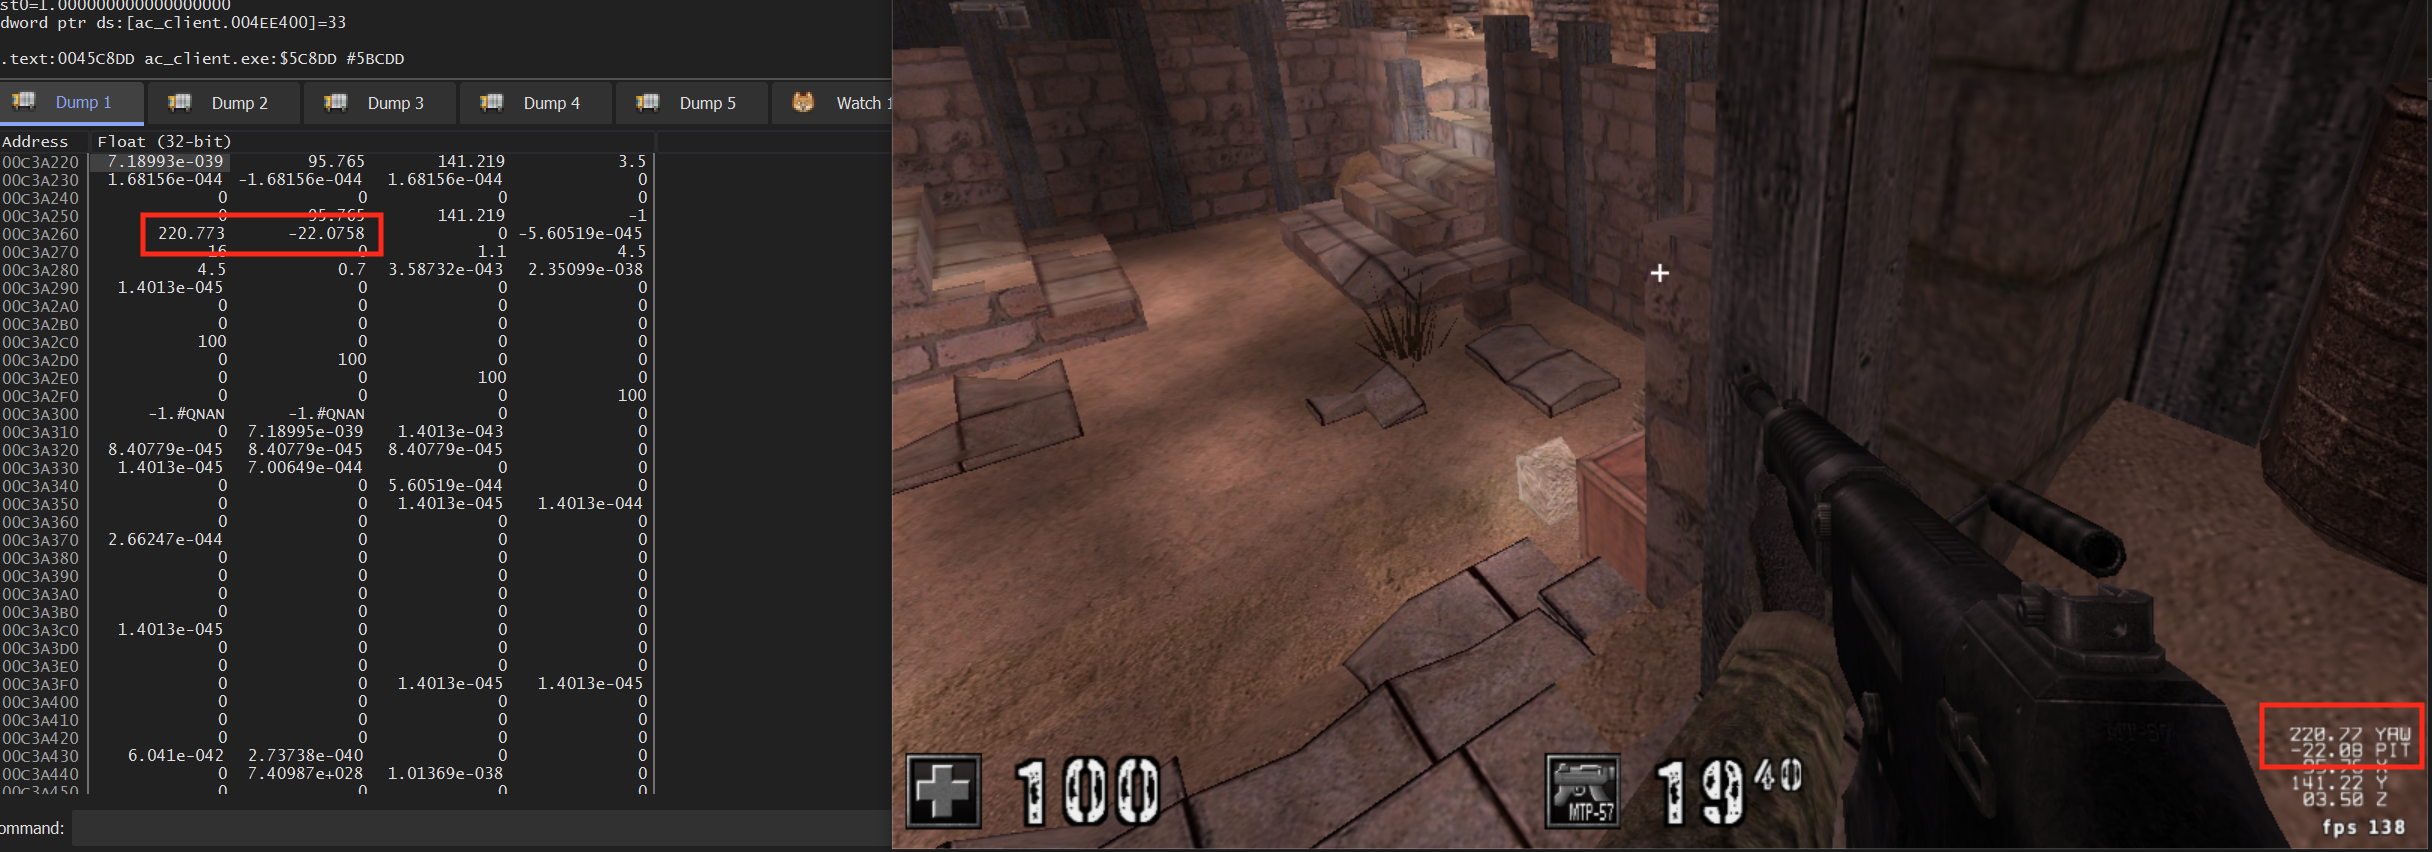
When viewed in x64dbg, this structure will appear as a long section of memory since data has no concept of its type. To identify this data, we will need to reverse the structure. x64dbg allows you to modify the data representation in the dump. The default view is hex with ASCII representation. We will start by trying to find the values for our position, which is represented by three float values. We can right-click and choose Float to have the dump data displayed in this format:
Upon doing so, several values should jump out immediately, which represent our X, Y, and Z:
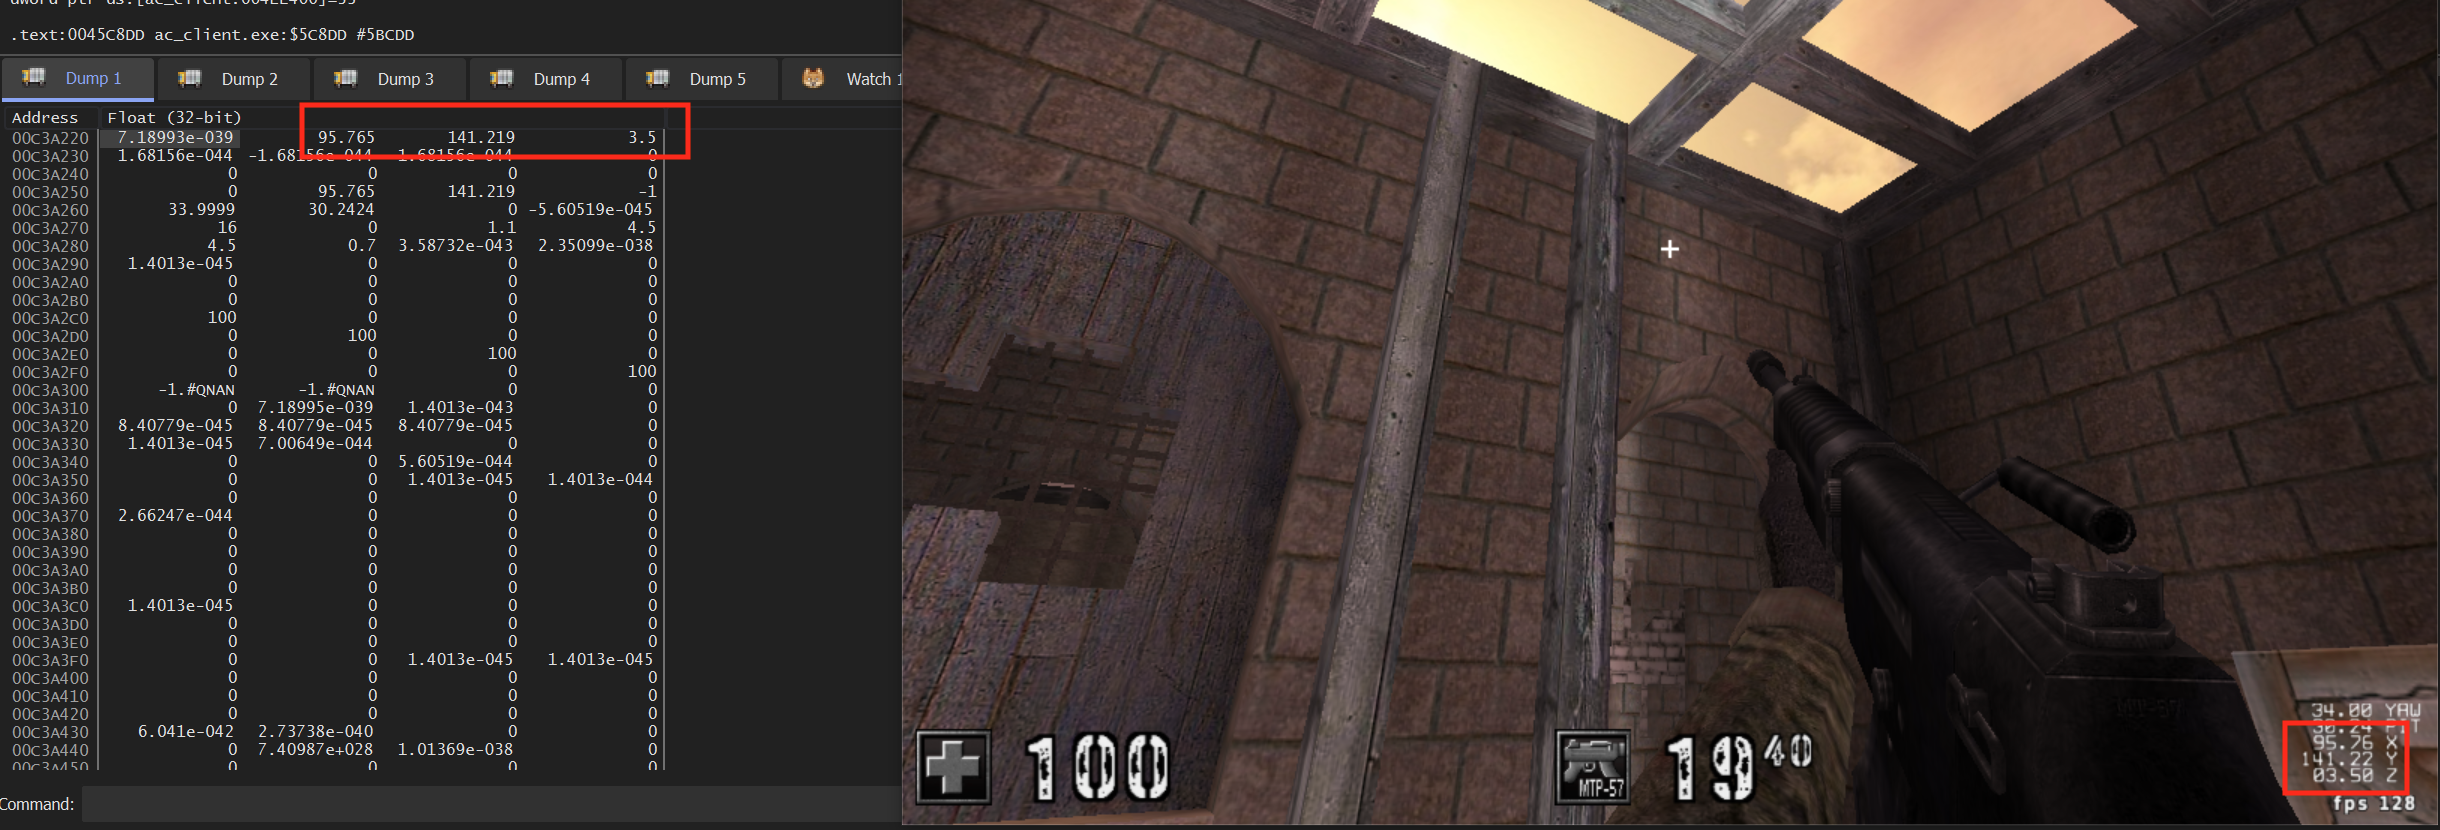
Similarly, our yaw and pitch are easily observable as well:
Changing our View Angle
At this point, we have all the offsets we need to start creating our aimbot. The first step is making a DLL that will continuously spin our player in a circle. We want to start with this to ensure that we have correctly located our player and reversed the player structure correctly. Like we have done previously, we will start by creating a thread that will run inside the game’s process:
#include <Windows.h>

void injected_thread() {
  while (true) {
    //aimbot code
    Sleep(1);
  }
}

BOOL WINAPI DllMain(HINSTANCE hinstDLL, DWORD fdwReason, LPVOID lpvReserved) {
  if (fdwReason == DLL_PROCESS_ATTACH) {
    CreateThread(NULL, 0, (LPTHREAD_START_ROUTINE)injected_thread, NULL, 0, NULL);
  }

  return true;
}
We have covered this code several times in previous lessons. Next, we need to define our Player structure above our injected_thread function:
struct Player {

}
From our work before, we know that our X, Y, and Z members are at the base+4, base+8, and base+C, respectively. We don’t know what the first 4 bytes represent, but we luckily don’t need to. Instead, we can create a placeholder member that is an array of characters. We choose characters since they are 1 byte long. We can then create float members for our X, Y, and Z values:
struct Player {
  char unknown1[4];
  float x;
  float y;
  float z;
}
Next, we need to add in our yaw and
pitch members. If we look at the memory, we see that
Z ends at 0xc3a230 and
yaw begins at 0xc3a260. Like the placeholder
above, we will use a char member to add
0x30 bytes of padding before adding our
yaw and pitch:
struct Player {
  char unknown1[4];
  float x;
  float y;
  float z;
  char unknown2[0x30];
  float yaw;
  float pitch;
}
We will then create a pointer from this structure that we will use to map the game’s memory into later:
Player *player = NULL;
With our structure created, we can now map the game’s memory of the player
to our structure. First, we will create a pointer to
0x509b74 in our while loop, since this
represents the base address of our player:
DWORD *player_offset = (DWORD*)(0x509B74);
Next, we will dereference this pointer to get the value of the player’s base address. We will then map the dereferenced address to our Player structure pointer. This will store the values we observed in the dump into this structure so that we can reference them in our code.
player = (Player*)(*player_offset);
Finally, we will increase the yaw member in a loop to cause our player to spin in a circle:
player->yaw++;
From here, we can build and inject this DLL. Our player will now spin around in a circle, showing that we have correctly reversed the player structure.
Aiming Left and Right
With all of this in place, we can create the first version of our aimbot. This version will aim left and right at a single opponent. When testing this out, make sure to create a two-player game, with you and a single bot. This will let you nail down the math.
First, we will use the same approach as before to map the first enemy into a Player structure. When reversing the code, we identified that the first enemy was at +4:
DWORD* enemy_list = (DWORD*)(0x50F4F8);
DWORD* enemy_offset = (DWORD*)(*enemy_list + 4);
Player* enemy = (Player*)(*enemy_offset);
One issue with our previous code was that we would crash if we were not in a game. That’s because we were accessing memory that wasn’t valid. To prevent this, we will check to make sure both of our pointers are valid before continuing:
if (player != NULL && enemy != NULL) {
At the beginning of this lesson, we had the following graph:
In this graph, we knew the opposite and adjacent distances based on the enemy’s position. However, as we have seen when reversing, our position is never (0, 0). Instead, the graph would look more like:
If we attempt to use the enemy’s position, our calculations will be incorrect. Instead, we need to determine these values by subtracting the player’s position from the enemy’s position. This will give us values that will act as if the player is always at (0, 0), or the absolute position (abspos) between our player and the enemy:
float abspos_x = enemy->x - player->x;
float abspos_y = enemy->y - player->y;
Next, we can calculate the arctangent using the atan2f function. We use this function as opposed to atanf, as it takes care of the case in which abspos_y is less than 0. Since the inverse tangent is an unsigned operation (i.e., it doesn’t have a concept of positive or negative), our aimbot would aim in the opposite direction if the enemy was directly behind us. We could manually check for this by checking abspos_y, but atan2f takes care of this calculation for us:
#include <math.h>

...
float azimuth_xy = atan2f(abspos_y, abspos_x);
The atan2f function produces a radian value. When reversing, we saw that the game represents our yaw as a degree value. To convert the radian to a degree value, we can multiply the radian by (180 / π):
#define M_PI 3.14159265358979323846

...
float yaw = (float)(azimuth_xy * (180.0 / M_PI));
Finally, we can set our player’s yaw to this value:
player->yaw = yaw;
If you inject this code into the game, you will notice that you aim close to the player, but always a consistent amount of pixels to the left or right, depending on where you are standing. This is because in our graphing model, we assumed that 0° was facing straight ahead. However, if you join a game without the hack, you will notice your player’s starting yaw is 90°. To compensate for this, we can simply add 90 to our calculated yaw:
player->yaw = yaw + 90;
With this change, we can run around the map and constantly stay locked on a player. However, if we jump up and down or go up an incline, we will be aiming above or below the enemy. Our next step is to set our pitch (or up and down) value correctly.
Aiming Up and Down
When we first approached this problem, we quickly set our perspective as top-down to eliminate the Z axis. To calculate our up and down angle, we will now fix our perspective as right-left (i.e., on the right of the player, looking directly at the player’s right side). The most important thing to note in our new graph below is the different axis values:
We can use a similar approach to the left and right angle to calculate the up and down angle. First, we will get the absolute distance:
float abspos_z = enemy->z - player->z;
Then, like before, we will calculate the inverse tangent. Unlike the yaw, our initial pitch starts at 0, so we don’t need to add any value to it:
float azimuth_z = atan2f(abspos_z, abspos_y);
player->pitch = (float)(azimuth_z * (180.0 / M_PI));
If you inject this code, it will appear to initially work. However, when you get within arm’s distance of an enemy, your player will suddenly look straight up or straight down. This is due to the game having very limited Z values. For example, most maps in the game have Z values between 0 and 6. When the value of Y gets too small, the resulting equation ends up being skewed. Imagine the case where the difference in Z values was 3 but the Y value difference was 1, or arctan(3 / 1). This resolves to 75°, which is effectively straight up in the air when it comes to pitch.
To account for this behavior, we will look at the value of Y and ensure that it is reasonably large. If it’s not, we will use X. This is not perfect, but it will help alleviate some of the issues. We will also ensure that the value is positive, regardless:
if (abspos_y < 0) {
  abspos_y *= -1;
}
if (abspos_y < 5) {
  if (abspos_x < 0) {
    abspos_x *= -1;
  }
  abspos_y = abspos_x;
}
Now you will notice that you can run up directly to the enemy and your aim will not jump in the air. Our aimbot is now working for a single enemy.
Multiple Enemies
With this foundation down, we can modify our aimbot to work with multiple enemies. To do this, we will change the code to iterate through the enemy list, pick an enemy to aim at, and set our yaw and pitch to aim at them. To pick the enemy, we will choose to always select the enemy closest to us. This will not always be the best case. For example, if one enemy is down a hall and one enemy is behind a wall next to us, our aimbot will always pick the enemy behind the wall. However, for the purpose of this lab, this method is the easiest to implement.
To find the enemy closest to us, we will calculate the Euclidean distance between our player and the enemy. The lower the value, the closer the enemy is to us:
float euclidean_distance(float x, float y) {
  return sqrtf((x * x) + (y * y));
}
Since we need to iterate over a list of enemies, we will create a variable to hold the closest enemy distance, as well as their associated yaw and pitch values:
while (true) {
  DWORD* player_offset = (DWORD*)(0x509B74);
  player = (Player*)(*player_offset);
  ...
  float closest_player = -1.0f;
  float closest_yaw = 0.0f;
  float closest_pitch = 0.0f;
At the beginning of this lesson, we determined the address that held the current number of players in the game. We can finally use that value now:
int* current_players = (int*)(0x50F500);
We can now iterate over all the enemies in the game. Unlike before, where we always added 4, we will now add the current loop index multiplied by 4, identically to how the game did it:
for (int i = 0; i < *current_players; i++) {
  DWORD* enemy_list = (DWORD*)(0x50F4F8);
  DWORD* enemy_offset = (DWORD*)(*enemy_list + (i*4));
  Player* enemy = (Player*)(*enemy_offset);
We can then calculate the absolute positions like we did before. However, before calculating the yaw or pitch, we will calculate the distance from our player to the enemy and ensure that they are the closest enemy. If they are, we will then set the closest_player value to their distance for future checks:
float temp_distance = euclidean_distance(abspos_x, abspos_y);
if (closest_player == -1.0f || temp_distance < closest_player) {
  closest_player = temp_distance;
Next, instead of directly setting the player’s yaw and pitch, we will store these in our variables. Once we have iterated over all the enemies, we will set the player’s yaw and pitch. This ensures that we aren’t constantly flickering through multiple enemies:
closest_yaw = yaw + 90;
...

closest_pitch = (float)(azimuth_z * (180.0 / M_PI));
...

player->yaw = closest_yaw;
player->pitch = closest_pitch;

Sleep(1);
We now have a working aimbot that will iterate through multiple enemies and aim at the closest one correctly in the X and Y axis.
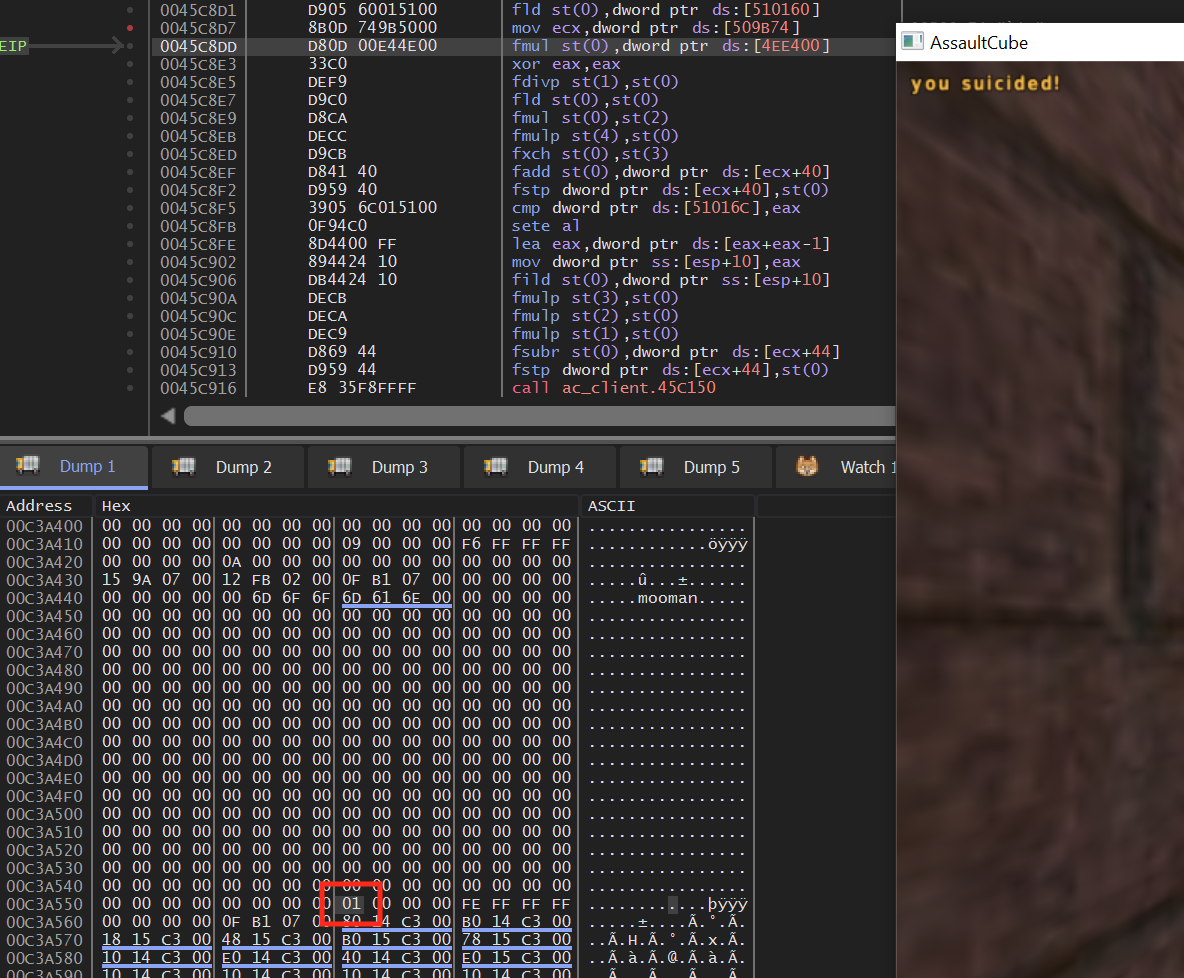
Finally, we can add a check to see if the enemy is alive, to ensure that we instantly switch from a target when we shoot them. This value can be found by observing the player structure for values that change when you are alive or dead. After killing yourself several times, you will notice that one value is set to 0 when you are alive and 1 when you are dead:
We can add this to our player structure, ensuring that we correctly offset it:
  float yaw;
  float pitch;
  char unknown3[0x2f0];
  int dead;
};
We can then check this value in our initial check to ensure that the player and enemy are valid:
if (player != NULL && enemy != NULL && !enemy->dead) {
The final result:
The full code is available on github for comparison.